 For winter, you can sew a huge variety of outfits. These can be either long skirts or shorter skirts. When choosing the most suitable length, you need to keep in mind that each woman also needs to take into account the numerous features of her own figure. Only in this case will it be possible to make clothes that will fit perfectly on the body.
It is also recommended to study in advance other clothing models that can be used to make the image look as harmonious as possible. However, the main thing is the choice of fabric that will be used during sewing. It is the material of the product that largely determines its characteristics. The fabric must be of sufficient quality, and its color must be selected in advance. In addition, such fabric should be dense. You can choose the style of the skirt yourself.
How to make a pattern for a bell skirt
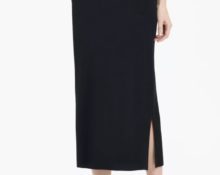
 From the article you can learn how to make a pattern for such a skirt.It is important to note that skirts that resemble a geometric shape such as a cone must be made with extreme care. Every element and every little detail is important. The thing is that they favorably emphasize the figure, as well as the waist. This skirt fits perfectly around the hips and looks a little wider at the very bottom.
Further in the text you can find detailed information about what needs to be done to make such an interesting wardrobe item. A detailed description of the process will allow you to appreciate all the advantages of such a skirt. In addition, to make it you do not need to be a great sewing specialist. To do this, it is enough to have basic sewing skills, which almost every modern person can master.
First you need to take measurements. After this you need to decide on the length. In this case, we are talking about a fairly long skirt, but the length can be reduced at your discretion.
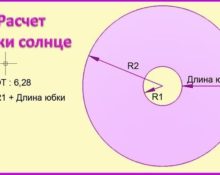
Step 1. You need to build a midline. To do this, you need to mark point O on a piece of paper, and then you need to draw a line from it.
Draw the waist line. From point O you need to draw an arc with radius OA = ½*From – 4 cm = ½*68 – 4 = 30 cm. This is the waist line.
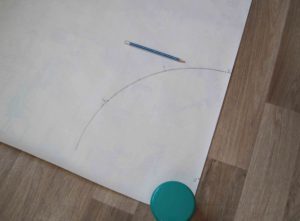
Step 2. Now we need to build a bottom line. In order to understand everything, you should carefully study the photo below. This will be quite enough.
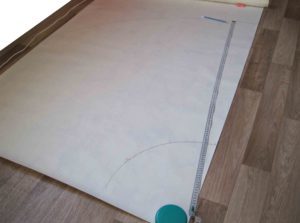
Step 3. All that remains is to build the midline. By repeating what is done in the figure, you can complete this task as quickly as possible.
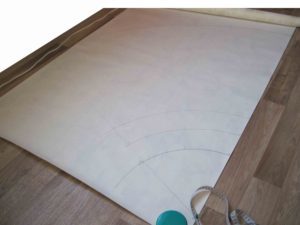
To avoid any problems during work, it is recommended to use large pieces of paper. Otherwise it will end too quickly.
Helpful Tips:
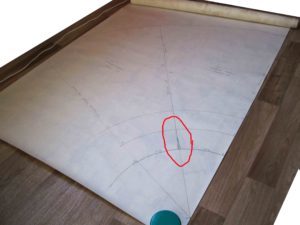
- Then you need to measure the segments AB and A1-B1. They should be the same.If this is not so, then you will have to redraw everything. There is nothing difficult about this if you have a ruler and pencil at hand, so you should not use an uneven and insufficiently accurate drawing.
- You also need to control your hip circumference measurements. This is necessary in order to check how correctly the width was chosen. There may be times when adjustments need to be made.
- Quite often the pattern is made for the most standard figure. In this case, the values of the measurements should not be greater than the length of the arcs CC1 and DD1. It should be borne in mind that even a non-standard figure is not a problem, because in this case you can still make a pattern that will “fit” perfectly.
Step 4. Making a side seam line is relatively easy, even for a beginner. In this case, you need to draw a line from point O to point O1. It should intersect with the bottom line. If you can’t do this, you need to redraw it. After this, you need to form a side dart, and along the waist line to the right (as well as to the left from point O1), another 0.5 cm remains to be left. Then you need to build smooth lines that should meet at the side seam. That's all. Now you can proceed to the next step.
This completes the construction of the pattern.
Step 5. It's time to make a cut along the bottom line, middle lines, and also the top line. You only need to cut along the side seam along the dart line. After this, you can admire your creation, because the pattern is ready.
Materials and tools
A relatively small list of materials will be required. In particular, we need pencil, as well as tape (centimeter), ruler, paper and sewing machine, chalk, thread. This is quite enough to make a skirt that meets all quality standards.
The fabric should be both main and lining. This is very important, because you cannot use the same fabric. Otherwise, you can count on the most unpleasant consequences. It also happens that there is simply not enough fabric. In this case, you will have to worry about having an excess of fabric. Otherwise, no tools will save you.
We can recommend purchasing additional tools that will make the job easier. As such, we can recommend some an expensive pencil whose lead thickness can be easily adjusted. In this case, the work will be even easier.
Master class: how to sew a bell skirt with your own hands?
Once the pattern is ready, it's time to start sewing the skirt. There is nothing particularly difficult about this. You just need to pick up the tools and start working.
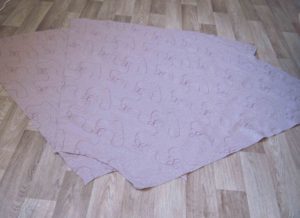
Step 1. Cut onto fabric. The bell skirt is cut only using an oblique thread. This is fundamentally important, so you shouldn’t experiment. It is best to sew the zipper on the side. We are talking about the side seam. Just because of this, you will have to cut out the panels of the skirt, and the middle needs to be aligned with the fold of the fabric. It should only pass along an oblique thread.
After this, you need to fold the fabric in several layers, as shown in the photo below. Then you need to attach a pattern made of paper. This is where pins are needed. These must be special tailor's pins. Using chalk, you need to outline the pattern with chalk, and then all that remains is to create allowances of at least 1.5 cm. Now you can breathe a sigh of relief, because the most difficult part of the work is done. And although there is still a lot to do, now you can put the chalk aside.
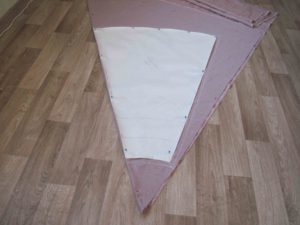
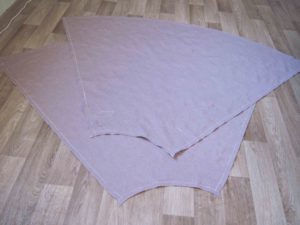
Step 2. It remains to cut out 2 halves.
This is what it should look like from the front:
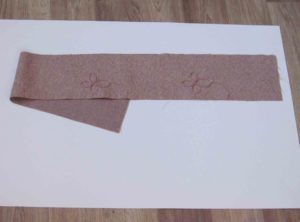
Step 3. All that remains is to start cutting out the belt.
Step 4. You need to sew a fastener into the left side seam.
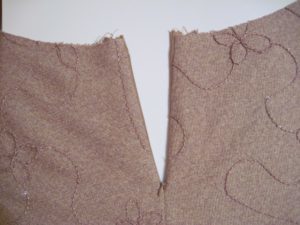
Now you need to grind down the right seam (side seam).
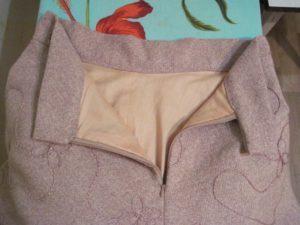
Step 5. All that remains is to sew on the belt and the lining.
Let's hope that the presented step-by-step master class for beginners turned out to be quite useful. If this is not the case, then you can consult a professional tailor, who can tell you how to make the drawings and what tools will make the work easier.
Making your own wardrobe items is a rather complex and stressful process, which is why it is so important that the person doing it has at least some experience. Otherwise, making a skirt can take many hours and the one who does it will regret the time spent.
But you also need to understand that not every person likes such work. You can make a truly beautiful skirt only with the right attitude, so before starting work you need to solve all current problems so that nothing distracts you.
 0
0