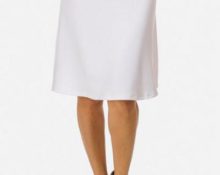
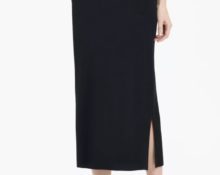
The last few fashion seasons have breathed new life into long-forgotten pieces like fanny packs and straight skirts. Appearing at the end of the last century, they have become one of the most versatile items of women's wardrobe that can be worn both at a feast and in the world. Today, previously considered a “uniform” for teachers and librarians, the straight-cut skirt is at the peak of popularity among both adult business women and young girls, who combine it with rough boots and sneakers. There are many models, including classic and elastic. It’s worth learning step by step how to sew a straight skirt quickly and easily.
How to create a pattern for a straight skirt for a beginner

Sometimes it happens that even among the huge assortment of clothes sold in boutiques and online stores, a woman cannot find a suitable option for herself, as in the famous film about exactly the same robe, but only with mother-of-pearl buttons.Having walked several tens of kilometers along the corridors of shopping centers and looked through hundreds of Internet pages, many girls come to the conclusion that it is much easier to sew the item they like than to find it on sale.
Those who are not comfortable with a needle and thread turn to professional seamstresses for help, who can sew almost any outfit in a short time and a certain monetary reward. The main advantage of contacting an atelier that tailors clothes to order is that the item will a priori suit the customer’s shape and size, and will correspond to all his desires.
Important! In order for the labor-intensive process to be crowned with success, you need to correctly construct a pattern, according to which the fabric prepared for sewing the skirt will be cut. The correctness of the pattern directly depends on how accurately the measurements of the future owner of the skirt will be taken.
Girls who attended labor classes at school and sewed kitchen aprons and dresses for dolls using patterns, and still have not forgotten the basics of cutting and sewing, will find it much more interesting to sew their favorite skirt model on their own.
Reference! Measurements are the distances between points of the human body that make up the calculation and measurement system of figure parameters. In mass production, standard tables are used, in individual production, measurements are taken from each person separately.
To sew a straight skirt you need to know:
- Semi-circumference/waist circumference. Measure it with a measuring tape at the narrowest point of the waist, at elbow level.
- Semi-circumference/hip circumference. Taking into account the protruding belly and pelvic bones, it is measured at the most prominent point on the buttocks.
- Hip length. The standard is considered to be a DLB of 20 cm; allow a run of 18 to 26 cm.
- Length of the product. The starting point is the waist line.
Attention! Measurements of this type are taken from a woman who has previously taken off her shoes and stripped down to her underwear.
Another significant point in taking measurements is the increase in freedom of clothing. It is called the amount by which the clothing size will exceed the actual size of a person. At the waist it should be no more than one and a half centimeters, at the hips - from 0.5 to 2.5 cm.
After taking the measurements, you can start creating the pattern. For this process you will need:
- pencil;
- graph paper (tracing paper, Whatman paper, remnants of wallpaper);
- centimeter;
- hard ruler;
- scissors.
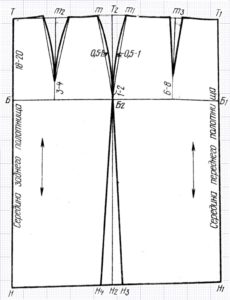
The construction of the scheme can be divided into several stages. The following parameters were taken as an example:
- OT – 72 cm;
- OB – 100 cm;
- DI – 72 cm.
Step-by-step instruction:
- Having spread the paper prepared in advance on the floor and retreating 5 cm from above, place point “A” in the upper left corner. Vertically down from point “A” you need to set aside 72 cm and place point “D”.
- To the right of point “A”, measure the half-circumference of the hips, taking into account a 1 cm increase (51 cm) and place point “B”.
- Points “B” and “D” are connected to each other at point “C”, which should be located in the lower right corner of the pattern.
- The segment “DS” is divided in half and a perpendicular is raised from the resulting point to the line “AB”. The result should be a side line.
- The hip line is determined by laying down 20 cm from point “A” - point “AL”. A line is drawn from it, the side points of which are designated “L1” and “L2”.
- Darts are calculated according to a certain formula. In our case, it looks like this: 100(OB) – 72(OT)/2=14 cm. Of the fourteen centimeters, it is important not to forget to remove half the distance for the side darts: 14/2=7 cm – 3.5 cm for each dart .From the clarified side line, draw two straight lines to points 3.5, adding 1 cm upward to them.
- Points “A” and “B” are connected by a curved line.
- The segment “LL2” is divided into two equal parts and a perpendicular line is raised from the division point, which should reach the segment “AB”.
- From point “B1” measure 5-6 cm to the right (the line in the figure is marked in red). The perpendicular is lowered down to the hip line.
- The area remaining at the waist after all calculations is divided into back and front darts.
- The side lines are divided into two parts and set aside half a centimeter from the dividing marks, drawn by hand or using a pattern.
Attention! The length of the grooves on the back and front halves is 13 and 10 cm, respectively. For beauty, you can move them a little to the left. It is important to note that the deeper the dart, the longer it is.
For convenience, it is recommended to transfer ready-made diagrams to tracing paper and cut them out separately.
How to sew a straight skirt yourself
Cutting the fabric is the next important step in sewing a straight skirt yourself.
Attention! When cutting, it is important to consider the direction of the fabric threads. If the parts are cut without taking into account the direction of the lobe and weft threads, the finished product will lose its shape or become deformed during wear.
Parts of the pattern are placed on the wrong side of the fabric, pinned with needles and outlined with thin chalk or a dried piece of cosmetic soap. Allowances are marked using a ruler. Leave 1 cm at the top, 4 at the bottom, 2 in the center and 2 cm on the sides. The belt is drawn at the bottom of the fabric, duplicating the details on thick non-woven fabric. After this, the parts are cut out with long tailor's scissors.
After this, it is necessary to lay basting stitches on the cut parts.They are laid with a regular needle and thread, using threads of a contrasting color from the fabric. The stitches should be wide and free, the thread should not be tight.
Attention! The skirt connected with running stitches can be tried on. This must be done very carefully so as not to stumble upon a needle sticking out of the fabric.
The first fitting should show whether the product fits the figure, whether the size and length are suitable. If the skirt turns out to be too big, the excess fabric is picked up under the seams; if, on the contrary, it is too tight, the fabric is released from under the side basting lines.
After fitting, the sewing process looks like this:
- The belt glued with non-woven fabric is applied to the skirt and pinned to the fabric. On the skirt, mark the joints and edges of the belt along the waist circumference.
- Existing defects are clarified and, if they exist, they are eliminated.
- They do a second fitting.
- The cuts are processed using an overlocker.
- Sew the side seams, pressing/pressing them to the back.
- Sew the zipper into the back seam using running stitches, sewing on a machine to the mark where the cut will begin. On the front side of the skirt, the stitch should be 5 mm from the teeth, the seam is drawn from top to bottom, near the lock the product is unrolled and another seam 1 cm long is made. From the inside of the skirt, another seam is made from the bottom up along the zipper.
- After removing the basting stitches, the zipper is thoroughly ironed. After combining the middle of the front and the middle of the back at the top of the product, the zipper is unfastened.
- From the marked line of the belt, set aside 1 cm for the seam, the rest of the fabric is cut off. In order to prevent the intended grooves and seams from coming apart, they are fastened with needles. The prepared belt is connected “face to face” with the main part, the sections are combined, connected and swept together from the wrong side.Having covered the edge of the belt from the wrong side with its other side, machine stitching is done using the superscript method.
- The bottom and the slit of the skirt are folded (the first, then the second), overlapping the lower cut. When stitching, stitches are made from left to right, placing them along the folded edge of the skirt. It is important not to pierce the main fabric, but to capture only part of it. Stitch length – 5mm.
- At the end of the work, the finished skirt is cleaned of traces of soap and thread scraps, and thoroughly ironed from the inside out, being careful not to deform the fabric with the iron in the process. After the fabric has cooled, a loop is made in the upper part of the belt at a distance of 1 cm from the edge and a button is sewn on the opposite side. The place where the button should be is determined while the zipper is closed.
How to decorate a straight skirt
To prevent the skirt from looking too strict and boring, you can decorate it with lace, braid, embroidery or decorative buttons, rhinestones or beads. This can be done both during the sewing process and after the skirt is completely ready. Let's consider several interesting options:
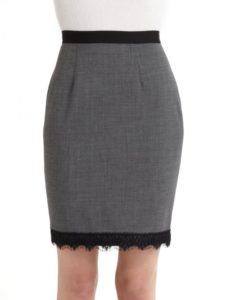
- Lace decoration. Recently, lace trim is considered one of the most fashionable techniques. You can combine a skirt decorated with lace with any “top” and wear it both for a walk and to work or study. Most often, a lace ribbon is placed along the bottom of the skirt, since this is considered the simplest method that does not require any effort or expense. The decor is sewn on either manually or using a sewing machine. One of the tricks of using such decor is that I use dense, almost opaque lace, sewn at the bottom of the skirt, you can make it a little longer.You can also give the outfit a slightly fairy-tale look if you sew lace in layers, starting from the top of the product and ending with its bottom. Black straight skirts with white or beige lace sewn on them look especially interesting.
- Decoration with braid. Multi-colored braid sewn to the fabric will help add piquancy and chic to such a simple wardrobe item as a straight-cut skirt.
- Embroidery decoration. Items decorated with embroidery are found in the collection of almost every famous fashion designer. Today, skirts, blouses and trousers with satin stitch embroidered flowers and other patterns are a real must-have that every fashionista should have in her wardrobe. It is not at all necessary to do embroidery on clothes by hand; you can do it much easier and purchase ready-made embroidery in a specialized store. It is attached to the fabric either with a hot iron or with a thread and needle.
- Rhinestone decoration. A boring straight skirt can be refreshed with a scattering of pearl beads or shiny rhinestones. They are sold in any sewing store and are attached with special glue or sewn with thread. You can use rhinestones and beads to lay out a specific pattern or place them on the fabric in a chaotic manner.
For those who learn how to cut and sew straight skirts or any other clothing on their own, it will be much easier to create their own and unique style. The main thing is to have the necessary tools, materials and the desire to create something with your own hands.
 0
0