 Thanks to the versatility and practicality of the style, the four-piece skirt has long been a classic model. It suits most women of all ages and body types. This style is able to emphasize the advantages and hide the flaws in the appearance of its owner. The design consists of four elements and has a distinctive, flared downward shape.
Measurements needed to create a pattern
Preparing a drawing with your own hands is quite simple. First you need to take the measurements correctly and write them down.
IMPORTANT! Up to 2 cm is added to the circumference of the waist and hips for freedom of fit.
The following measurements are required for operation.
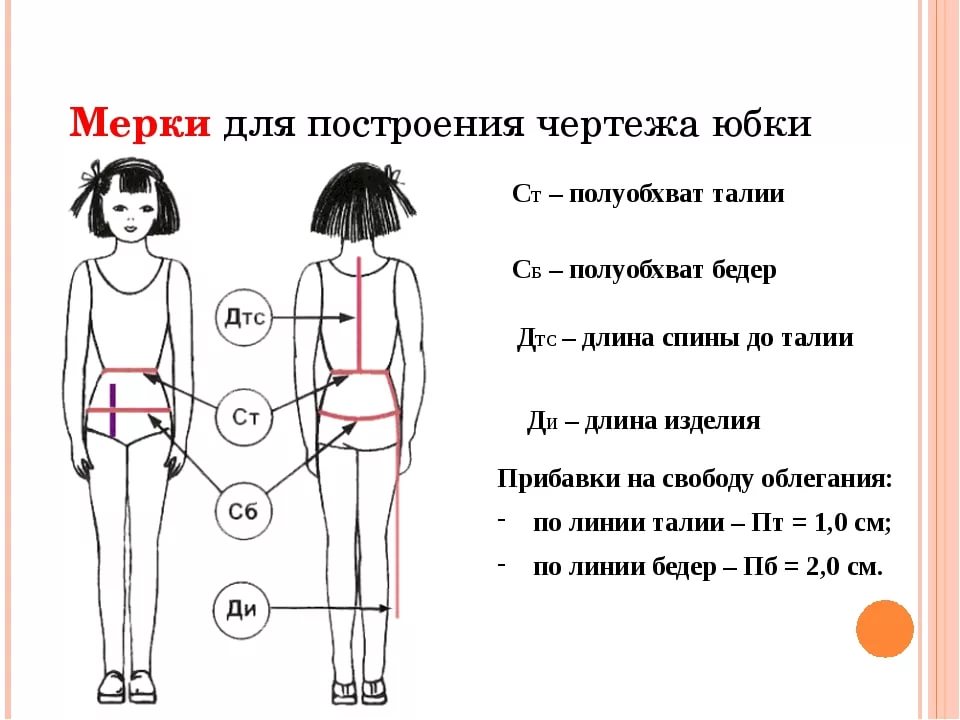
- Waist circumference (FROM). Measured at the narrowest part of the waist. In this case, the measuring tape should lie flat and free, without tension. A person should feel comfortable, since the convenience of wearing the item received in the future depends on this.
- Hip circumference (H). Measured at the widest point of the hips.
- Length from waist to hips. The standard value is 20 cm. However, for greater accuracy of the drawing, real measurements are taken.Measure from the waist to the most protruding point of the hips.
- Product length (DI). The yardstick is measured from waist to estimated hem skirts Depends on the purpose of the skirt, the characteristics of the figure, as well as personal wishes for the length. The The style is universal and has no clear restrictions on length. These can be a variety of mini, midi and floor-length skirts.
IMPORTANT! From the resulting four-blade base, you can later model various options, including on the yoke.
Making your own four-blade pattern
After all the measurements have been taken, you can begin drawing the pattern. To do this, use tracing paper, Whatman paper, graph paper or old wallpaper. You will also need a ruler, a triangle, a simple pencil and an eraser.
Below are detailed construction instructions for beginners. Follow a certain sequence of actions.
Step-by-step instruction
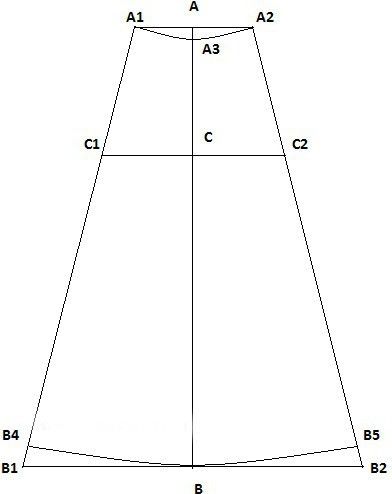
- To begin, step back about 2 cm from the top of the border of whatman paper. In the middle, make a mark in the form of point A.
- Through point A, draw a straight line parallel to the top edge of the Whatman paper. The result is a waist line.
- Next, you should place points A1 and A2 to the left and right of point A, respectively. Segments AA1 and AA2 are equal to 1/8 OT. For example, with a waist circumference of 64 cm, you need to set aside 8 cm in both parts.
- From point A downwards we draw a line AB equal to the length of the product.
- From point A, a segment AC is laid down, corresponding to the distance from the waist to the hips.
- Through points C and B we draw segments parallel to A1A2.
- From point C we retreat equal parts to the right and left. CC1 = CC2 = (OB + 2 cm), divided by 8. Let's assume that the girth is 94 + 2 (cm) for freedom of movement, then 96 cm. Divide by 8 and we end up with 12 cm.
- We connect points A1 and C1 and continue until they intersect with line B. Mark point B1. In the same way we find point B2.
- From point A we retreat 1.5 cm down and put mark A3. Next, draw a waist line, smoothly connecting A1, A and A2.
- Find the length of A3B and put it on the straight line A1B1 and A2B2. We denote the new points as B4 and B5.
- By connecting B4, B and B5 with a smooth line, we get the bottom line of the product. If desired, you can make a stronger flare of the product.
The resulting drawing must be cut out and used for the next stage of work.
Belt
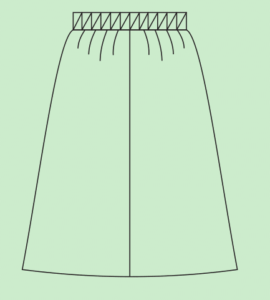 Now you can start cutting out the belt. Its length is equal to the waist circumference plus 12 cm. Next, it is advisable to clarify how wide it will be when sewn according to the author’s idea. So, if the width of the belt is 3 cm, then the element will be equal to two widths plus an increase for connecting the seams (3+3+1+1=8 cm).
You can also sew a skirt with elastic, which is much easier for a beginning craftswoman. In this case, a rectangle is drawn equal to the waist circumference with the corresponding increases. Later, after sewing, an elastic band will be inserted into it.
ATTENTION! Do not ignore allowances that are made directly on the fabric. You should add 1 cm along the waistline, up to 2 cm at the bottom and 1.5–2 cm at the sides.
By following the proposed instructions, you can draw a pattern for a four-piece skirt in a couple of hours, taking into account your body parameters and personal preferences for length and flare. Having learned to draw this base, you can make a six-piece skirt using a similar pattern.
 0
0