Knitted jackets have firmly entered the wardrobe of fashionistas. However, many people underestimate knitted items, considering them echoes of the past. It is for this reason that a girl in a knitted jacket will absolutely attract the attention of others.
Long jacket with stand-up collar
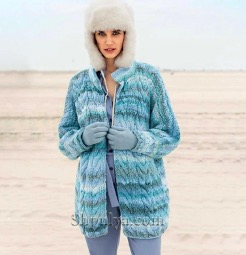
This jacket can be knitted from plain yarn or you can opt for sectional dyeing. Both options will look amazing.
For knitting you will need:
- Yarn 240 m/150 g – 600 g;
- Knitting needles No. 6, 7;
- Circular knitting needles No. 7;
- Buttons.
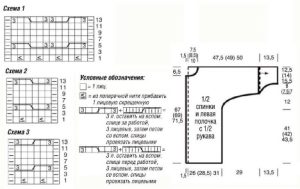
The size of the finished product is 40/42.
Important! The arrow on the pattern indicates the direction of knitting.
Patterns used
Structural pattern: alternate 3 purl and 3 knit stitches. In front rows, shift the pattern to the left by 1 loop.
Braid No. 1: knit according to the pattern. It shows only the front rows. On the purl side, continue knitting according to the pattern. Knit once from rows 1 to 14, then alternate from rows 7 to 14.
Braids No. 2 and No. 3: knit according to the diagrams.
Plank.In the front rows, alternate removing 1 loop as a purl and knitting 1 purl loop. At the end of the row, slip 1 stitch as a purl.
Purl rows: alternate 1 purl and 1 knit stitch. At the end, knit a purl loop.
Elastic band: alternate 3 knit stitches and 3 purl stitches. In purl rows, continue knitting according to the pattern.
Back
The back is knitted on needles No. 7. Cast on 67 stitches. Purl the first row. Next, knit in the following sequence: slip 1 loop, knit 9 loops with a structural pattern, starting with 3 knit or purl loops, 6 knit, 10 loops according to braid pattern No. 1, 27 loops with a structural pattern (beginning and end - 3 knit/purl), at the end 1 purl (edge) loop. There should be 75 loops left on the knitting needles, since the braids added them. Continue knitting in this manner until the length of the fabric reaches 41 cm.
Sleeves
This model features seamless knitted sleeves. They are knitted from the back. To do this, add 1 loop to the existing loops once. Further increases are made in every second row:
- 3 times 1 loop;
- 3 times 2 loops;
- 3 times 3 loops;
- 1 time 4 loops;
- 1 time 13 loops.
After increasing, you should get 147 loops. Then continue knitting with a structural pattern.
At a height of 73.5 cm or 136 rows, bind off all the loops: 25 loops in the middle - straight neckline, outer 64 loops - shoulders and sleeve edges.
Left shelf
It is also knitted on needles No. 7. Cast on 38 loops and knit 1 row with purl stitches.Next, all rows are knitted according to the following pattern: remove 1 loop (edge), knit 9 loops with a structural pattern, starting with 3 knit or purl, finish with 6 purls, knit the next 10 loops with a braid pattern No. 1, 6 loops of a structural pattern (3 each purl and knit), 6 loops of braid No. 1, knit 5 loops with a placket, the last loop is always a knit stitch.
There should be 44 stitches left on the knitting needles due to increases in patterns. Continue knitting the sleeves in the same way as already described, but from the right edge of the front.
When the height of the shelf reaches 67 cm, begin to close the loops to create the neckline. To do this, close off 5 loops once. Then in even rows:
- 1 time 4 loops;
- 1 time 3 loops;
- 1 time 2 loops;
- 2 times 1 loop.
Having reached the height of the back, close all the loops.
Right shelf
It needs to be knitted similarly to the left one, but in a mirror image. In this case, replace braid No. 2 with braid No. 3. To form a hole for a button in row 121, remove the edge stitch, knit the next two loops together and yarn over. In the purl row, knit the yarn over as a purl loop.
Connect the back and the shelves, sew the side seams. Sew a button on the left shelf.
 0
0