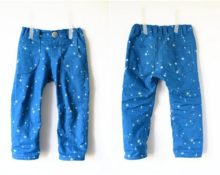
 A school uniform should be comfortable, practical and beautiful. This opinion is shared by both children and parents. If we are talking about a boy, then it should be noted that the vest gives him special elegance.
It can be worn not only with a jacket. A light shirt and a uniform vest also look attractive.
True, a stylish sleeveless vest increases the cost of a school suit. Therefore, sometimes mothers have to refuse to purchase this wardrobe item, even if their son liked it.
But buying is not the only way, because you can sew a school vest for a boy or teenager with your own hands. We'll tell you how to create a pattern for making a new thing.
What measurements will you need for the pattern?
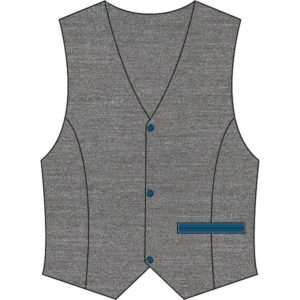
To make your child look attractive in a vest, The sleeveless vest must fit exactly to your figure. Therefore, it is important to take accurate measurements.
To construct the drawing you will need to make the following measurements.
- Circumferences: neck, chest (the latter is divisible by 2).
- Length of the product: the boy’s back is measured, the measurement is taken from the 7th cervical vertebra, the bottom line is determined individually.
- Side length: measured from a point located 2-3 cm below the armpit, the lowest point depends on how long the vest you want to get.
- Shoulder length.
- Cutout depth: measured from the hollow of the chest where the collarbones meet, the lowest point is determined independently.
Having received the necessary data, you can begin to build a pattern.
How to make a school vest pattern
There are several ways to create a school vest pattern for a boy. You can draw a paper blank yourself from scratch. Or you can take as a basis the details of a product that suits the child or has become too small for him.
Let's look at each method.
How to build a pattern drawing
Let's look at a pattern that is designed for a boy with a chest circumference of 77 cm. The drawing is made for making a vest with a length of 47 cm. Based on it, you can model the pattern using the available data.
Drawing basis
- The construction is based on a rectangle. Its width is equal to the half-circumference of the chest, increased by 3-5 cm, and its length corresponds to the length of the future vest.
- This rectangle is divided by a vertical line into 2 equal parts. The left one is for cutting out the back halves, the right one is for the front halves.
- At a distance equal to the height of the armhole, draw a horizontal line.
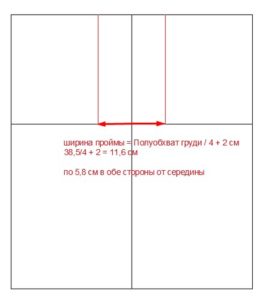
Reference: to determine the height of the armhole, you need to divide the half-bust circumference by 3 and add 6 cm to the result.
- From the point of intersection of the internal lines, we set aside a distance to the right and left equal to half the width of the armhole. To find out this width, you need to divide the half-circumference of the chest by 4, and then add 2 cm.
- Connect these points to the top of the rectangle.Thus, we get another one, located in the center of the upper part. There will be an opening here.
Back shoulder
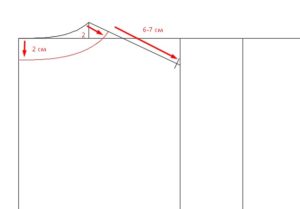
The neck line is connected to the shoulder of the back and shelf.
- From the upper left point we measure the length, which is calculated as follows. Divide the neck circumference by 6 and add an additional 0.5 cm.
- We mark the point of growth. From the resulting point at a right angle above the border of the rectangle, draw a segment of 1.5 cm. Using a concave line, connect it to the upper left point of the rectangle.
Reference: height 1.5 cm is relevant for all sizes of children's vests.
- We measure 2 cm along the left side line of the armhole from above. We connect these points to obtain the line of the shoulder bevel of the back.
- Set aside 2 cm and draw another line, which will become the neck of our vest. In the drawing it is indicated in red.
- We measure the length of the shoulder.
Front shoulder and armhole
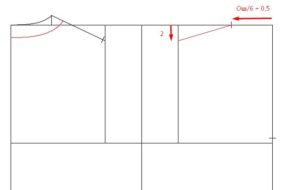
- We outline the shoulder on the front of the vest. From the upper right point we measure the same distance as on the back (divide the neck circumference by 6, add 0.5 cm).
- On the right vertical border of the armhole, put 2 cm down and connect these points.
- We measure 2 cm from the top to get the shoulder of the shelf.
- Divide the lower corners of the small quadrangle by 2, measure 2 cm. Draw the armhole line.
Shelf
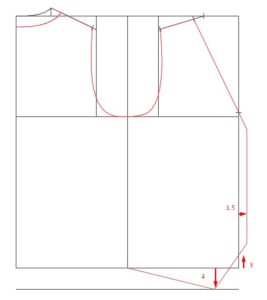
- Mark the bottom point of the cutout. To do this, divide the neck circumference by 6, add 1 cm and the desired neckline length. Connect this point with the shoulder line.
- From the right vertical border of the drawing, mark 1.5 cm and draw a parallel line. We connect it with the bevel of the cutout. That's how we we get the fastener location.
- If desired, make the bottom of the vest not straight, but curly.
Left in the middle of the shelf and back outline the darts, after which the pattern is ready.
How to make a pattern from a finished vest
Another method may seem even simpler to some.After all, you don’t have to do calculations and drawings. We will make the pattern using a finished product, which will have to be cut into its component parts.
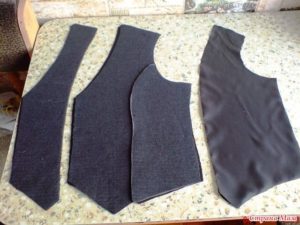
- Divide the product into elements.
- Lay out the parts on paper and circle. If necessary, increase the size, make adjustments.
- Cut out the vest details.
Tips for sewing a vest for a boy
• When cutting out the details of the vest, do not forget to leave a seam allowance of 2-2.5 cm.
• Cut out the lining according to the same drawing, making each element 2.5-2 cm smaller than the main part.
• Start with darts.
• Then make connecting seams on the sides and shoulders of the product.
• Follow the same steps with the lining.
• Combine the vest fabrics and the lining.
• Don't forget to smooth out your stitches.
• It is easier for a beginning seamstress to sew a vest with patch pockets. And experienced craftswomen can make them slotted.
• If the vest turns out to be too big, you can make a drawstring at the waist line. To do this, an additional flap is sewn from the inside, inside of which there is a wide elastic band.
A new vest, sewn with your own hands, will require perseverance, accuracy and a little free time. As a result, it will decorate a school suit and will definitely please and warm your student.


 0
0


