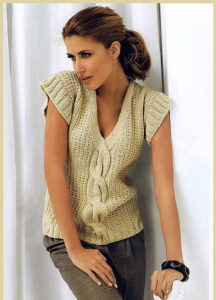
 Knitted items always remain in fashion. In the cold season, when it’s already cool to walk around in light clothes, and it’s too late for winter jackets, vests will save you. They look elegant and stylish on a girl of any length and style.
Women's knitted vests: review of models
Anyone who wants to create a new garment with their own hands will be glad to know that there are quite a few different types of vests. With their help, you can create a unique thing, starting from these images, or do everything exactly as in the picture.
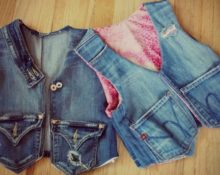
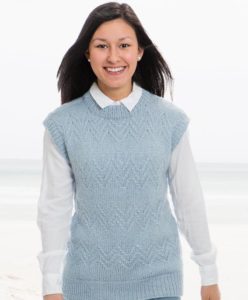
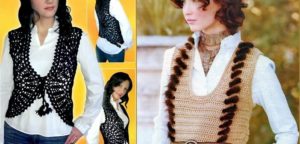
- Women's classic sleeveless vest. A universal model, it can be worn on top of a shirt, thin blouse, T-shirt or T-shirt.
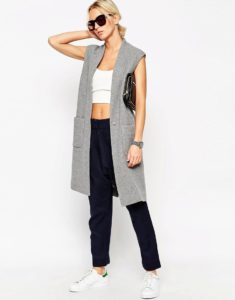
- Knitted long sleeveless cardigan. Any girl will like him. This look makes you look slimmer visually, and the length can warm you up much better. You can also sew a hood to it, make it with buttons, with a belt or open.
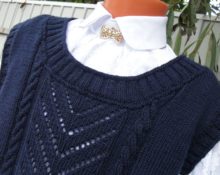
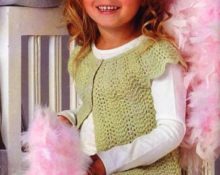
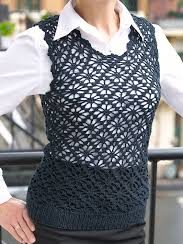
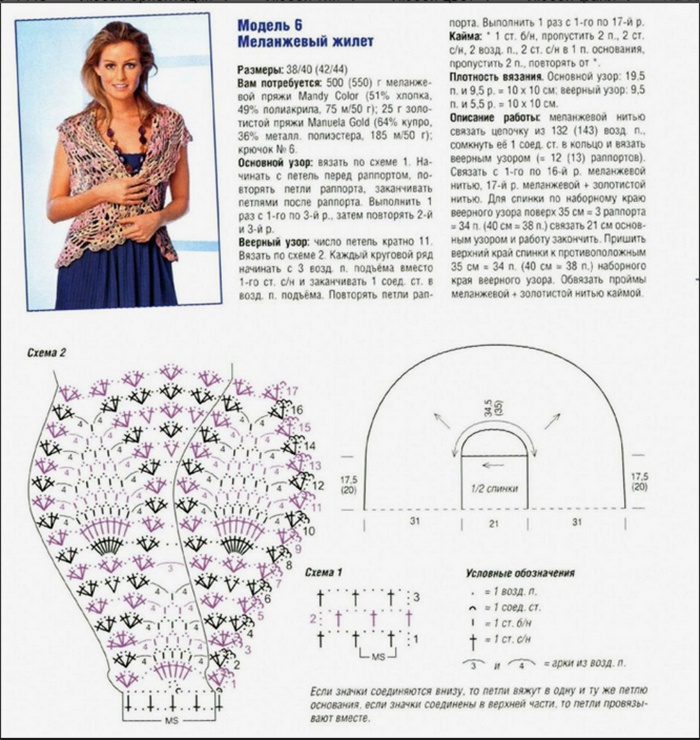
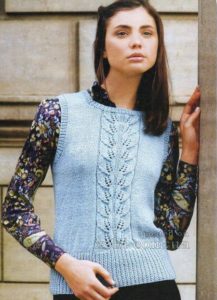
- Openwork vest. Fits perfectly and complements the look with unusual patterns.
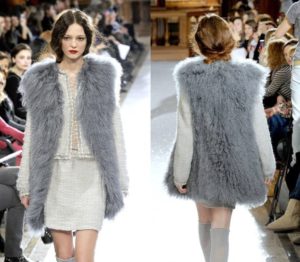
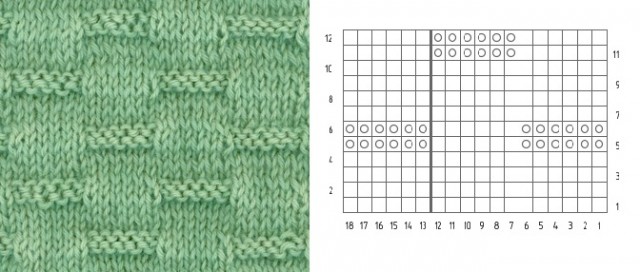
- Grass vest. This model is suitable for any slender woman; it is better not to use it for plump girls. The “grass” effect makes the appearance more voluminous.
- Waistcoat knitted with a waffle pattern. It looks interesting and attracts attention.
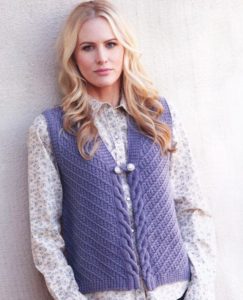
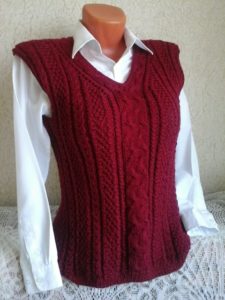
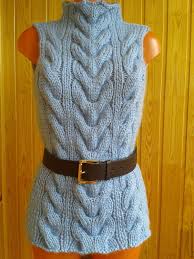
- Vest knitted with braids. Braids look cute and are usually worn at the front of clothing. The patterns can be arranged as your heart desires.
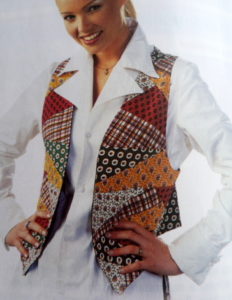
- Vest with geometric shapes. Most often, rhombic patterns are used as weaving. They turn out to be voluminous and also make the upper part of the clothing larger.
Women's knitted vests: review of patterns
You can weave clothes of this type in any way that you know how and most often use. The result is a wonderful thing, created in harmony between imagination and hands. Below are diagrams that will help you in your creative work. Choose colors to suit your taste.
- Knitting pattern for an openwork vest.
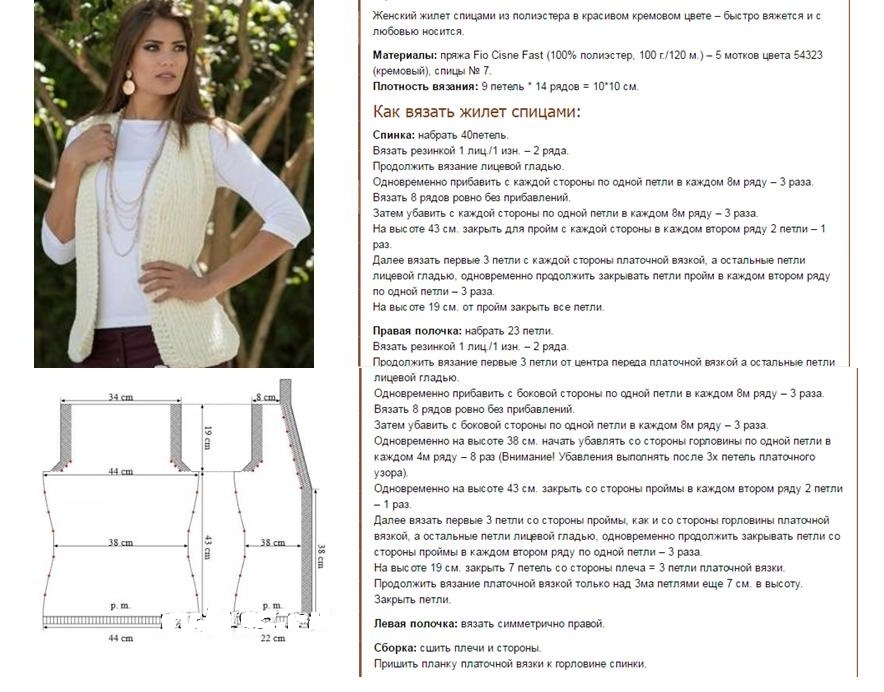
- Scheme for a classic vest.
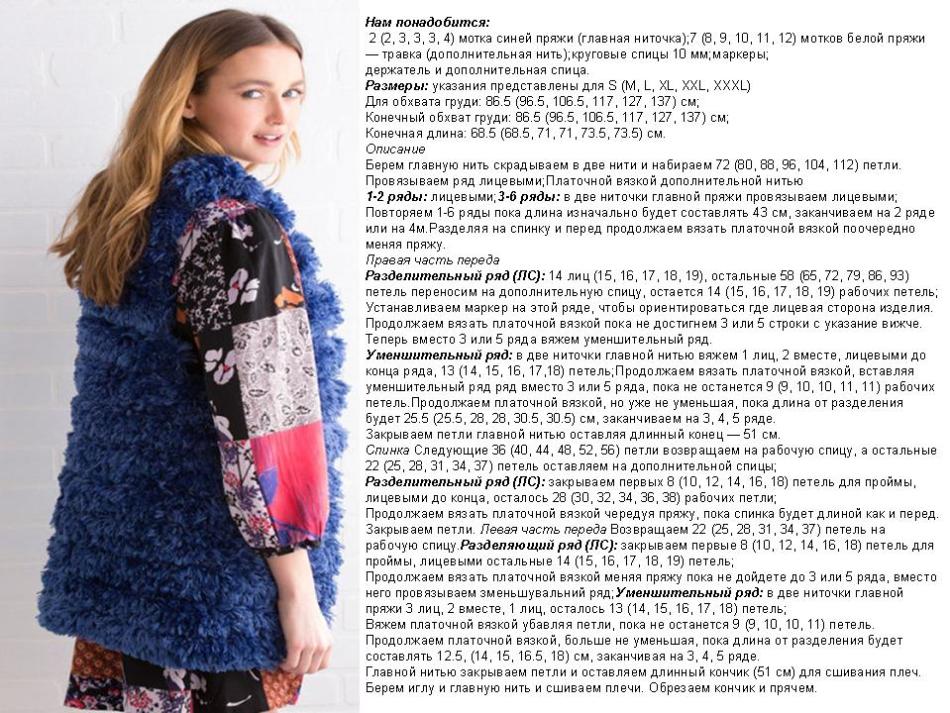
- Pattern for a grass vest.
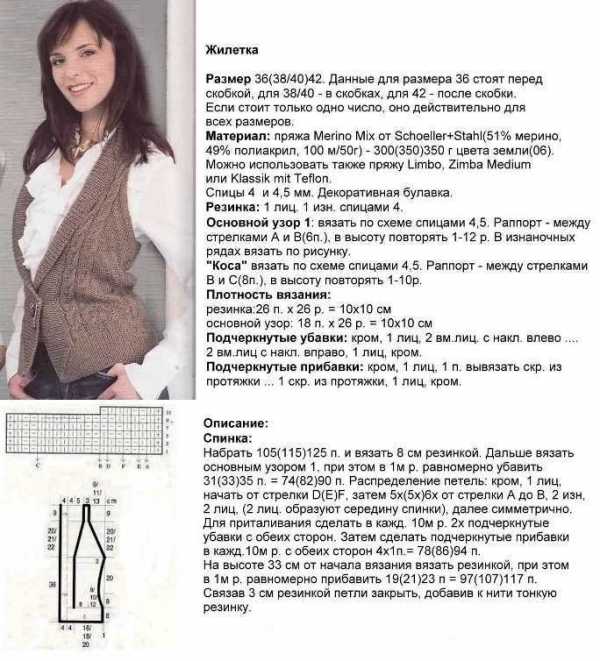
- Pattern for a vest with braids.
- Knitting pattern for waffle patterns.
- Scheme with geometry.
It will not be difficult for you to do this if it is done with great desire and aspiration. It will be difficult at first. Over time, as you know, your hand becomes full and knitting all kinds of clothes will be easy.
The simplest patterns for knitting a women's vest
This section is suitable for beginner needlewomen. It is impossible to understand patterns and learn how to knit beautifully in the shortest possible time. When the season of cool and windy weather has already arrived, but there is no desire to knit a simple vest, then you can use simple patterns. These include diamonds, checkers, zippers, pearl, simple openwork, rice, openwork leaves, spikelets, and putanka.
How to choose the right materials and tools for knitting
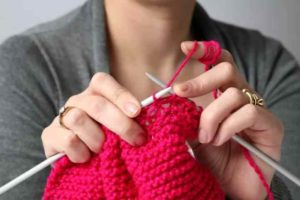
 The process of weaving with knitting needles largely depends on how good the work items are. When choosing, carefully inspect the tool; it must be level, otherwise the thread will cling and cause inconvenience. It doesn’t matter what they are made of. Often when buying, people turn their attention to steel products; they fit well, but in practice they are difficult to work with. There are metal ones made of aluminum, which are also popular and ensure the thread slides, thereby making the work go better.
ATTENTION!
Buy an aluminum device only with a coating, because without it, oxidation will occur, which will leave the thread and your hands dirty.
The most expensive are wooden, bamboo (they are useful for knitting with silk threads and other sliding threads) and bone, and the latter are quite fragile and can rarely be found. Plastic tool light, smooth and flexible, but highly electrified. Next we will look at the types of knitting needles.
Spokes are divided into:
- straight;
- circular.
The first ones are necessary for flat knitting some parts in two directions - forward and back. They come in short, long, stocking (both ends are sharp), single-ended regular and with fishing line.
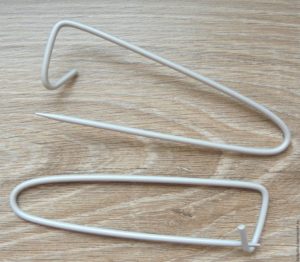
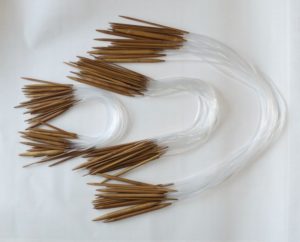 Another type consists of two knitting needles connected by a fishing line. During operation, the material is distributed evenly. There are a number of advantages that they have, firstly, it is convenient to knit large and heavy things, and secondly, they are good for knitting in tight spaces. New technologies are increasingly surprising, because now there is knitting needles with CLICK system - these are rods with removable threads of various lengths, with which it is possible to knit in any direction. And the last ones are auxiliary knitting needles, they are designed for knitting complex patterns. Curved in the middle prevents the yarn from slipping too much.
You also need to look at the diameter. There are 2 types of tables of values:
- European (numbers from 1 to 10 mm);
- American (from 0 to 15 mm).
To choose the right size, fold your thread in half and twist it a little - the resulting diameter will correspond to the desired knitting needle.
IMPORTANT!
To create products from chamlin, mohair and other similar threads, the working rods should be three or four times larger than recommended. The openwork is best woven using needles No. 4 or No. 6. The elastic at the bottom of the robe and on the sleeves is done using tools 1-1.5 sizes smaller than the main ones.
Finally, look at the ends: they should under no circumstances be sharp, thin or damaged, otherwise future work will be in vain.
 Other accessories for needlework, some of which do not need to be purchased: a knitting pin, needed to remove open loops on it; row counter, it determines which row you have already made; spoke calibrator, determines their size; marking rings to mark the beginning of a pattern or circular row.
Step-by-step knitting of a women's vest for beginners
 Here is a plan for creating a classic vest. This will give you an understanding of the process of working with knitting needles, which will have a good effect on further production.
- First of all, decide on the color and buy materials. Select yarn of a certain thickness and the desired composition. Also, do not forget about the diagram and patterns that you want to make. Measure your parameters: hips, waist, chest, neck, armhole depth (sleeve opening). After taking measurements, make a pattern on special paper.
- Now you can start the process. Having cast the required number of loops on the knitting needles, make an elastic band. Using the pattern, make the elastic of the desired height, and proceed to the main part with the pattern.
- Next, you should switch to knitting needles one size larger than the primary ones. This is required to make a three-dimensional drawing. After this is completed, add a few loops in a measured manner and calculate how many you need to attach (you need to keep the count by how many there are in the pattern itself).
- The pattern is made up to the armholes, then gradually begin to decrease the loops. This way you will have a smooth line that will sit comfortably on your body. To start, remove a large amount, about 5 or 6, then reduce one at a time until the end. It was the back.
- Let's move on to the front. Everything is done in exactly the same way, just don’t forget about the neck. Knit to the armholes and decrease the stitches. This should be done symmetrically, so that later all the parts can be sewn together correctly.
- As soon as you reach the middle, proceed to the throat (knit the three middle loops according to the diagram). Turn over and make a whole row without decreasing. Next, start decreasing the neckline stitches for the sleeves in a new row, and at the end only one stitch for the neckline.
- Cast off the stitches and begin making the other half the same way as the first. Just first decrease the loop at the throat, and then at the armholes.
- All that remains is to sew the halves of the product. Take the shoulder seams first, then move to the side seams. For the neckline and armholes, cast on non-edge stitches. Be careful, everything should be the same, make the armholes 1*1.
- There is one stitch left in the final row, you need to lift the broach between the remaining loops, then turn it over and put it on one knitting needle.Join together the last stitch on the needle, the first stitch on the new row, and the one you picked up. So you need to try to make each row and close it. Ready!
Knitting a vest with knitting needles
This section will be useful to you when you gain some experience. Now you can move on to more complex patterns and types of weaving. Without a doubt, you will succeed. Follow the step-by-step instructions.
Knitted vest with braids
 Here you will need threads not only from wool, but also from acrylic. Select knitting needles of two numbers (for example, 4 and 3.5), circular ones of a smaller number and one auxiliary one. As always, we start with an elastic band, knit it 2*2 between the edges (two knits and two purls), making it the smallest number. Patterns are made in large numbers. Then on the purl stitch we make the front rows with purl loops and vice versa. You can choose whatever pattern you want for this pattern.
How to knit a women's vest and sleeveless vest
 Let's take an openwork pattern as a basis. Materials used: yarn from any material (usually hemp, flax or cotton), regular and circular knitting needles of the same number, you can use buttons if you wish. Knitting an elastic band begins and ends with an odd number of edge loops. Knit the front rows alternately from the front to the back and finish with the front one. Next, according to the diagrams given at the beginning of the article, continue working on the product.
How to make a fashionable women's knitted vest
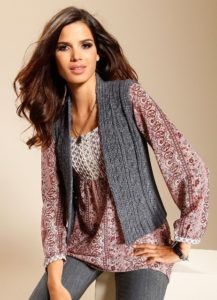
 You can either make decorations yourself or purchase them in special stores. You can add a flower in the form of a brooch to the chest. Rhinestones, beads or beads of different colors will look good if you are a lover of sparkly outfits. They can be attached near the throat, in stripes on the sleeves or on the front of the product.It would also be a great idea to decorate your robe with ribbon embroidery.
You can change your usual method of knitting with an elastic band to any other. For example, replace it with varieties of stocking weaving. You can also add embroidery. More interesting ways: in the round, rice or garter stitch.
Tips from experienced craftswomen on knitting a women's vest
 Recommendations from people with extensive experience will make your work much easier when weaving a vest.
- It's important to create a swatch first to see if the yarn and knitting needles are right for you. Wash, dry and see what happens. After this, correct all the shortcomings in the pattern and then you can confidently start weaving.
- By washing a new product, you rid it of unnecessary substances in the yarn. The water should be warm. Dry on a flat surface covered with a dry towel.
- Don't skimp on threads. It is better to buy expensive ones, from which your product will remain in excellent condition for a long time, than cheap ones, which will affect wear.
- Before working, make notes on the source materials. This will come in handy in the future when you need to do something similar.
- If you can’t do decreases very nicely, try hiding the purl stitches under the knit stitches. In these places, work with knitting needles one size smaller.
Knitted vests have not gone out of fashion for many years now, so feel free to knit and don’t be afraid that you will look unfashionable.
 0
0