Every girl wants to be the most fashionable. That is why it is necessary not only to look at fashion trends and shows, but also to use the means at hand to create high-quality children's clothing. Knitting is a way to come up with something that will be one of the most creative and original options. It is worth considering several basic rules to ensure that the final product is of high quality and without visible flaws:
 Knitting density must be observed. That is, do not exceed or reduce the number of loops;
- A pattern with geometric patterns looks very good. However, it is worth considering that such ornaments are quite difficult to perform, so it will be quite difficult for a novice master to complete them;
- The finished product cannot be machine washed or wrung out, as this can significantly damage the fabric structure. It must be washed by hand, in warm water, without adding harsh detergents.
 Knitting density must be observed. That is, do not exceed or reduce the number of loops;
What types of vests are there?
- with pockets.It is quite convenient, since additional recesses can accommodate many necessary items;
- with a hood. It looks quite original and comfortable;
- a vest may look like a cardigan when its length significantly exceeds the norms for the above type of clothing;
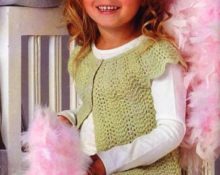
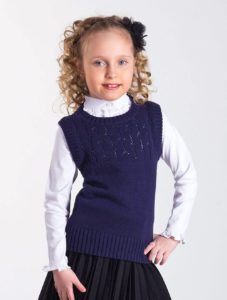
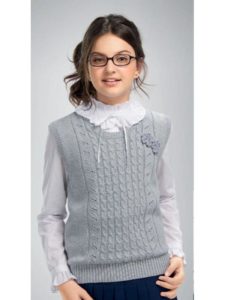
- classic and basic variants of vests. Girls prefer to wear them to educational institutions, because this option adds seriousness and business style, even for the little ones.
How to knit a children's vest for a girl's school?
Before you start knitting a vest for a schoolgirl, you need to consider several basic factors.
 The first thing worth noting is the general style of the establishment. Namely, does the school have a generally accepted uniform? Then you need to stick to this option;
- The second thing worth noting is the combination of the vest and the rest of the casual school clothes. It is necessary that the knitted product does not look ridiculous, but, on the contrary, gives the form elegance and attractiveness;
- The third thing to consider is the rapid growth of children. When knitting, it is worth noting the fact that the vest can become small very quickly. Therefore, additional supply is urgently needed.
 The first thing worth noting is the general style of the establishment. Namely, does the school have a generally accepted uniform? Then you need to stick to this option;
Anyway Before you begin developing and planning the future layout, you need to clarify all additional preferences and factors. And also, consider all the options for fashionable and modern vests that can not only diversify the schoolgirl’s basic wardrobe, but also give her image elegance and originality. It is worth considering in more detail exactly what items are needed in order to create a beautiful product.
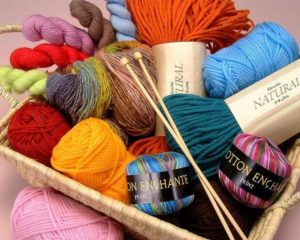
What is needed for the job?
There are several basic items that need to be prepared before you begin.
 The first thing worth noting is the knitting needles. Each set comes with a number. It must be taken into account that the coarser the threads are, the thicker the tool should be. Accordingly, with fine yarn it’s the opposite;
- the second point is yarn. Its quantity, number and color must be indicated in the product diagram. If the vest is made for a child, then you can use several shades;
- a knitting pattern is also required to follow the pattern clearly. If it is a small format, then it is recommended to enlarge it and print it on a printer. Then there will be less chance of missing any detail;
- you need to prepare threads and a needle. They will be necessary to sew together the parts of the finished product;
- decor is an optional element. You can use a wide variety of beads and sequins. If the product has buttons, then they can also serve as a kind of decoration.
 The first thing worth noting is the knitting needles. Each set comes with a number. It must be taken into account that the coarser the threads are, the thicker the tool should be. Accordingly, with fine yarn it’s the opposite;
After all the details are prepared, you can proceed directly to the process of knitting a vest.
A simple pattern for knitting a school vest with a description
Knitting a school vest is a timeless classic that can be made quite simply. To do this, it is worth considering the work scheme. But, in addition to this, it is necessary to take into account some basic rules and subtleties. You need to start with the basics, or rather, with the correct set of loops, so that the product is made exactly to size.
Calculation of the number of loops
In any pattern that has approximate indicated dimensions, there is also a prescribed number of loops. However, there is always an option when your own measurements differ from standard standards. Then the product can be large or, conversely, small. It becomes very sad to undo and redo the work done.However, there is a way to avoid this process.
There is always the opportunity to calculate the number of loops yourself. There are several simple ways to do this, which have been tested by many craftswomen. One of the best options is as follows:
 knit a small sample with the corresponding pattern. It should be approximately ten by ten centimeters. You can choose a smaller size, but the above option is optimal to make the calculation much easier;
- count how many loops there are in one centimeter and in five;
- use the proportion to calculate the number of loops for a product with a width of, for example, 70 centimeters. You should end up with two values to start from:
 knit a small sample with the corresponding pattern. It should be approximately ten by ten centimeters. You can choose a smaller size, but the above option is optimal to make the calculation much easier;
1 cm = 2 loops
70 cm = 140 loops
5 cm = 9 loops
70 cm = 126 loops
After receiving the first results, you need to stretch the sample a little, imagining how it will sit on a person, and repeat the measurements. The result should be several values. Between them you need to choose the middle one and build on it when casting loops for the product. It is worth noting that this method has never failed anyone. And it takes a fairly short time to calculate.
Knitting the back
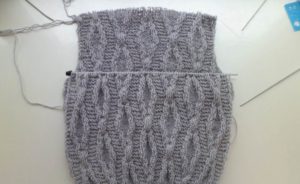 After you have chosen the appropriate pattern and calculated the number of loops, you need to start knitting the back. According to the standard, she is always knitted first. You can use a ready-made diagram, which can be found in any fashion magazine or on the Internet. Initially, you need to cast on the required number of loops and knit about 5 centimeters with an elastic band. Then knit with the selected pattern up to a height of 50 centimeters. Next, to cut the neck, close off the middle 17 loops. And knit both sides separately.
In order to have a beautiful, neat rounding, you need to close three loops once, two times two loops, once one loop. Having reached a height of 53 centimeters, close all loops.
Front with V-neck
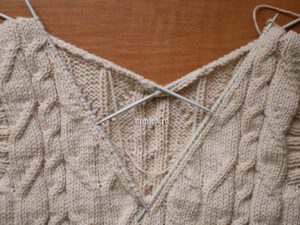 Cast on the required number of stitches and knit as a back stitch until the neck level is reached. At a height of 43 centimeters, in order to form a V-shaped cutout, you need to close the middle loop. Continue knitting separately. In order for neat bevels to be present, from the neck side it is necessary to close one loop nineteen times, in every second row. Having reached a height of 53 centimeters, you need to close all the loops.
After doing everything, you need to carefully inspect all the corners and edges for smooth closed loops and maximum accuracy of the process.. When all the irregularities have been clarified, you can begin to assemble the product. It is worth considering this process in more detail.
Assembling the vest
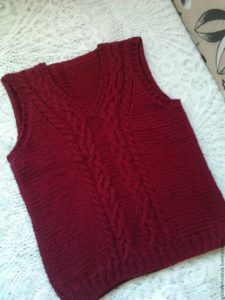 Once both parts are ready, you need to begin the stitching process. This is exactly what the threads and needle were originally prepared for. It is worth considering that the color of the threads must match the shade of the yarn. This work must be done from the wrong side. Before this, it is advisable to steam the product well, especially its edges.. This must be done so that when stitching there is a thin, neat line. After the product is ready, it needs to be turned right side out. And steam thoroughly again. Then all the shortcomings will be immediately visible.
It is worth noting that the stitching process can always be improved, provided that basting was done initially. If everything is done correctly according to the scheme, then the finished product will be ready for use.
Description of knitting a vest with a hood for a girl
Vests for girls with a hood are also considered quite popular. This product is much more complex in its technique than a simple vest for a schoolgirl.
Back
 The backrest will be similar to the standard version. Using the main thread you need to cast on the required number of loops. For example, let's take 46 loops. Next you need to knit 4-5 centimeters with an elastic band. By adding one loop. After 40–42 centimeters from the bar, you need to close the middle 11 loops and continue knitting separately. It is also necessary to close along the edges of the cutout in the second row, the first loops. After 45 cm knitted from the bar, you can close all the loops.
Before
Start working as with the back. Only the neckline should be deeper. In this case, you need to close the middle loop 30 centimeters from the bar. Start casting off the first 5 stitches along the edges of the cut. Close all loops at back height.
Knitting a hood
You need to cast on 83 stitches and knit approximately 4 centimeters in stockinette stitch. After this, bind off 1x1 loops on both sides, in every second row there are 5x1 loops, in the fourth row there are 1x1 loops. After 14 centimeters, simultaneously mark the middle two loops and knit 2 more together in front of them. After that, one stretch. Similar decreases must be repeated in the fourth row once. Every other row four times. After 24 centimeters, close off the remaining loops.
Assembling the sleeveless vest
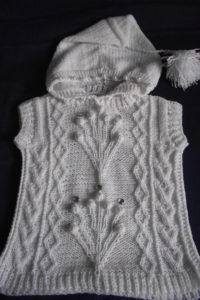 In order to assemble the finished product, it is necessary to carry out some actions that are similar to the original version. The shoulder seams are made first. Next, you need to sew a seam at the back and sew the hood into the neckline. Then sew in the sleeves in the same way. Then the side seams are made. If desired, you can tie all the edges with a thread of a different color for decoration.You can decorate with beads or sequins.
Conclusion
Learning to create things with your own hands is a good decision. And it has a number of advantages:
- exclusivity of the product. It will be individual and original;
- you can save a lot. In the modern world, yarn and a set of knitting needles can be much cheaper than a ready-made version from a store.
 0
0