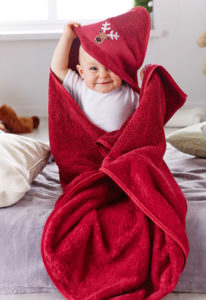
 A baby towel with a hood is an indispensable item in caring for your baby. You can use it from birth, because the soft, fluffy, breathable cotton perfectly absorbs moisture. And the voluminous hood gently wraps the child’s head, protecting him from temperature changes.
We'll tell you how to sew a necessary accessory for children with your own hands.
Sewing materials and tools
Every mother can sew such a cozy towel for her child. To do this you will need the following.
- Soft absorbent terry cloth or regular terry towels.
IMPORTANT! For baby towels, it is better to use fabrics without bright colors, as dyes can cause allergies in the baby. Preference should be given to natural white or beige shades.
- Small piece of fabric for finishing products around the edges. It can be satin, calico, cotton or cambric.
- To decorate the hood, you can choose ready-made embroidery in the form of applique.
- Threads in the color of the fabric, scissors, measuring tape, iron, sewing pins and, of course, a sewing machine.
Sewing a towel with a hood for a newborn
Step-by-step instruction
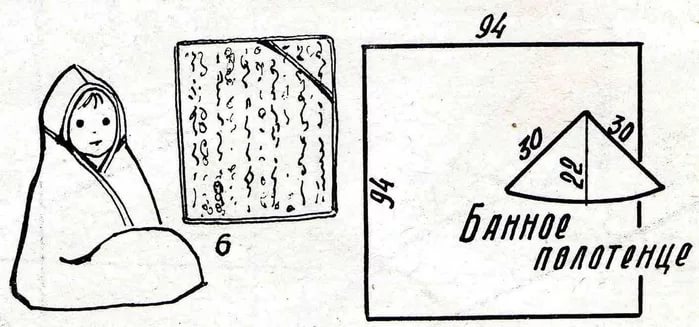
- First, prepare a square of fabric from which you will sew a towel. For this lay the terry cloth on the table and measure the required dimensions. In the classic version this is 75*75 or 100*100 cm. But you don’t have to be tied to standards; focus on your child’s growth.
- For the hood you will need two triangular pieces of fabric (one from terry, the other from thin cotton) with sides 31*31*50 cm. For convenience, you can first draw a triangle with the required dimensions on paper and only then transfer the workpiece to the fabric.
- Place both parts of the hood together with right sides facing out, pin them together and sew on all sides using a sewing machine. The blank for the hood is ready.
IMPORTANT! Do not forget to remove the pins in time while sewing, otherwise the sewing machine may break.
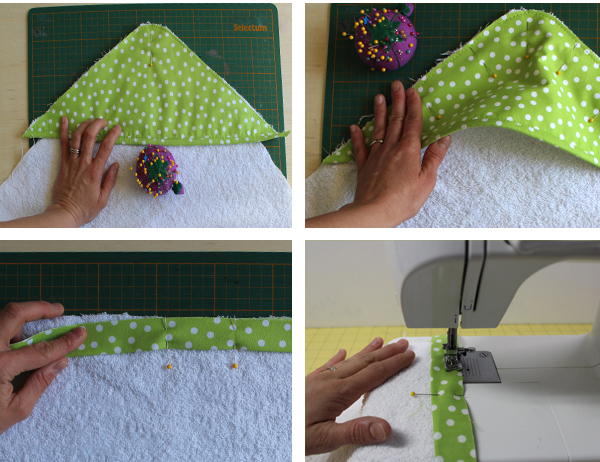
- From the fabric prepared for edging, cut strips 5 cm wide and a length equal to the perimeter of the towel + one long side of the triangle for the hood (50 cm) + a safety margin of 10–20 cm.
- First we will make the edging of the long side of the triangle. We place a strip of fabric with the right side to the edge of the triangle and sew a line the width of the foot. We turn the sewn edging face up and iron it with an iron. Turn the triangle over and fold the edging 2 times. First, in half to the cutting line of the triangle, then overlapping the triangle itself, and again iron it well. Now you can fix the edging on the sewing machine by stitching the same way as last time - the width of the presser foot.
REFERENCE! If you decide to decorate the hood with applique, it is better to do it at this stage of work.In the future, the triangle will be sewn to the towel and it will be inconvenient to design it.
- Place the hood blank on any corner of the prepared square of fabric. Be sure to ensure that all cuts are aligned.. To prevent the triangle from rolling away during sewing, secure it to the fabric using sewing pins.
- You can start edging a large square of towel. This is done according to the principle we have already described.
The bath towel with a hood is ready!
 0
0


Cool article. Thanks a lot.