creativecommons.org
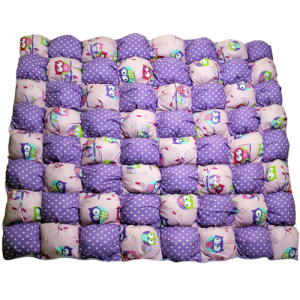
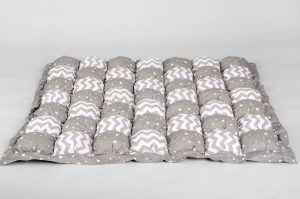
A bonbon rug is sewn according to the principle of a patchwork blanket, but they use waterproof fabric and a wear-resistant base so that the rug does not lose its shape, is not afraid of water, and lasts a long time.
How to sew a bonbon rug: where to start and how to choose the right materials
If you decide to sew a bonbon rug yourself, then first you need to decide on the size and its purpose (how exactly you will use it), the choice of materials depends on this.
There are two options for sewing a bonbon rug:
- Sew many individual pads of the same size and sew onto the base.
- Sew whole “ribbons” of fabric onto the base, which are then divided into pockets and stuffed with holofiber.
The first method is done entirely by hand, the second is designed to use a sewing machine. We will look at the second method of making a rug.
If the rug will be used for decorative purposes, then any material can be used for sewing.If the bonbon rug is intended for children, pets or use in the bathroom, it is worth taking a waterproof fabric (or impregnating the suitable material with water-repellent agents before sewing) and a rubberized base to avoid the appearance of blooms and foreign odors. A product made of waterproof fabric is easier to clean and wash.
The choice of size depends on the purpose of the product.
Knowing the size of the finished bonbon rug, we select the size of the “pads”. There is a “standard” of 6x6 cm for children’s rugs, 11x11 cm for adults, but if you want to get the job done faster, the size can be increased.
Sewing a bonbon rug: step-by-step instructions
creativecommons.org
- We start by drawing a plan for the future rug on a piece of paper, taking into account the pattern.
- We draw the base of the future product into squares, leaving a 1 cm gap between them; the seams will go along these gaps.
- When laying out the base, be sure to leave an allowance of 5 cm on the sides of the rug.
- We cut the fabric for the “pads” and sew them into ribbons, according to the intended pattern and diagram from step 1.
- All seams on the tapes are pressed in one direction.
- We pin the ribbons to the lined base and sew them horizontally, put folds on each square and sew them vertically. This is how we get “pockets” filled with holofiber.
- We sew on the next strip of fabric so as to sew up the edge of the previous strip, where the pads have already been formed. And we do this until we cover the entire base.
- The final stage is decorating and sealing the edges of the rug. They can be overlocked or trimmed with braid. If desired, you can sew on decorative elements, ruffles or stitch a design.
- If you want to sew a bonbon rug using the first method, you will need to sew the pads separately, which then need to be sewn to the base, and cover the edges of the mat and the seams between the pads with braid. Important: when using this method, you will need twice as much fabric, since instead of “pockets” for holofiber you are sewing separate pads.
This technique is used to sew blankets, seat cushions, bumpers for cribs and other products.
 0
0