To make a wallet with your own hands, it is better to use dense material and further strengthen its density with a special lining. So, even a large wallet will keep its shape perfectly, otherwise it will turn out to be an unpresentable model. It is recommended to study other tips to get a beautiful option.
Recommendations for creating a fabric wallet

For those who decide to create a product with their own hands, you should carefully consider the choice of fabric. Here you should not use old and damaged fabrics; it is better to choose suitable options in the store. There are also special selections, they are sold specifically for patchwork sewing and already have a special combination.
You can also purchase very expensive and luxurious materials for your wallet, since there is always a huge discount on small pieces of material (leftovers). And you should worry about decoration in advance; it could be an emblem or an attractive brooch. Perhaps someone has their own talent for decorating with beads or beads. Embroidery is useful in decoration.
And the last thing worth paying attention to is the fittings. The new item will require a clasp; a small carabiner will be appropriate for a comfortable handle. If pockets are planned, then a zipper is indispensable.
Important! Before going to the store, you must have a plan, otherwise you can buy completely incompatible things that will simply gather dust and wait their turn. You should definitely decide on the model and size.
What you need for a fabric wallet
The whole selection begins with the fabric itself. The most important thing you need to choose is the fabric for the front side. But it may not be one fabric. It can be a combination of several materials, which is quite fashionable. For example, creating a geometric pattern. The patchwork sewing technique looks very beautiful, but is more suitable for models with floral prints. As for the texture of the fabric, it is better to pay attention to the denser ones - thick cotton, linen. The fabric for a coat and anything else thick and unusual looks very nice.
Next, the material for the lining. It can be variations with a print, a plain fabric, but it should be thin. Silk and something so bright and shiny look good.
Some models of DIY wallets have a convex shape and for them you simply cannot do without padding polyester. This white lining is placed between the back side and the front side. For other models, you should pay attention to special dense fabrics to give the product shape.
Purse hardware can be purchased from a handbag hardware store. This is the clasp for the side of the wallet. The small handle on the side of the wallet needs a clasp, such as a carabiner.The bag's pockets may require Velcro, snaps, or zippers.
The decoration in the bag is no less important and should also be purchased in advance, while there is an opportunity to attach it to the material, and evaluate how well they harmonize.
How to sew a fabric wallet with your own hands
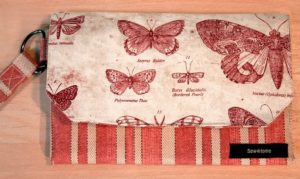
A wonderful and quite unusual wallet. This is what every master wants to do when creating new models. Since this is precisely the role of a DIY wallet - to make a beautiful and unusual product that will be unique, and will not merge with the products from the counter.
The work will require:
- for the front side with butterfly print;
- for the front side “technical”;
- button (magnetic) for fastening;
- emblem;
- carbine.
 Stages of work:
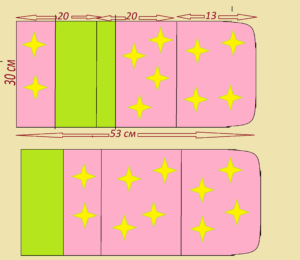
- Pattern. For the pattern, you will first need to draw a long rectangle. The width of the rectangle is 30 cm and length 53. It is more convenient to cut two such rectangles from denser material - this is a “technical” model. Next, cut out rectangles from the printed version, as shown in the picture with patterns. For pockets inside the wallet, cut two small rectangles with sides 30*20 from thick material.
- Stitching. Fold two large rectangles with the wrong sides facing each other and sew (after folding the edges of each rectangle inward). Sew along the edge of the fabric completely.
- Pockets. For pockets you will need two cut rectangles with sides 30*20. They need to be folded and stitched along the short sides, also pre-folding the sides. Next, sew them onto the fold line of the wallet, that is, to its bottom. Sew also on the sides and make a seam exactly in the middle of each pocket. You will get small compartments for credit cards and discount coupons.
- Side seams.Fold the wallet and sew the sides.
- Clasp. This model uses a magnetic clasp. Very convenient to use and use.
- Decoration. A small emblem is used for decoration; it is sewn in the lower left corner of the wallet. For the carabiner, make small strips of thick fabric, sew one to the wallet, and simply thread the other onto the carabiner after stitching. This is a very convenient wallet accessory.
At this point, your DIY wallet is ready and you can put your first money there. If it is a gift, then it is also worth putting a symbolic amount so that the one who receives it will receive monetary luck.
 0
0