 All the girls play with dolls, inventing various stories, making the world of toys look like reality. In the game, the doll is often sent to school.
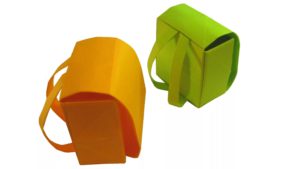
To send a first-grader to toy school, you will need many different supplies, including a backpack. There is no need to immediately run to the store to buy everything you need. After all, you can make a backpack with your own hands.
Making the necessary accessories is quite simple. In addition, you don’t need to buy anything for this; everything is made from scrap materials.
We'll tell you how to make such a backpack out of paper.
What you need for work
To make a homemade backpack for a doll, the following materials are needed:
- paper;
- scissors;
- pencils;
- glue stick.
How to make a backpack using origami technique
The technique is quite simple and is done in several steps.
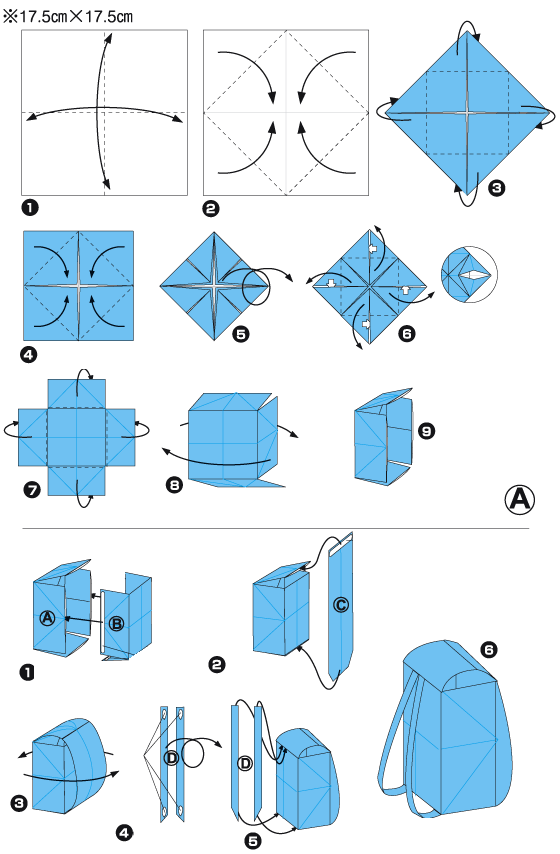
The basis
- You need to take a sheet of A4 size paper and place it in front of you. A strip 1 cm wide is measured on the right. A fold is made along the marking line.
- The sheet must be folded in half so that there is a clear fold exactly in the middle.
- The strip needs to be glued to the opposite side. It turns out to be a kind of “pipe”.
- On one side of the resulting “pipe” you need to measure the middle. To do this, You need to connect the opposite corners, and lightly pinch the resulting fold line.
- We bend the corners to the marked line and draw along the folds of the resulting triangle. It needs to be lowered and the fold line clearly marked.
- The workpiece must be turned back. All fold lines must be well marked.
- The “pipe” with the resulting folds needs to be opened and carefully pulled by the middle so that a rhombus is formed.
- We divide it into three equal parts, located at the same distance from the center of the workpiece.
- We raise the bottom corner to the resulting line, after which it is glued.
- We perform the same manipulation with the upper corner. It comes down and sticks.
- We bend the right corner of the diamond to the center line, then the left. We straighten the corners. The result is a package.
- We put our hand into it and carefully straighten all the corners.
- We hide the sides in the resulting package.
- We make a fold of about 4 cm at the top of the bag and draw a semicircle with a pencil. The excess is hidden inside the semicircle and lowered. This will be the flap of the backpack.
Straps
The next step is the straps. We also make them from colored paper. You need to cut pieces of paper to the required length and bend them several times along the entire length. Then glue it to the backpack.
ADVICE. The resulting backpack can be beautifully decorated with appliqués, a pocket can be made, and patterns can be drawn on the edges of the straps and lid.
Another version of origami is presented in the following diagram.
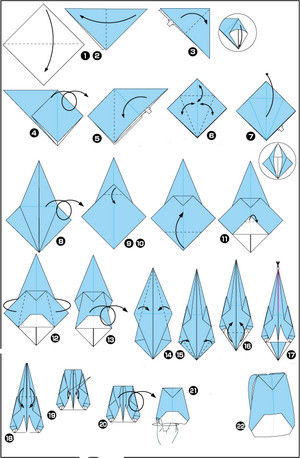
Making a backpack with a pocket
The materials used for manufacturing are the same as those used to perform work using the origami technique. However, for registration you need to additionally take paper of another color.
The basis
- You need to take a sheet of A4 format and place it horizontally.

- One third of the part is measured from the top edge, after which a fold is made along the marked line.
- The upper part of the sheet is folded towards the fold line.
- The sheet of paper needs to be unfolded crosswise and bent along the edges, retreating the same distance.
- Excess folds located in the upper part must be cut off, and glue must be applied to the side ones.
- The lower half is lifted and glued to the marked places.
The result is the basis for a backpack.
Additional details
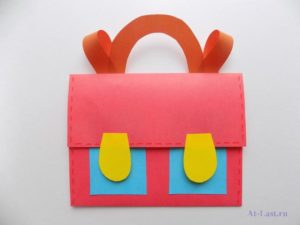
- Now we need to do valves. To do this, you need to take paper of a different color and cut out 2 identical valves of any desired shape.
- The resulting tabs are glued to the top of the backpack. This locks future portfolio.
- Take another sheet of paper of any desired color and cut out small rectangles from it, which are glued on the front side. That's how it turned out pockets.
- Cut from paper handle and straps for a portfolio. The handle is glued to the top of the briefcase. One part of the straps needs to be glued near the handle, and the second at the bottom of the backpack.
If desired, you can use a felt-tip pen to apply a pattern that imitates a seam.
ADVICE. To decorate products, you can use beads, sequins, appliqués made of fabric or paper, and ribbons.
By spending a little time and a minimum of materials, you can get an original briefcase for a doll that will delight its owner.


 0
0