creativecommons.org
Cycling brings not only pleasure, but also health. Riding through the forest in warm weather, we breathe fresh air, get a charge of vigor and strength. All fans of this sport have faced the problem of transporting necessary things. You need to take your phone, wallet, and apartment keys with you on your walk. If you are planning a long trip, you will need tools in case of breakdown, spare parts, etc. Already after the first ride, a novice cyclist feels the need for a bike bag. Any bicycle is designed in such a way that the bag can be fixed on it. Sports stores offer a huge range of such products, but they are quite expensive and do not always meet the athlete’s requirements.
In this case, the best solution is an exclusive DIY bicycle bag.Only the owner of the vehicle can accurately calculate the size, select the mount and determine the location of the product. For example, making a bicycle bag for the trunk with your own hands is very simple, but you can try on a self-created item and adjust it during the manufacturing process to a specific bike. The material for making the additional compartment can be leather, fabric or mesh - it all depends on what you plan to carry.
DIY bicycle bag - general principles
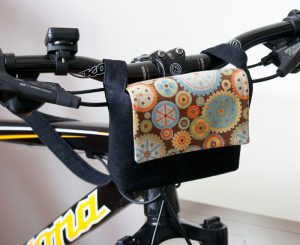
To make a comfortable bag for your bicycle handlebars with your own hands, you should prepare in advance:
- Cardboard paper for creating a pattern.
- Ruler and tape measure.
- Reflective elements.
- Waterproof, dense material.
- Snakes for fasteners.
- Hook, clip, Velcro and other fasteners.
- Scissors, sewing machine.
A similar set of tools and materials will be needed if you are making a bag for the trunk of a bicycle with your own hands. The difference lies in the type of fasteners and sizes. The principle of manufacturing products is similar:
- The work process begins with taking measurements. You need to write down the length, width, height of the future product. In accordance with the parameters, a pattern is created on cardboard. When calculating dimensions, it is important to consider that a pocket that is too large can interfere with movement. It is advisable to calculate in advance what will be transported in the bag and the dimensions of the items.
- After completing the pattern, cut out the fragments. We redraw the details onto the material. Leave centimeter seam allowances.
- We cut out all the fragments and sew them according to the pattern. Often, a DIY bike bag differs from a factory one in its durability. It holds its shape better due to plastic and cardboard inserts.At this stage we sew in all the seals.
- Insert snakes. We cut the material at the site of future pockets, sew each half of the fastener on a different side of the cut. To correctly place the fasteners, you need to make approximate markings on the bag in advance.
- We sew on the fixing elements.
- We sew reflective elements onto the bag. You can make several elements around the perimeter of the product or one continuous line.
Each type of bag has its own unique features. They should be taken into account when sewing. At the initial step, you need to carefully measure all the parameters. If the product interferes with the riding process, it will be dangerous to use.
Sewing a cover for a bicycle - important nuances
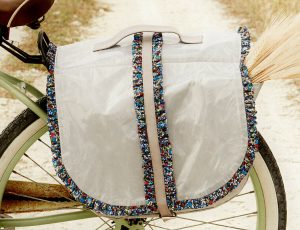
Professional cyclists often decide to sew a bicycle cover with their own hands, patterns for which they find on the Internet or professional magazines. According to the rules, the best DIY bicycle cover must meet the following criteria:
- Made from durable but lightweight fabric that is resistant to moisture and minor mechanical damage.
- Have comfortable handles for transporting the bike over long and short distances.
- Quickly fastened, equipped with reliable and durable fastenings.
- Be loose, not tight on the bike.
Before you start sewing, you need to measure your vehicle in accordance with the rules:
- The height of a bicycle is measured without taking into account the front wheel.
- The extreme points when measuring length are the rear wheel and the steering wheel.
- When sewing, at least five centimeters are added to all parameters for reserve.
- Measurements must be taken taking into account the free position of the transport in the cover.
How to sew a bicycle cover with your own hands
To make a case at home you need:
- Slings – six meters.Bag handles are made from them.
- The snake is three meters long. Can be replaced with rivets. You will need about fifty of them.
- Runners - two jokes.
- Fabric – four meters.
In the process of work, it is advisable to rely on the principle of factory tailoring. Step-by-step instruction:
- We measure the parameters of the vehicle, excluding the left pedal and the front wheel. We lower the saddle before taking measurements. The right pedal is not removed, it does not matter much when measuring.
- At the rear wheel, the bag should be rounded to match its shape. The product should not dangle. It is important that there is no empty corner.
- Covers with side fasteners on one edge are considered more comfortable. The book model is less convenient.
- Where the front fork will be located, there should be a special pocket that will help protect the soft product from damage.
- First, the bicycle is placed in the case, to the right of it is the place of the front wheel. Its support is the right pedal, which is not removed. If desired, you can make a separate pocket for the wheel. This minimizes the likelihood of rolling and the part will be securely fixed. There is space to place a fender next to the front wheel.
The sewing process itself - what needs to be done:
- Take material two meters long and one and a half meters wide. The fabric should not get wet. This is a light, special material. Cut out a piece of 1.5-1.6 meters from it. These sizes are aimed at bikes with measurements of 140 centimeters.
- We insert special rings for inserting ties and handles. They firmly fix the slings, so they are optimal holders.
- We sew the cover from the side wall where the rear wheel is located. We move along the perimeter of the product.
- We sew a snake on each side of the cover.
- We choose any wall for a pocket under the front fork and sew it on.
 0
0