Straight to the point
Bow for girls
 We are preparing beautiful bows for girls from organza decorated with rhinestones. For work we will need:
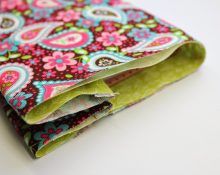
- white tulle. Recommended width: 15 centimeters;
- “Moment” glue for decorating bows with rhinestones;
- lighter;
- hair elastic for the base of the product;
- some rhinestones measuring 3 mm;
- comfortable scissors;
- tweezers;
- pieces of white satin ribbon, size 50 * 50 mm (1 pc.), 20 * 50 mm (1 pc.);
- a circle cut out of thick cardboard for gluing a flower;
- glue gun with a rod;
- blanks for petals from mesh.
- Let's start with the petals. Cut strips 7.5 centimeters long from the tulle and cut them in half. We get squares measuring 75 * 75 mm. They will be useful for preparing future petals. We place one square on top of the other so that it looks like a square with a diamond placed on top. We fold the blanks so that in the upper part we get several sharp corners similar to sharp petals.We fold the lower right corner with the upper edge of the workpiece, and close the remaining corner. We should get a blank that looks like a bell with sharp petals “looking up.” We fix it at the bottom with a drop of glue so that the part does not unfold. Glue the rhinestone onto the glue using a toothpick. This is done in one direction on each “petal” in the same way. We prepare the remaining parts in the same way.
- Let's prepare the base. We take a prepared piece of cardboard and decorate it with a satin strip. A hole is cut in the workpiece with scissors to thread the elastic through; we do the same with a square of white tape (50*50 mm). The edges of the hole are melted with a lighter so that the edges do not fringe. We put the square and circle together so that the slot matches. A square measuring 20 * 50 mm, bend it in half, fuse the edges using a lighter, fold it in half again. The strip is inserted into the slot of the parts and pulled through, we fix the elastic band by gluing it with a gun. We glue the base with tape and cover it with satin.
- Glue the petals counterclockwise using a glue gun to the base so that the narrow side connects to the base, and the “fluffy” side faces up. We glue row by row, carefully adjusting the parts. Each row contains approximately 7 petals, gradually, as the area decreases with each row, the number of petals decreases to 1 or 2 at the very top of the bow.
Tulle bows for chairs
Method 1
We take a wide, bright, contrasting organza ribbon and tie it on the back of the chair, so that the beautiful knot “looks” into the room. Tying is done with a regular bow, threading the ends of the ribbon. Carefully straighten the resulting bow on the back of the chair.
Method 2
We throw a piece of organza over the back of the chair, take the upper corners, bring them back, connect them to the bottom layer of fabric and tie them in a knot, letting out the edges of the material. Carefully pull the knot to the back of the chair and straighten the resulting bow.
Method 3
We throw a piece of material over the back of the chair. The loose fabric is pulled into a bun and secured with a ribbon or strap. We straighten the organza beautifully.
Tulle car bow
- Take a bright thin ribbon and thread it through the ring (bracket) in the trunk of the car, fold it in half, close the trunk of the car. After 30–40 centimeters from the “beginning” of the tape, we tie its two strips with a strong knot.
- Two more multi-colored wide long stripes are attached to the passenger's ceiling handle. We tie their corners to the handle and pull both ribbons through the window. We connect them with the “bottom” strip (which is attached to the trunk) like this: we pass them under the first knot, pull them out and fix the second knot of two strips in the same place.
- We perform a similar action on the second side of the machine: We pull out two more ribbons, tying the ends to the ceiling handle, and fix the second end at the back of the car. We securely fix it by making a tight knot on each of them. We should have 5 knots.
- We form a bow. We take a wide ribbon in our hand, bend it to form a “petal” of a bow, and tie it with a thin one so that the structure does not fray or fall apart in the wind. On the second side we form another “petal” of the bow for symmetry. For greater pomp, you can attach a pre-made organza bow from ribbons of the same color to the center. It is also secured with a thin strip. The free edges of the bow are folded in half and cut diagonally with scissors to form unusual edges.
- You can decorate the ribbons themselves with small prepared bows, hang them on the car door or in other places by attaching them with a regular stapler. And you can tie a couple more soft toys or other figurines to the bow, symbolizing the newlyweds.
- We take a bright thin ribbon, thread it through the ring (bracket) in the trunk of the car, fold it in half, and close the trunk of the car. After 30–40 centimeters from the “beginning” of the tape, we tie its two strips with a strong knot.
- Two more multi-colored wide long ribbons are attached to the passenger's ceiling handle. We tie their corners to the handle and pull both strips through the window. We connect them with the “bottom” strip (which is attached to the trunk) like this: we pass them under the first knot, pull them out and fix the second knot of two strips in the same place.
- We perform a similar action on the second side of the machine: we pull out two more ribbons, tying the ends to the ceiling handle, and fix the second end at the back of the machine. We securely fix the ribbons, making a tight knot on each of them. We should have 5 knots.
- We form a bow. We take a wide strip in our hand, bend it to form a “petal” of a bow, and tie it with a thin ribbon so that the structure does not fray or fall apart in the wind. On the second side we form another “petal” of the bow for symmetry. For greater pomp, you can attach a pre-made organza bow from ribbons of the same color to the center. It is also secured with a thin strip. The free edges of the bow are folded in half and cut diagonally with scissors to form unusual edges.
- You can decorate the ribbons themselves with small prepared bows, hang on the car door or in other places by attaching them with a regular stapler.And you can tie a couple more soft toys or other figurines to the bow, symbolizing the newlyweds.
Bow made of tulle and satin material on a dress
To make it, you need a piece of light fabric (tulle), a satin ribbon (10 millimeters wide), thread, needle, sharp scissors, and a gun for gluing parts. To decorate the middle of the bow on the dress, we will need a rhinestone ribbon.
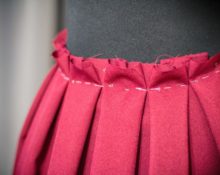
- Place the plate on the fabric, draw an even circle with soap or chalk, and cut it out.
- “Julim” a cut out circle around the perimeter, tighten the thread to get a “bag” of fabric, fix the thread.
- Turn the piece over and continue stitching with a basting stitch from the edges to the middle. We tighten it and the product will take the shape of a bow. We fix the thread again.
- We set the ends of the ribbon on fire using a lighter. Cut a piece of ribbon slightly larger than the width of the product and glue it with a gun.
- We decorate by gluing a ribbon of rhinestones. Previously, the edges of the rhinestone ribbon are also singed using a lighter. Lightly press the satin ribbon and rhinestones with your fingers so that they stick well to the fabric.
- We glue a brooch holder or a pin to the resulting bow, generously lubricating it with an adhesive base.
This decoration on a dress can be easily made in just ten minutes; all you need is to have a few pieces of fabric on hand, a little free time and a little patience. You can decorate a dress, a blouse, a handbag with it, and even weave it into your hair. It can be made from tulle of the same colors or from fabric of a contrasting color.
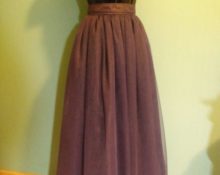
Working with beautiful noble tulle is a pleasure. This material is easy to drape, sew, and has a decorative appearance. It is used to decorate festive halls, make accessories, and decorations for clothing.Handmade is a rather popular and fashionable art that never ceases to amaze with its beauty, originality of ideas and ease of execution. For example, you can make a bow for a girl for kindergarten or school; create a wonderful decoration for an anniversary or festive evening, surprising guests with the originality of the room’s design.
Handmade crafts made from tulle are also indispensable when decorating a wedding table, cards, invitations, decorating holiday bottles and creating decorative pleasant little things. But one of the most important decorations is considered to be the decoration of the car in which the newlyweds will go to the registry office and for a walk around the city. It is the combination of satin and tulle that will give homemade jewelry a festive atmosphere, and at the same time convey all the warmth of the hands of the person decorating the car.
 0
0