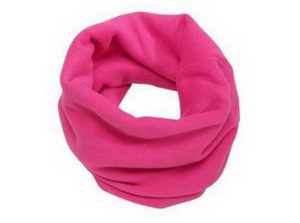
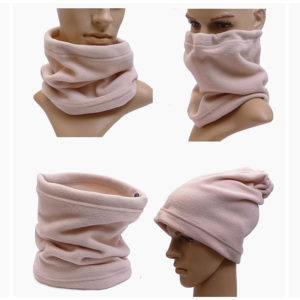
 A snood is called a tube scarf or ring scarf. This scarf has no ends and is not tied around the neck: its edges are neatly sewn together to form a wide ring. This design allows you to effectively drape the snood around your neck without fear of something accidentally getting knocked out or unraveling. Another convenience will be the ability to use the snood as a scarf and hat at the same time. The flexibility of the ring allows you to make a kind of hood out of it.
No wonder that Snoods, having come into fashion several years ago, are not losing ground from season to season. Today, from a trendy novelty, they have become familiar classics that many women have in their wardrobes. By the way, not only women, the versatility of such a scarf allows you to create models for men and, of course, for children.
Interesting! In foreign online stores, snoods can be found as infinity scarf.
It deserves this poetic name due to its shape. When folded, it can resemble a figure eight - an infinity sign.. And when unfolded, the ring has neither beginning nor end.
Snoods can be either knitted or sewn. Thanks to their simple and universal shape, they can be made quite quickly with your own hands. Just as your imagination tells you. We recommend sewing a snood from fleece.
Sewing materials and tools
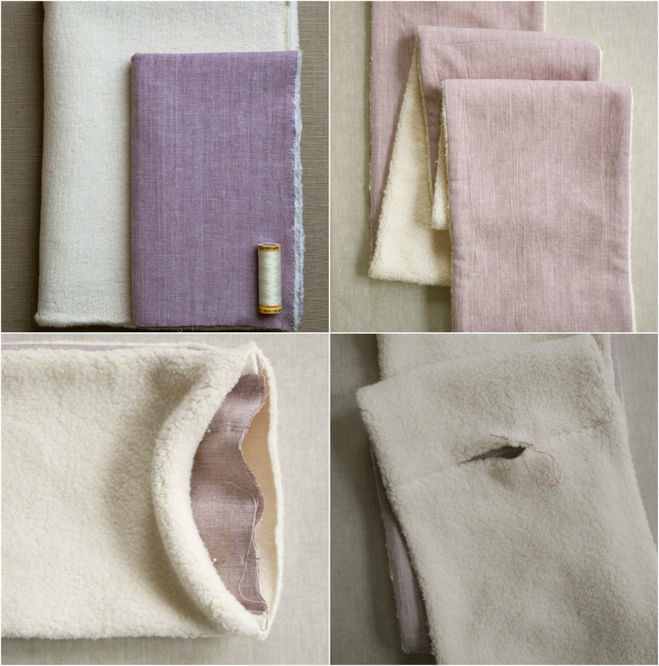
As for the fabrics, you can choose fleece (both natural and the more common synthetic), kulirka, ribana or footer. In general, almost any dense, warm and at the same time elastic fabric.
Attention! It is better to make things from a cooler a little smaller - it stretches very well.
To sew, you will need a regular sewing machine, threads to match the fabric, scissors and a ruler. The product is cut in a straight line, as simple and easy as possible.
How to sew a snood
If you have at least minimal sewing skills, this model will not cause you any difficulties.
What measurements are needed for work?
The only measurement you really need is the circumference of your head. After all, the scarf should be easy to put on and take off even when folded in half.
Important! Be aware of the seam allowances: they will take up about a centimeter on each side.
The width is calculated according to your taste, but should not be less than the width of the neck - this is a scarf after all! You can “try on” the fabric in front of a mirror and determine which width will best fit into your wardrobe. Both as a hat and as a scarf.
Work order
 You will need fabric: slightly more than two circumferences of your head in length. You can choose the width to suit your taste. Just don't make the scarf too narrow, it should drape.
The snood can be made either one-sided or two-sided.
- For unilateral The width of the fabric will be twice the expected width of the finished product. It will be folded in half during sewing.
- For double-sided You will need to choose fabrics of matching colors.
The fabric is simply folded in half. In the case of a double-sided product - two pieces of fabric next to each other. A then stitched on the wrong side. Don't forget to leave a small hole in the seam. Through it you will then turn the scarf right side out.
Sewing a baby snood
 For example, we chose double-sided option. This is the most difficult model - if you can handle it, one-sided snood will not cause you any difficulties.
Step-by-step instruction
- Making a pattern. For a child 4–6 years old, it will be a rectangle 55x26 cm. For better protection of the neck in the neckline of the jacket, we will make the middle wider - 33 cm.
- Cut out two sides our snood. Don't forget the seam allowances!
- Place the pieces right sides together, sew at the top and bottom.
- Turn it right side out. The more accurately the details match, the more accurate our snood will be! To be sure, let's iron it.
- Sew the edges with temporary basting and try them on. product for a child. If it is large, the edges can be trimmed slightly.
Attention! If you are sewing a snood as a gift, you can do without trying it on. But it is better to know the head size in advance. And don’t delay with such a gift - children grow up quickly!
- Turn it inside out again and sew the side edges together.to make a ring. Leave a hole of several centimeters unsewn.
- Turn it right side out again. It's almost ready. All that remains is to quietly sew up our hole with a hidden seam.
Hooray, it worked!
 0
0