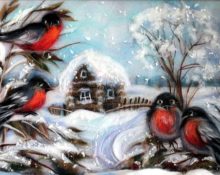
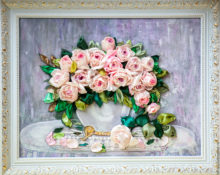
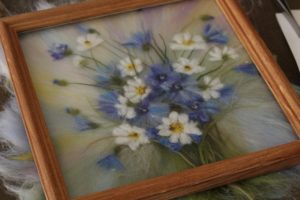
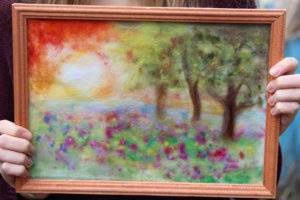
Making paintings from wool is a multi-layer process of laying wool material, in which the image is gradually created from parts of different colors.
Creating pictures is like painting. Volume is depicted using color and light and shade. In this case, wool plays the role of paints that can be used to create a three-dimensional figure on a flat canvas, which is confirmed by various photographs of the works.
Features of wool paintings
 Creation begins with the background, and only after that they begin with foreground objects. In this case, the material is not held together in any way. The finished product is a multi-layer picture, which is attached with a frame on both sides - glass and a cardboard base. In a word, the yarn is laid on the fabric and pressed against the glass of the frame.
For this work, you can use either a special frame or the most ordinary one purchased at a stationery store. In the second case, the yarn is held together in the process using clamps. With their use, the material will shrink faster and work will be much more convenient.
Note! It is better to complete the product not in one go, but in several! It’s better to spend a few days doing quality work than to get tired on the first day out of habit. In addition, speed will negatively affect quality.
Be sure to have a sketch of the painting you plan to make before your eyes. This can be either a painted picture or a printed drawing from the Internet. This will help you concentrate directly on the image itself. Without a sketch, it will be more difficult to complete the work, especially for beginners. If you don’t have time to run to print the image, you can at least open the image on your phone or tablet. In any case, the image should always be before your eyes.
It is necessary to apply glass very often. This will help you understand your mistakes in time and correct them. As a result, the work will be under glass, so you need to focus on exactly what ends up under the glass. Using glass, you can notice that the layer is too thick, or, conversely, in some place it is necessary to add material. It is under the glass that you can see the not-so-successful small details that can still be corrected.
Wool is a voluminous material that is compressed under glass and, as a result, slightly increases in diameter. It happens that, for example, you make a thin stem, but when you apply glass, it becomes clear that it is too wide for the plant and you have to redo this area of work.
At the same time, a painting made of wool is very easy to remake. You can correct the work a little, because it is multi-layered, you just have to remove the section of the work that you were unhappy with. It will take a little more time, but next time you will be more experienced.Don't be afraid to make mistakes, because in any case you can always correct them.
If you plan to finish the work tomorrow, be sure to fasten it with clamps and press it down with glass. Under the weight, the painting will shrink and work with it will be much easier.
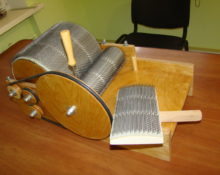
What you need to create a wool painting
 To make a painting you need to prepare:
- frame with glass;
- nail scissors;
- stationery scissors;
- material;
- glue stick;
- tweezers;
- iron for ironing.
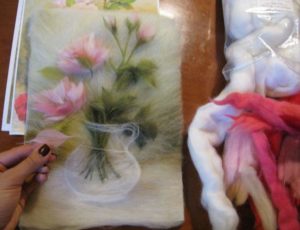
DIY wool paintings for beginners: how to make
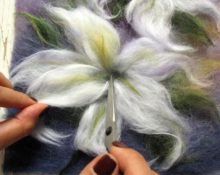
 First you need to disassemble the frame. Place a napkin on the cardboard base and carefully attach it with paper clips. Wrap the wool for the background tightly around your index finger and pinch it off to work as needed.
Place the plucked pieces on a napkin and glue with pencil glue. It is possible for the edges of the wool to extend beyond the frame.
The edges of the background are laid out in a darker color; towards the middle the wool should be of a lighter shade. Each piece of wool must be secured with glue.
After the base is ready, apply a clean sheet and iron it. It will be enough to run the iron over the workpiece a couple of times for the wool to set.
After this, we begin to further lay out pieces of wool according to the drawing. We iron each of the elements through a piece of paper. We remove excess lint using nail scissors. If you twist the strand in different directions, you can unwind it.
After the work is done, iron it again a couple of times through a piece of paper. This will remove excess fluffiness from the work. Remove excess elements using scissors.
Not only masters can create such masterpieces. The ability to draw in this case does not matter.The most important thing is desire, imagination and minimal skill in working with the material. Even a beginner will be able to create amazing works that others will appreciate.
Creative success!
 0
0