creativecommons.org
Beautiful bows leave no one indifferent - they are used to decorate business clothes, children's outfits, accessories and interiors. Every craftswoman knows at least several ways to create bows. One of the original solutions for modern design is a stylish bow on a fork made of satin ribbon. It is done very simply, but looks stylish and modern. Such decorations are used in various areas of design. With their help, you can create a unique hair hoop, a fashionable hair clip, or decorate a holiday table.
How to make a bow on a fork - step by step bow on a fork
Let's look at the easiest way to tie a bow on a fork:
- The work begins with preparing the necessary material. You need to buy several thin satin ribbons, find nail scissors and a kitchen fork. To make a bow using a fork, you need to choose a tool with long teeth.It is much more convenient to work with him.
- You will need the back of the cutlery. We lay out the tape at the base of the teeth. The end of the material remains on the right side. The length of the remainder must be at least three centimeters.
- We wrap the satin ribbon around the fork, and then insert it into the gap between the middle teeth. The free end remains at the top of the thumb. This situation makes the work process easier.
- We bring the upper part of the free end under the loop located on the right. It is formed by wrapping the tape around the device.
- We tighten the ends of the tape with maximum care. Do not tighten the bow on the ribbon fork too tightly. If the decoration turns out to be not symmetrical, you can always untie it and make it again.
How to make a bow using a fork - the second option
creativecommons.org
Another way to tie a bow on a fork, which is often used by craftsmen:
- Select the required number of ribbons. The size of the bow depends on the length of the satin stripes. You need to understand that you won’t get a too big bow from a ribbon on a fork. We prepare the material at the rate of one piece per product.
- We take the device in our left hand. We lay one end of the tape on it, leaving a free piece about two centimeters long on the right side. We hold the satin with our fingers in the central part so that the ribbon does not slip away.
- We bring the material under the corner of the device. The ending remains behind the fork on the left edge.
- We pass the right end of the satin between the second and third teeth. We get a knot that needs to be slightly tightened. A loop will form, which will also be tightened.
- We take the opposite end of the strip. We also thread it between the second and third points.Through the loop, which was previously slightly tightened, we draw this part of the tape.
- Carefully tighten the end threaded through the loop. The bow on the fork, the step-by-step production of which is completed, can be used for decoration.
In some cases, the end of the tape is too long. You can simply cut it off - the decoration will not be damaged.
How to make a ribbon bow on an electrical plug
If you don’t want to use cutlery, you can tie a bow on a fork from an electrical appliance. This is quite easy to do. We follow the step-by-step instructions:
- We select a satin strip for decoration;
- We apply the short end of the material to the pin on the plug and hold it with our fingers;
- We wrap the working side of the tape around the pin;
- Using a figure eight we move to the second pin and wrap it;
- We repeat the steps twice on each base;
- We throw the endings one on top of the other;
- We wrap the second ribbon through the top and bottom of the previously wound material and tie it into a knot;
- The ribbon bow on a fork is ready, all that remains is to process the ends.
This method is suitable not only for working with atlas. You can make a bow on a fork from thread, lace, or ribbon. The decorations are beautiful and symmetrical. They can decorate any crafts.
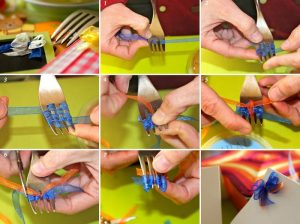
How to tie a bow using a fork - a double bow on a satin ribbon fork
The double fork bow requires a little more effort, but the creation process is still simple and straightforward. Initially, you need to select satin stripes of bright colors. Decorations made from raspberry, light green, and red materials look good. In addition to the satin, you will need scissors and a fork with long teeth. To make a bow on a fork, you will need to follow five steps:
- We fix the satin on the points of the fork. We wrap them with tape once.To hold the material, hold your left thumb on it. The fork is also in the left hand. This will make working much more convenient.
- Again we wrap the fork with satin twice, since we are making not a single, but a double bow.
- After two windings, two loops are formed. When viewed visually, they are combined into a single two-layer loop. We thread the free end of the strip through it.
- Carefully tighten the ends of the tape. We remove excess length from the ends using scissors.
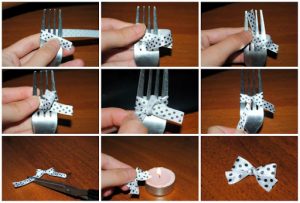
Small bow on a fork - master class
The little bow on the fork is a real work of art. Despite the simplicity of the technique, the products are original and neat. They are perfect for decorating jewelry, accessories for various hairstyles and costumes. A miniature bow will complement earrings, hairpins, a necklace or a dress. Such decorations are often used in decorating gifts and emphasize the beauty of interior solutions. It is difficult to tie a miniature bow with your fingers. This problem can be solved using a fork. Children will surely enjoy the process of creating decorations on cutlery. It consists of the following steps:
- To get the minimum size of the decoration, you need to take a ribbon no more than a centimeter wide. The length is independently adjustable.
- The fork should be in the master's left hand. We throw the right edge of the tape over it, place our thumb on the satin, fixing the positions.
- We draw the right end between the first and second points on the right side along the bottom, as close as possible to the base. We bring the tape up.
- A loop is formed. We insert the second end of the atlas into it and make a knot. Repeating the knot made on the previous one will help increase the strength of a small decoration.
- Remove the finished bow from the points, carefully straighten it, and remove the length of the tails if necessary. It is important to ensure that the tape does not curl during operation.
How to tie a ribbon bow on a fork - a beautiful double bow
There is another way to make an original bow from two multi-colored ribbons. To do this, you need to follow four simple steps:
- We select two satin ribbons of different colors. We pass one of them through one tooth of the device. Visually, a checkerboard pattern is obtained - one tip is above the material, the other below it.
- We thread the strip in a similar way until we get five tiers. We squeeze and move the material towards the ends of the points, freeing up space for satin of a different color.
- We begin to pass the second ribbon between the central teeth at the base. On the reverse side it should exit through the upper end of the previously put on material.
- We tie the second strip with a strong knot. We get an original, even bow in two colors.
 0
0