Before you print the pattern, you need to determine the printing method. At home, a printer and an A4 sheet are used. After printing is completed, a solid pattern is formed from the sheets. To do this, they are glued together with transparent adhesive tape. The second option is to use a plotter. This is a special, wide-format printer that allows you to print on large sheets of A3, A2 and even A1. In this case, the pattern will be solid. But such equipment is rarely available at home. You can contact a copy center or print it in the office, if possible. It is advisable to open a document with a drawing on a computer or laptop; not every phone will be able to load a large-scale file, especially in PDF format. To set up printing, use the free Adobe Reader program.
Printing a pattern on an A4 printer is an easy way
The easiest way to print patterns is that they come as a ready-made set of A4 sheets.You don't have to spend a lot of effort on such a printout. Initially, the document is downloaded. It is then sent for printing. In this case, the printing method is standard.
You should first check the scale. Then we look for the page containing the control square. In most cases it is marked with color. This page is printed first. It is used to check the conformity of the dimensions indicated in the drawing. The standard parameters for the edge of a square are ten centimeters.
If the figure on the sheet corresponds to the stated parameters, we begin to print the remaining pages of the pattern. Then we glue the pattern pages together with clear adhesive tape.
How to print a life-size pattern pdf
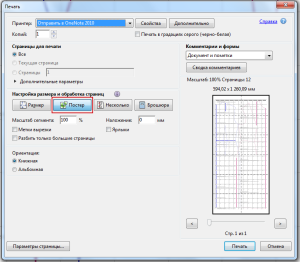
The operating principle is not much different from the previous one. Adobe PDF Reader software is used for printing. You can use another application if it is installed on the laptop in advance. Some programs can be embedded into the browser itself. PDF patterns require a test pattern on the first or second sheet. The exact size is indicated here. It is identical to the previously given parameter. The edge of a square is ten centimeters, one or two inches. Before you start printing, you must set the actual size in the settings of the printing device. Further:
- On the test square, measure the edge of the square using a ruler.
- If the parameters match, we move on to the rest of the print. Otherwise, we return to the settings, change the settings and reprint the test sheet.
- Some sheets contain recommendations for sewing the product. On other pages there are elements of the drawing.If desired, you can print just the pattern, leaving the instructions open on the monitor.
- Paper should be fed into the printer carefully so that the sheets lie perfectly flat.
- Place the pages next to each other. Often the recommendations indicate how to properly place the sheets. You will need a large, flat surface to work with. You can cut the pattern on the floor.
- Having laid out the images in the correct order, you need to move the pages as close to each other as possible. They should not overlap one another. For connection we use transparent adhesive tape.
For some crafters, the thickness of standard printer paper seems too thick. In this case, the pattern is transferred to specialized sheets for patterns. This will also allow you to save the main layout and use it again. It will not be damaged by pins or needles. To redraw the pattern, you need to lay out thin paper on a flat surface. Place the printed parts on top. Attach them with tape at the corners. Trace along the contour with a pencil, observing the size. Any mistake in the future will affect the finished product.
 0
0