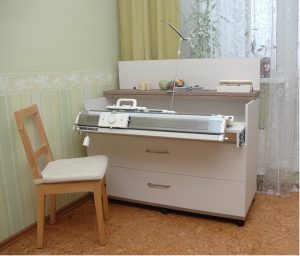
Knitting by machine is an exciting activity that requires not only skills and patience, but also a specially equipped workplace. A DIY knitting machine table is an excellent solution for those who want to create comfortable conditions for their hobby. It will also come in handy to optimize the space for storing necessary materials and tools. In this article we will share with you instructions and a drawing of a table for a knitting machine. We will also offer a drawing of a chest of drawers for a knitting machine, which will be an ideal addition to your workplace.

Preparation and materials
Before starting work, you must carefully prepare and collect all the necessary materials. It is important to consider the size of the knitting machine. The table should be comfortable to use. It should also be roomy enough to accommodate all the necessary accessories. To create a table you will need the following materials:
- wooden slabs for the table top and legs;
- screws and angles for fastening;
- wood glue;
- varnish or paint for finishing;
- tools: saw, screwdriver, hammer, ruler, pencil.
Create a drawing
Before you begin actual production, you need to carefully consider and prepare a drawing of a table for a knitting machine. The drawing must include the following items:
- exact dimensions of all elements;
- location of fasteners;
- location of additional shelves or storage boxes.
Don't forget to make room for a foot drive (if your knitting machine has one). Also, consider sufficient space for the free movement of fabric.

Step-by-step table making
Making a table for a knitting machine with your own hands begins with preparing all the parts according to the drawing. It is important to carefully cut out all elements. Then worry about ensuring smooth and clean edges. Assembling the table begins with the frame: first, the legs are attached to the tabletop. Then additional shelves and drawers are added. All connections must be as reliable as possible. Use angles and screws, and in some places wood glue.
To store accessories and threads, you can add a chest of drawers or shelves to the table. The drawing of a chest of drawers for a knitting machine assumes the presence of several drawers, which can be placed under the tabletop or on the side of the table. This will allow you to organize the space so that everything you need is always at hand.
Finishing
After assembling the table, its surface should be thoroughly sanded and covered with varnish or paint. This will not only give the table a finished appearance, but will also protect the wood from damage and moisture.The choice of shade and type of coating depends on your personal preferences and the general style of the interior in which the table will be located.
Conclusion
Creating a table for a knitting machine with your own hands is not only an opportunity to create a comfortable workspace, but also a great way to show off your carpentry skills. By following the suggested recommendations and carefully working on each stage, you can create a functional and beautiful table that will become an indispensable assistant in your creative process.


 0
0


