Not only bracelets can be made from rubber bands. A huge number of descriptions for this type of creativity fall on the share of small figurines that are usually used to create keychains. For me, the cutest animals are the ones I will talk about working on in this article.

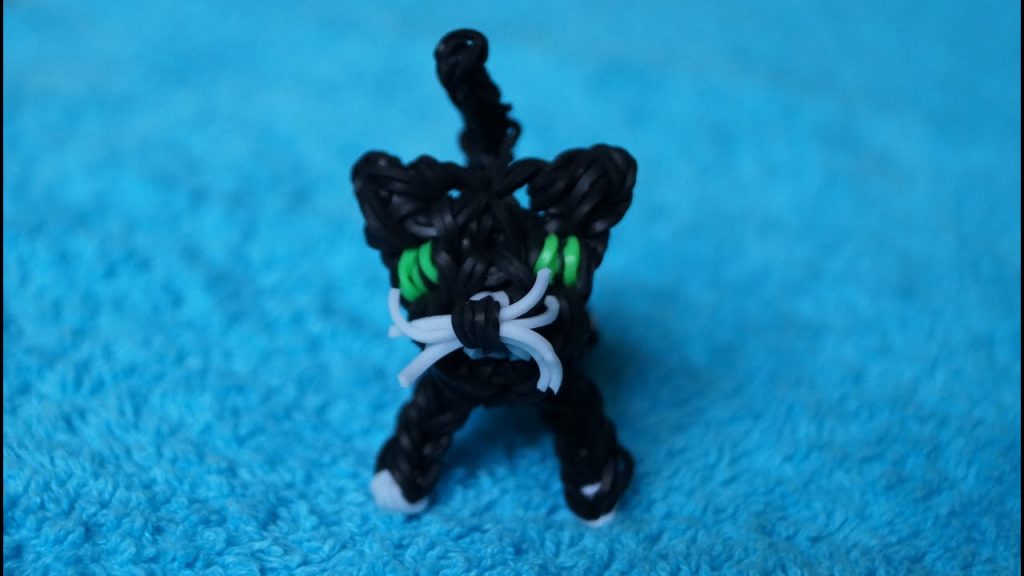
Cat
To work on this funny figure, we will need elastic bands of the main color (I have white), as well as black, blue and pink.
- Let's start working from the tail. We take 1 res. (hereinafter, without special notice, we are talking about elastic bands of the main color) and put them on in 4 turns on the left st.
- One white res. we put it on both columns. in 2 turns, we throw off the lower elastic bands from the right st. for this res.
- Throw in a cut. in two turns, we drop elements from the left and right columns onto it. We repeat this a total of 9 times, counting this and the previous cut. Next we will weave the body.
- We put 2 cuts on both columns, throw the previous ones on it.
- We simply put 1 cut on the right column, then a pair on both columns.We remove the previous rubber band on them and the rest too.
- We throw on a couple of cuts, throw off the lower cuts. from two columns.
- We repeat steps 5 and 6. We center the resulting loops from looser elastic bands. Then we’ll transfer everything from the left column to the right.
- We insert the hook into the first loop after the tail. Throw a couple of threads onto the hook and pull them through the loop. The second end is on the hook, we put both ends on the right post.
- We will weave a foot, it starts with a black cut. – we throw it in 4 turns on the left st.
- We throw a couple of white cuts on two columns, and throw black ones on them.
- Let's throw on a pair, throw off the elements from the left and the top pair from the right.
- Let's throw on a couple, throw them off like the previous ones. Then another couple - and now we drop a couple from the left column and 3 pairs from the right column.
- We grab the free loop closest to the “tail” (from step 7) from the inside and throw it over the right st.
- Let's throw a couple of res., throw two res on them. from the left and three from the right st.
- Let's throw on a couple, throw off a couple of cuts. from each station
- We throw the second free loop, as in step 13, from the inside onto the right st.
- Let's repeat step 14.
- A couple of cuts. from the left st. let's move it to the right one.
- We make the 2nd leg according to step 9, repeat steps 10–12 and 15. We wove the left side of the cat, now we need to make the right one.
- We transfer all the elements to the left column.
- We repeat steps 9–11, only we throw a black one on the right stitch. The top pair of cut. on the left station let's move it to the right one.
- One paw is ready, let’s weave another one, repeating all the steps from step 20.
- Now you need to attach the legs to the body. We repeat step 8, only we drop the elements onto the left column.
- We throw on a pair, throw off the top 2 pairs from the left. From the right column we drop the elements from the upper foot.
- We find two free loops.Throw the one closest to the tail onto the left st.
- Throw on a couple of cuts, throw off 2 from the right and 3 from the left stitch.
- Repeat step 15, place the 2nd free loop on the left st.
- Let's repeat step 25, throw on a pair, move 2 pairs of cuts onto it on the left, and 3 on the right.
- For one more pair of cuts. Let's remove all the elements from both columns. The cat's body is ready.
- We begin to make the head, repeat step 15.
- To the right st. in 4 turns we place the pink cut.
- We'll throw a couple of black ones on both stitches, and we'll throw pink ones on them.
- We place a pair of whites, throw blacks on them, then whites.
- From the left st. We transfer a pair of white ones to the right one.
- We insert the hook into the first loop of the neck and use it to pull through a pair of white ones. The second end of the cut. on the hook, then placing them on the left st.
- Add a couple of white ones, remove all the elastic bands from the left stitch, then repeat step 15.
- Let's make an eye. Throw a blue elastic band over the right st. in 4 turns. Elastic bands from the left st. Let's throw it on the right.
- Let's make an ear. To the left st. twist the white res. 4 turns, add a couple of res., throw the elastic bands on them on the left.
- Let's add a pair, throw everything from the left and 4 pairs from the right stitch onto them.
- We'll move the elements from the left to the right.
- Let's insert the hook into the loop formed on the thrown elements after the previous point (as if in the eye), and move it to the left st.
- Let's add 2, throw elements from the left column onto them.
- For 2 more new ones we will throw everything off the left and 3 pairs from the right.
- We transfer all elements to the left st.
- We repeat step 34, only we place the elements on the right st.
- Add 2, drop elements from the left column onto them, then repeat step 15.
- We form the second eye on the left st. as in paragraph 36., we will transfer the elements from the left to the right column.
- Similarly to step 37, we make the second ear, only on the right st.
- Let's mirror steps 38 and 39, all elements should be on the left column.
- Let's repeat the steps from step 40, placing the “ear” on the right st.
- Let's repeat step 41 (discard the elements from the right), then mirror step 42.
We throw 1 elastic band on the slingshot, throw all the elements onto it, throw the remaining ones onto the hook and tighten the loop. Let's hide it and also make a mustache by threading 4 black elements through the “nose” and cutting it off. Insert black rubber bands into the eyes. The cat is ready!
@YouTube
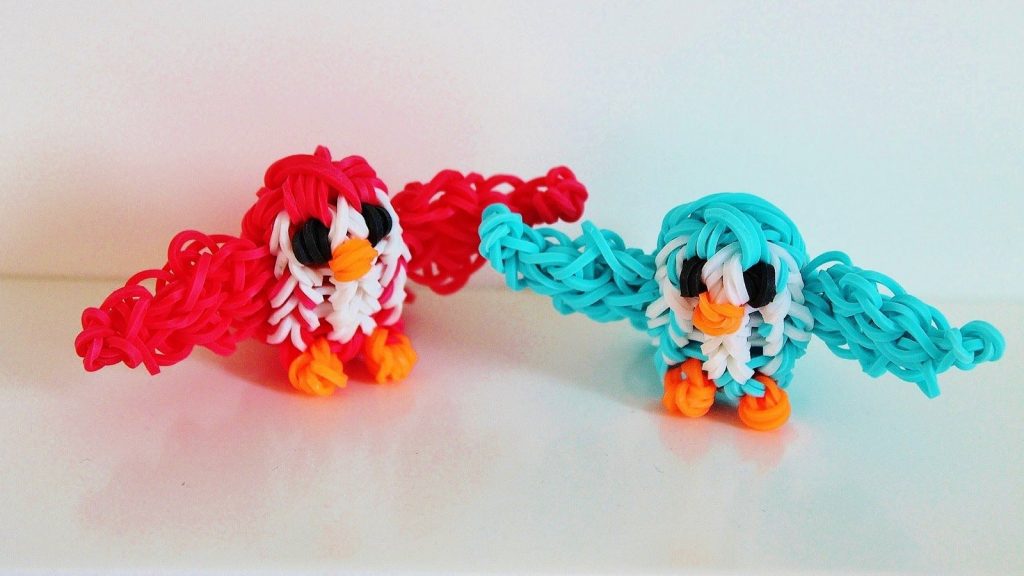
Owl
You will need rubber bands for the main “body” of the owl (I have blue), orange, white and black.
- We wind one blue one in 3 turns on the right st.
- Let's throw 2 (hereinafter without instructions - blue and on both columns), throw off the bottom ones from the right stitch. Let's move everything to the left st.
- We screw the orange element 4 turns onto the right st.
- Let's add 2, throw orange on them from the right and blue from the left.
- Let's add 2, drop the bottom ones on them.
- Repeat weaving step 5 2 more times. Let's transfer everything from left to right.
- Insert the hook into the very first loop (which was 3 turns), throw it over the left st.
- Let's add 2 white elements and drape them over the parts only from the left st.
- Let's add 2 more whites, and discard the previous whites onto these two.
- Repeat step 9 2 more times, transfer the white elements from the left st. to the right
- Using the same hook, we transfer the blue loop from step 7 into which the hook was inserted to the left st.
- Let's add 2 blue res., drop elements from the left column onto them and move everything to the right one.
- Let's repeat step 3, only on the left st.
- Repeat step 4 in mirror, then step 5 three times.
- Let's add 2 res., throw off all the elements on them sequentially, first from the left, then from the right. The body is ready.
- We begin to weave the head.Add a couple of blue elastic bands, throw the bottom ones over them, repeat again and throw everything onto the right column.
- Res. screw black color 4 turns onto the left st. This will be the eye.
- We throw a couple of blue elements on both stitches, and throw black ones on them. Then blue from the right st. we throw it there.
- Let's add a couple, throw off the bottom ones, and transfer everything to the right one.
- Place the hook under the first single loop after the white “breast”, put 2 orange elastic bands on its head, and pull it through the loop. Let's grab the second end of the orange elements and throw the resulting 2 pairs onto the left st. This will be the beak.
- Let's add a couple of blue ones and throw some orange ones on them. Let's transfer everything to the right st.
- We repeat the steps from step 20, only add a couple of blue cuts in this way.
- Add a pair of blue ones, drop everything from the left, move the top pair from the right st. to the left.
- To the right st. We wind the black cut in 4 turns. - second eye.
- Let's throw on a pair, transfer the black one onto it and do everything from the left st.
- Again, add 2 cuts, drop a pair from both sts.
Let's throw on 1 blue one, throw all the elastic bands on it. Let's remove the last cut. on the hook, tighten the loop. It turned out to be an owl, we'll straighten everything out. Let's add tassels to her ears: place the hook under 4 loops on the side of the tail of the last loop, thread the blue thread there, tighten the stitch. Repeat for the other side. Let's cut them in half. The figurine is ready!
Useful tips
As we describe the figures, you will notice: in order to make the element more dense, you need to throw one elastic band over the slingshot twice. And to make it looser, you need to throw 2 elastic bands on both posts.
I would also like to note that slingshots come not only from two columns, but also from four.Needlewomen even came up with the idea of replacing them with a regular fork - there are a lot of such master classes on the Internet. But the more columns, the more difficult the work will be - take this into account.
If you do weaving with children, it perfectly develops fine motor skills. Just don’t give rubber bands to very little ones: the elements are small and easy to swallow or even inhale.
If you are short on funds, buy ready-made kits. There are usually rubber bands, a slingshot or machine, and a hook. When the opportunity arises, you can always buy better tools.
The technique of weaving animal figures is suitable for children and adults, bringing a lot of pleasure from the process. This is a truly meditative activity, and ready-made cute animals will serve as funny accessories or will simply be elements of a needlewoman’s ever-expanding collection.
 2
2