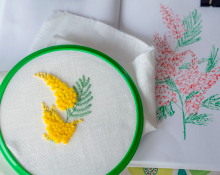
Ribbon embroidery is a very interesting activity. It has come down to us from time immemorial and is now becoming increasingly popular. And it’s not surprising, because each such product is a real work of art.
Flower bouquets made using the ribbon technique look especially beautiful. Due to the volume of embroidery and the slight shimmer of satin ribbons, the compositions look simply unforgettable.
And if you also use acrylic paints and highlight the elements of the bouquet or unobtrusively plant a butterfly or dragonfly on a flower, it will be simply a masterpiece!
In our article we will tell you how to embroider a spikelet with ribbons.
Ribbon embroidery - spikelet, master class

Embroidering spikelets is a fairly simple task. The following materials will be needed for work:
- The material for embroidery is canvas.
- Hoop.
- Satin ribbon, 5 mm wide – yellow.
- Satin ribbon, 3 mm wide, is also yellow, but a tone lighter than the previous one.
- Shiny threads to match the color of ribbons for embroidering antennae.
- 2 needles: regular and with a wide eye - for ribbons.
Let's get started with ribbon embroidery - spikelet:
- We prepare the canvas: cut out the required size and sew it with an overcast stitch.
- Insert the fabric into the hoop.
- We transfer the diagram of the spikelet or simply sketch out the drawing with thin chalk.
- We make a knot at the end of the yellow ribbon and pull it from the wrong side to the front.
- Adjust it so that it faces up and stick it into the top point where the first grain should end.
- Also embroider all the other grains. But place them at a slight angle, like a real spikelet. Keep in mind that the grains of a spikelet are small at the top, larger towards the bottom, and small again at the end.
- So we embroider the entire spikelet. When finished, take a second, lighter ribbon and stitch it through each grain with a second layer. Due to the smaller width of this tape, additional volume of the spikelet will be created.
- We take a simple needle, thread an iridescent thread into it and embroider antennae.
- The leaves and stem are made like this: we draw a ribbon at the base of the stem, twist it 2-3 times and stick it into the end of the stem. We stretch the ribbon and secure it.
That's all, the embroidery with ribbons - ears of wheat, is finished.
Using this principle, you can make not one, but several spikelets. You can play with flowers - embroider some with a little greenery. After all, nothing is the same in nature. A slight difference in colors and sizes will only benefit your painting.
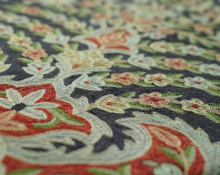
Embroidery - plant motifs, is now very popular. What kind of plants and herbs are not embroidered by craftswomen!
For example, needlewomen have adapted to making grass such as feather grass with fluffed woolen floss threads. And this is done like this:
- The thread is brought to the face of the product, secured with a loop knot and cut, retreating 5 centimeters from the outline.
- This is how a whole canvas is made, depending on the design. The threads are attached very tightly, imitating steppe feather grass.
- We take a toothbrush and fluff our future feather grass.
- In the foreground you can put out a few leaves cut from a green ribbon. They are glued using a glue stick.
Ribbon embroidery - grass is done in different ways, depending on how a particular grass looks.
Ribbon embroidery – dragonfly, master class
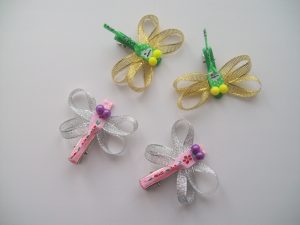
If you have already started embroidering plant motifs, then how can you do without a dragonfly? Dragonflies, butterflies, ladybugs - serve as decoration for any panel, giving them a natural look and feel.
Embroidering a dragonfly is not a difficult task. And the result will definitely please you.
So, we embroider a dragonfly:
- We stretch the canvas onto the hoop.
- We prepare a needle with a dark narrow ribbon (dark green, blue or black).
- Schematically draw the contours.
- We begin to embroider: from the inside out, we bring the needle to the face and proceed to the insect’s head. On the front side we tie the ribbon with a ribbon knot. We need to fold this knot in half and tighten it, stitching it through from top to bottom. We take out the needle and make a stitch across, hiding the bottom knot.
- Use the granitos stitch to create the body of the dragonfly. It should be voluminous.
- From the end of the body we draw the tail of the dragonfly - in one stitch, slightly longer than the body. The ribbon needs to be twisted several times. We return to the end of the body and wrap the ribbon around the tail several times, moving towards the end. We fix it. Ribbon embroidery - a dragonfly would be incomplete without its charming transparent wings.
- Take a piece of any transparent, preferably shiny, material.We cut out 4 rectangles from it, lightly singe it with a candle and sew it to the dragonfly’s body with a straight stitch. Our dragonfly is ready.
If desired, you can add four legs to it, which are embroidered with simple dark threads. Or you can embroider the wings themselves with thin threads. It is better to use threads of the same color as the dragonfly’s body. If you want, you can also embroider the eyes.
It all depends on your desire and your imagination.
Ribbon embroidery - butterfly - is done using the same principle. The main thing here is to try to ensure that your creation is as close to the original as possible. To do this, you need to open a picture on the Internet depicting the part you need and get to work. I assure you, the result will surprise and delight you.
 0
0