Unintentional dissolution of papers, forgery, refusal to check or store, return of applications unexamined - these are just some of the consequences of improperly systematized internal documentation. To avoid fines and other unwanted incidents, you should take a responsible approach to organizing the firmware.
Regulations governing the norms of stitching documents with threads
 There is no GOST containing a detailed description of the procedure. GOST R 51141-98 “Office work and archiving” does not address the issue of firmware, although some sources erroneously refer to it. In fact you need to be guided exclusively by the internal charter of the enterprise, the standard instructions for office work from 2005 and order No. 76 of the Federal Archive (from December 2009). Information of interest is presented in paragraph 3.5.3 and Appendix No. 24.
What is needed to lace the sheets?
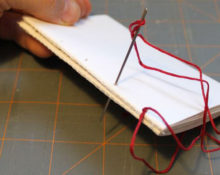
 To carry out the procedure, you must first familiarize yourself with the accompanying documentation, and only then proceed to selecting tools. Moreover, their type often depends on the thickness and importance of a particular document. So, when handling very thin papers, it is easier to use a needle; with medium-sized ones, it is easier to use a hole punch. The fastening of voluminous, dense folders takes place with the participation of a screwdriver and a moderately thick rope.
Typically, firmware is installed using the following items and devices:
- hole puncher;
- scissors;
- stitch file;
- threads or braid;
- needle;
- awl;
- glue.
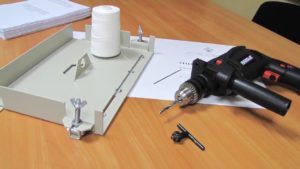
A drill is sometimes used to create holes in particularly thick toms. However its use requires caution, skill and the correct drill diameter. As for glue, the rules are extremely simple. Rubber is prohibited, as it can be printed on other sheets. Good options: regular printing PVA, casein and silicate. Each has its own strengths and weaknesses, but overall they are all approximately equal to each other.
Important! Silicate glue leaves behind a yellow crust, and the pencil does not provide the level of fixation necessary for protection.
There are also special requirements for threads. They should be moderately thick, very durable and non-flowing. Mylar tape meets these criteria. If it is missing, you should use a harsh thread. Cotton is also suitable, but only if it is folded many times (to thicken and increase tear resistance).
Important! The manual method using thread is not the only possible solution. Special machines and machines have been invented for stitching.Some of them fasten individual sheets with a spring, plastic or metal (the first option is easy to unstitch). Others provide adhesive seamless bonding.
Step-by-step instructions on how to stitch documents with thread
The key difference between the methods is the number of holes and the distance between them. According to this criterion, methods designed for 2, 3, 4 and 5 holes are distinguished. An additional angular version of the firmware is sometimes used. However, it is suitable for a limited number of papers (not for files and reports).
In two holes
The simplest option. Suitable for handling internal papers that will not subsequently be submitted to external authorities for review.
Algorithm of actions:
 print the document, organize the sheets;
- punch holes with a hole punch;
- thread;
- make a knot on the thread (should not be on the front side);
- cut a sheet from the stitching file;
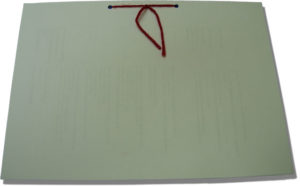
- glue it over the knot so that the ends of the rope are not completely covered (they should end lower);
- fill out the firmware sheet.
 print the document, organize the sheets;
The items to be filled out are already printed on the firmware sheet. All that remains is to make inscriptions of the appropriate nature. Recommended paste color: blue or black. Usually this issue is regulated by standards drawn up at the enterprise itself.. If there is no such document, the work is carried out with a blue pen.
If there is no sheet of stitching, then cut out a piece of white paper measuring 3x5 cm. Next, glue it and put the inscription “stitched and numbered.” In addition, the number of pages is indicated, as well as the details and signature of the responsible person, and the date. There is a seal on top.
Important! A wax impression can be used instead of a seal, but it is considered an outdated and less reliable form of filling.
Three punctures
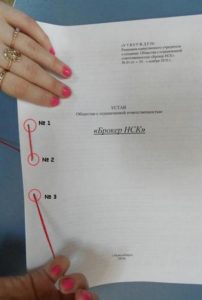
To begin with, it’s worth mapping out exactly where the holes will be located. Ideally they must be centered unless otherwise required. They should also be at an equal distance from each other. They must be placed on the left edge of the document.
Step by step representation of the process:
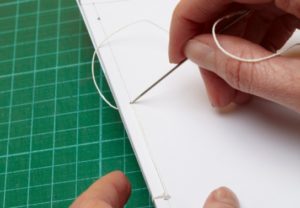
 make a puncture with a needle exactly in the middle of the left edge of the sheet (the needle enters from the back side and comes out from the front side);
- perform a second puncture (the needle enters from the front side of the document and comes out from the back);
- make a third puncture (the needle enters from the back side and comes out from the front side);
- reinsert the needle into hole No. 1;
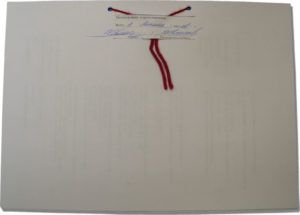
- tie a knot (leave at least 7 cm from the thread);
- glue the firmware sheet;
- assure.
 make a puncture with a needle exactly in the middle of the left edge of the sheet (the needle enters from the back side and comes out from the front side);
At four
Sequence of steps:
- making holes;
- inserting the needle from the reverse side (it should go into hole 2, counting from right to left);
- threading a needle and thread into 1 hole on the right;
- then the thread is again sent to the 2nd hole on the right;
- after that the needle is sent to the 3rd hole on the right;
- then move on to the far left puncture;
- return to hole 3;
- take it to the other side and make a knot.
When forming a knot, you need to ensure that the thread does not sag in any areas. She should fix the pages tightly and neatly.
At five
This technique is used extremely rarely. Usually supervisory and regulatory authorities are satisfied with the option with 3–4 holes. An increase to 5 indicates that the papers in question are documents of the strictest accountability and paramount importance. For example, this is how some tax reports are handled.
Important! If there are 5 holes, the glued rectangle should be cut out of tissue paper, and the holes should be located at a distance of 5 cm from each other.
The sequence of inserting the needle depending on the number of the hole (can be counted from any edge):
 3–4;
3–4;- 4–5;
- 5-4;
- 4-3;
- 3-2;
- 2-1;
- 1–2;
- 2–3.
 3–4;
3–4;At this stage, the thread must be secured with a knot.
To the corner
The charter and some papers of the trading industry can be sewn using the corner method. With this method, a single hole is made with a hole punch in the upper left corner. A ribbon (40 cm) folded in half is threaded into it. Insert it in such a way that the curved middle part is on the back side, and the ends are on the front side.
Next, the tails are threaded into the loop. This creates a knot. It needs to be moved to the non-front side of the document and secured with a rectangular piece of paper. On the piece of paper they write:
- stitched, numbered;
- number of sheets (letters and numbers, the latter should be in parentheses);
- the employee’s initials along with the signature (the last one comes first, its decoding is indicated after).
Requirements for the preparation of bound documents
 Do not stitch using a stapler, glue, or paper clips. They do not provide the appropriate level of protection: with such fastening methods, you can quietly remove the fastening element, remove the sheets, replace them or add new ones. If an auditor, tax service or other regulatory body sees a document stitched in this way, the organization may have various kinds of problems, starting with the refusal to accept reports and ending with the issuance of an ultimatum to immediately correct all important papers in the archives.
Important! If you doubt your own skills or are faced with the need to reflash a large volume of documents, it makes sense to turn to professionals for help. Services of this kind are provided by archives and printing houses. At the same time, there is no need to wait for immediate execution of the order due to the workload of organizations. They have a lot of work especially during the period of submitting reports and diplomas.
The number of holes actually plays an important role. When determining the required number, you should start from the importance of the contract. The simplest documentation in terms of content is stitched with 2 holes, and especially valuable documentation with 5 holes.
The distance between the holes is also taken into account. The best option: each is located at a distance of 3 cm from the previous one. To meet the requirement, preparatory alignment is carried out: they plan in advance where the holes need to be made. However Ruled lines don't always help. For example, skewed holes often occur when filing very thick documents or magazines. When working with them, you should use an awl and act extremely carefully. It is better to thread the thread used into the needle - it will help correct and accurate insertion.
Close attention is paid to page numbering. Key points on the issue:
- Arabic numerals are used;
- numbers are arranged in ascending order;
- Placement: upper right corner;
- the number must not go beyond the edge of the sheet;
- applications are also subject to numbering;
- numbering type for the application: continuous;
- when attaching a letter, the report is made starting from the envelope (the first number is placed on it);
- each page of the letter is numbered depending on the order of presentation;
- When working with a case presented in several volumes, the contents of each of them are numbered separately.
Special printing also requires an approach. It must be installed last and in such a way that it is simultaneously on the firmware sheet and on the document. If an individual entrepreneur does not have a personal seal, then he can skip this step.
Important! If the document is then inserted into a folder, then there is no need to glue the “stitched, numbered, signed” sheet on the back of the folder. The right place for this is the back side of the last stitched sheet.
When filling out the stitching sheet, there is no need to chop. Each piece of information should be easy to read. Abbreviations are also not allowed. In addition, you should format the entry so that it goes both on top of the document and on top of the pasted rectangle of paper.
Important! If certification is carried out on the basis of a power of attorney, its number and date of signing must be indicated.
 1
1