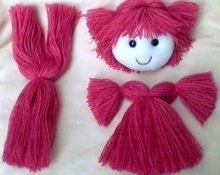
A doll is not only a favorite toy for little girls. Self-creation helps to make an original and bright decorative element, a Christmas tree toy or a hand-made gift. An important element in the doll is her hairstyle. When using several options, it is easy to create hair for a toy yourself.
Features of creating hair from threads for a doll
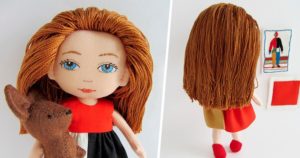
Making dolls yourself allows you to create an original and unusual toy that will fully meet the child’s requirements. Such an accessory will have a unique design and special comfort.
When making hair, an important point is the choice of material. The threads must be strong enough to withstand regular hairstyle changes and periodic washing. The best option would be yarn or wool. The structure of these materials is characterized by high wear resistance and resistance to damage.
Attention! When choosing such threads, you should make sure that there are no allergic reactions to the components.
An important aspect is the material from which the doll itself is made. For example. You can simply sew hair onto textile or knitted toys. Plastic or plaster have a strong base that is not suitable for use with a needle or sewing machine. In this case, you need to knit a special cap to which the woolen curls will be attached.
Reference! Instead of the above components, “grass” yarn or felting wool is also used.
Many craftsmen use tresses for needlework - special curls made from artificial materials. Such products are practically indistinguishable from real hair. The material has a special adhesive layer with which it is attached to the surface of the toy’s head. Before starting the process, you need to mark the location of the layers with a dotted line.
How to make hair for a knitted doll from threads with your own hands
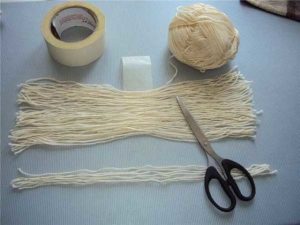
Hand-knitted dolls are particularly attractive and original. This product is suitable both for interior decoration and as a gift to a loved one. Several methods are used to create hair. To create lush and voluminous hair, it is recommended to use yarn.
Materials:
- yarn of the desired shade;
- scissors;
- thin hook;
- safety pins;
- doll.
The threads must be cut into pieces of the desired length. It is impossible to calculate a specific amount, since the number may vary depending on the desired thickness of the hairstyle itself.
Important! When forming curls, you should take into account that the thread is folded in half. When cutting, the segment itself should be twice as long.
The next stage is the formation of the hair growth area. It is located from the forehead, runs along the sides, behind the ears, and ends at the back of the head. For greater comfort, it is recommended to use safety pins with large heads. Using the tool, the location of the future hair is outlined.
It is recommended to start the process from the middle. The thread is threaded through the center into the hook. The loose ends are passed into the loop, the thread is carefully pulled out. The entire head is treated in a similar manner. Shaping the hair along the growth line should be done last. When finished, unnecessary pins should be pulled out. After a few simple steps, the doll's curls are ready. In conclusion, you can form the desired parting, trim the length or make the necessary haircut.
To make the doll more attractive, you can add bangs. The operating steps are similar to the process described above. Segments are cut from the threads for the future bangs. The length should be slightly longer than the final installation. Formation takes place in two stages. The first row is applied in a similar way, into each loop of the head.
One end forms a bang, the second is located with the main hair. When forming the second row, the threads are passed through the loop. One end is located on the bangs, creating volume, the second is with the bulk of the hair. At the end, the bangs must be cut, giving them the desired length and shape.
Note! Instead of a hook, a thin, durable needle can be useful when working.
How to make doll hair from wool threads
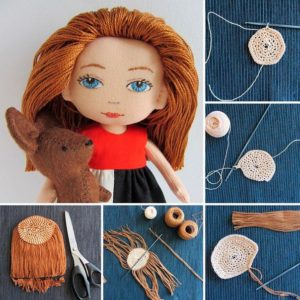
The use of wool when shaping hair allows you to create voluminous hair. In its actions, the process is similar to the method described above.The big advantage of this option is its functionality and versatility. The hair can be used as a wig. If necessary, you can try it on another doll, and also knit several options of different color palettes.
Preparation:
- wool threads of the required shade;
- thin elastic band for linen;
- scissors;
- hook;
- thin dense threads.
Thin threads are needed to create a cap to which the curls will be attached. The hat itself should fit snugly to the toy’s head. This will require knowledge of the glans circumference. An elastic band should be placed along the edge of the product. It is located in the bottom row. The elastic is inserted through the row, between the loops. The ends can be sewn together with thread, or tied into a tight knot.
Threads are cut into sections of required lengths, curls. When determining the length, please note that the thread is folded in half. To begin with, about 30 segments will do. As you work, sections can be added to create more volume and thickness.
Advice! It is recommended to leave one thread as a sample for subsequent sections.
The technological process begins from the bottom row. The thread is folded in half and the loop is threaded into the cap. The ends are threaded into a loop and the knot is carefully tightened. The entire series is worked out in the same way. It is recommended to make the lower edge, which is the hairline, denser.
After the growth line has been formed, you can begin to create the hair itself. It is advisable to place the upper strands through the row so that the hair does not turn out too voluminous. To create an attractive hairstyle, it is better to use a checkerboard arrangement of knots.
Reference! The threads can be unraveled into several fibers to form curls.
Re-threading a doll's hair with threads: recommendations and features
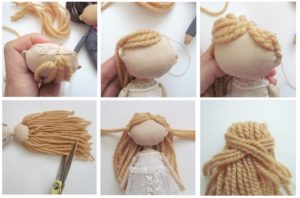
To update an existing toy, a hairstyle change is suitable. In this case, the hair needs to be reflashed - replaced with new material. The best choice would be tresses. They are a complete analogy to real curls.
During preparation, it is necessary to remove existing hair on the doll. The length can be cut as close to the head as possible. The tails located inside the body are carefully plucked out. This is necessary for high-quality application and adherence of the product to the surface of the toy. The gluing process itself is carried out in accordance with the rules indicated on the packaging. At the initial stage, it is recommended to make the first row. The strands themselves are located in the existing holes.
Such hair can be curled with a curling iron, forming graceful curls, or straightened.
A self-made doll is an original gift for any occasion. Lush long hair will help decorate the toy. Recommendations and tips will help you create chic, voluminous hair.


 0
0