According to the Chinese calendar, the pig is the symbol of 2019. It will definitely bring wealth, luck and prosperity. That is why today we will talk about how to make the symbol of the year with your own hands using yarn.
General recommendations for creating a piglet from threads
 How can you make a pig with your own hands? There are many options that can be found on the Internet. The choice depends on your taste, free time and the material you have for needlework. We suggest making piglets from threads.
From just one pompom you can make an original toy for an exhibition at school or kindergarten. This toy will be a suitable gift option for parents, grandparents. In addition, such toys can become real theatrical characters from the fairy tale “The Three Little Pigs.” Only for such a production it will be necessary to also make a gray wolf, but we’ll talk about that another time.
How to quickly and easily make a pig from threads
 To make a pig you will need:
- pink yarn;
- round ball;
- glue;
- plastic cup;
- needle, thread, scissors;
- colored sheets.
Stages of work:
- First you need to make all the yarn blanks. This is the body of an animal and 4 hooves.
- For the body you will need a balloon, which must be inflated to the required size. After that, take the glass and pierce it through. The hole should be near the very bottom. Pour PVA into a glass and pull a thread through the hole in the glass so that it is lubricated as it passes.
- Now you need to wrap the ball with thread from the glass. The strength of the toy will depend on the number of threads wound, so you should not skimp on the material.
Attention! It is necessary to make a toy several days before sending it to the exhibition. Because the glue will take several days to dry completely.
- The thread should wrap around the ball in a chaotic manner. Stop winding when the ball is difficult to see through the threads. Then leave the work to dry for a couple of days.
- After the glue has completely dried, you need to take a needle and pierce the ball. Carefully remove it from the workpiece.
- He performs the pig's legs in the same way. You need to inflate a long ball and wrap it with thread. You can make each leg separately, or you can make one long piece; after drying, it is cut into 4 identical hooves.
- The hooves are glued to the body, we leave the workpiece to dry and at this time we begin to make the muzzle.
- On colored paper you need to draw eyes, ears, and a nickel. We cut everything out and glue it with glue. You can also decorate the pig with decorative elements. For example, sew a flower made of ribbons onto his head. Or put a tie around your neck. In any case, the craft will turn out to be original.
- After this, you need to sew a rope, by which the toy will be hung on the Christmas tree.
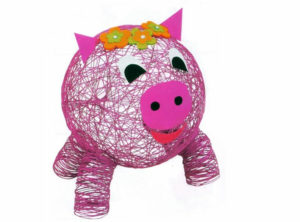
DIY thread pig: what you need
 This year the symbol is the Pig, so it is not surprising that the animal has become so popular. The cutest option for making a pig is a toy made from pompoms.
Making such a toy is very simple. The buboes used for work are pink, but you can also take a robe of any other color, then the toy will turn out to be more cartoonish.
Required material:
- pink threads;
- felt;
- compass;
- scissors;
- thread and needle;
- PVA glue;
- eyes for a toy;
- decoration for a toy; in this case, red felt was used to make a cap.
How to make a piglet with your own hands from threads: step-by-step instructions
 A bubo pig is a great gift for 2019. We suggest making a rosy-cheeked character out of yarn with your own hands. The work is done very quickly and even a person who has never done needlework can cope with the task.
In order to make a pig with your own hands, you do not need any skills, and to make a toy, improvised materials that every girl can find are suitable:
- First you need to cut out 4 templates. It is necessary to make two pairs of blanks - one pair is slightly larger, the other is slightly smaller.
- We take the thread and the first pair of blanks and fasten the thread between the cardboard rings. After this we begin to wind the threads.
- The volume of the toy depends on how many layers of thread are wound.
- After this, the winding is cut along the outer edge and a very fluffy bubo is obtained.
- It will not be possible to make it perfectly even the first time, so be sure to trim the edges with scissors.
- We do the same with the second pair of cardboard rings.
- After this, we move on to making the animal’s face. Using scissors, cut the threads. To do this, it is necessary to conditionally divide the bubo into two parts - top and bottom. The lower part will be the animal’s face, where the cheeks, coin and eyes will be located, therefore it is necessary to distinguish between these two parts. After this, the threads are cut to the required size. After this you should get a bubo, as shown in the photo.
- Then you need to glue on - eyes, ears, a nickel.
- To make ears, you can use pink felt.
- The pig's mouth is also cut out of red felt. So the animal’s face is ready.
- After this, you can cut a little more threads along the piglet’s body, leaving the longest ones in the belly area. This will make the toy even cuter.
- Then we move on to making the hooves. To do this, you need to make pom-poms using a regular fork.
- The essence of their manufacture is to wind the yarn around the tines of a fork. It is necessary to thread the thread in advance, which will then collect all the threads into a single bundle. After this, the yarn is wound onto a fork.
- Nicks are removed from the fork and tightened in the center.
- The workpiece is cut from the outside.
- We trim the resulting bubo on all sides, giving it the appearance of a perfect ball.
- Similarly, you need to make 4 more legs for the pig.
We attach each leg to a match and attach it to the body. Here's your cute bubo piglet! You can decorate it with a beautiful bow or cap.
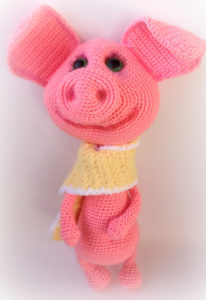
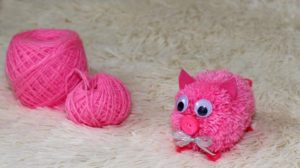
We also want to share an original hand-knitted product. This is a great gift option for loved ones and friends. This pig can be attached to a bag or backpack.
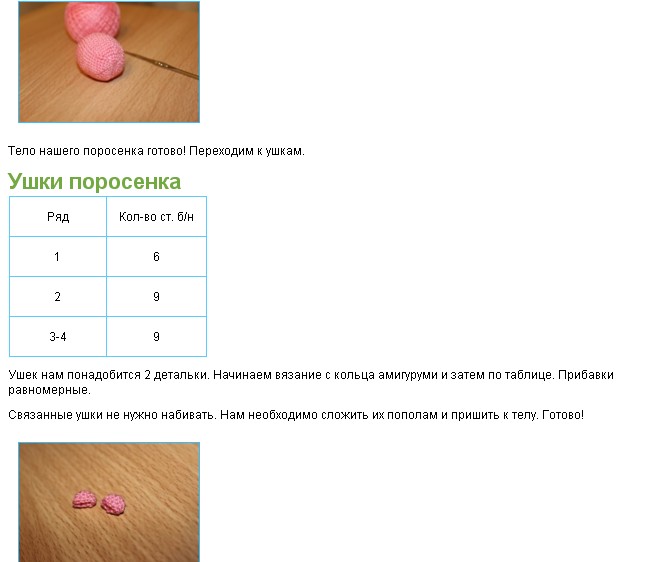
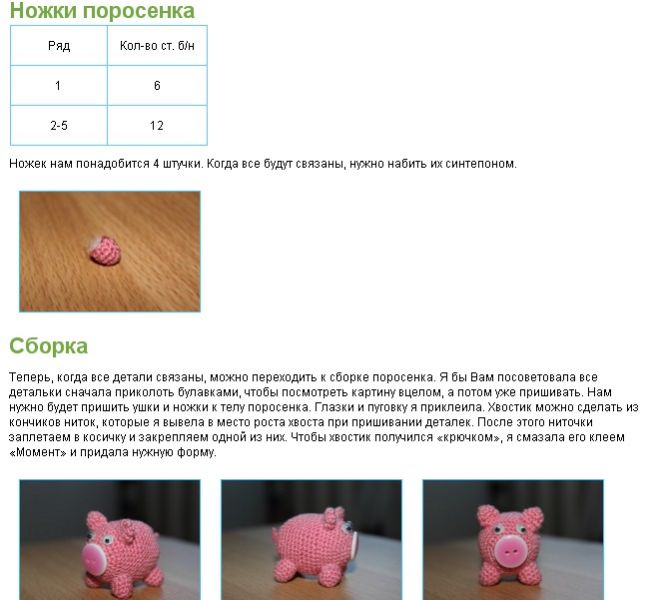
Work begins with a circle, 6 single crochets are knitted.After this, follow the instructions indicated in the image: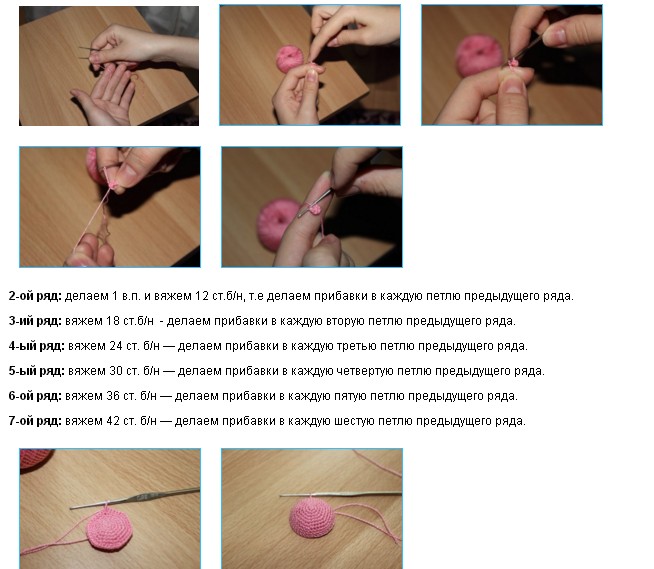
 In addition, you can make an excellent interior decoration using an ordinary plastic bottle, which is tied up and you get a funny pig. Truth be told, not everyone can make such a toy, because to do this you need to have at least minimal crocheting skills.
We make the symbol of the year with our own hands.
List of required materials:
- foam balls with a diameter of 6-7 cm;
- pink yarn;
- white felt – 1 sheet;
- glue gun;
- plastic eyes for a toy;
- toothpicks.
To work, you will need two foam balls, cut off the top of each of them a little, approximately 6-8 mm. After this, the balls are glued to each other with a glue gun. This is a blank of the head and torso of the symbol of the year.
After this, you need to take another foam ball and cut out a nickel and two cheeks from it. We cut a recess in each of the blanks so that they are well attached to the face.
The cheeks are glued to the head, and do not forget to leave a decent distance because you still need to place a nickel.
Then we begin to wrap the head with pink threads, while fixing everything with glue.
Attention! The threads should lie one after another very tightly so that there are no voids. But there is no need to tighten them!
After this, the piglet's body is wrapped with yarn of a different color.
The next step is gluing the nickel.
After the nickel dries, it also needs to be wrapped with pink threads and glued well.
Two ears are cut out of pink felt. Keep in mind that they should fit harmoniously with the animal.
The ears are also glued on using a glue gun. After this, you need to make punctures for the eyes with an awl.You can buy plastic eyes for the toy at any craft store. The eyes are glued to the piglet's face.
After this we begin to make the legs. To do this, you will again need a foam ball. We cut the ball into two equal parts and cut each part slightly diagonally.
After this, you need to cut out and felt decoration for the hooves and arms. You can cut out hooves from pink felt or print the finished piece on a printer.
The pig's legs are covered with heated foam. You can heat it up using an iron. After this, they are fixed with glue, and the unnecessary part of the material is cut off.
Then the piglet is given boot soles from foniamin.
The handles are made from the same foam ball and are glued using a glue gun. After that, the legs are strung on toothpicks from the inside and pierced through the body. Secure with glue if necessary.
You can decorate the craft with a bright bow, a scarf, buttons on a shirt, a flower, or a bright hat. After this, you need to draw the piglet’s nostrils and the work is ready.
You can hang such a toy on the Christmas tree, make it with your child, and you will not only spend time usefully, but also communicate with your child. A pig made from threads will be an excellent option for a gift. Make a pig out of yarn and it will definitely bring you good luck in the new year 2019.
Good luck and creativity!
 0
0