When there is snow outside and the cold penetrates through the thickest jackets to the bones, most people decide to take up a long-forgotten or newly discovered hobby. But what can be done? There are many options, but perhaps the most correct one would be to make a Bullfinch with your own hands, because who else but him is one of the most living symbols of winter! Such a fake will not take you much time, and then it will delight you every day; by the way, such a bird can be given as a gift to your loved ones or friends.
Bullfinch made of threads instructions
A bullfinch made from threads will not take too much time; you will need a maximum of a couple of hours to make it, but the effect it will give you throughout the entire time will be colossal.
So, what do we need to make this winter bird step by step, except time?
What you will need
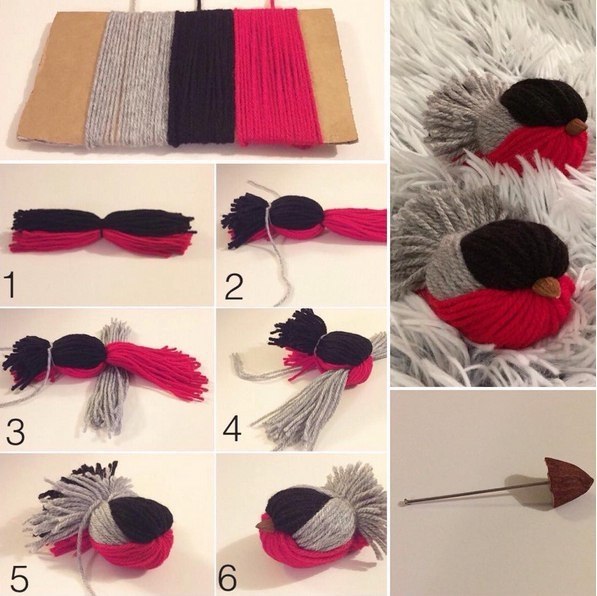
For this wonderful fake you will need:
- Wool balls are black, gray, and, of course, red, but if you want to create not an ordinary, but a magical bullfinch, you can take yarn of other colors.
- Scissors.
- Roasted sunflower seeds.
- Two eyes made at the factory; they can be bought at any craft store.
- Good glue moment.
This is the entire list of materials we need.
How to do
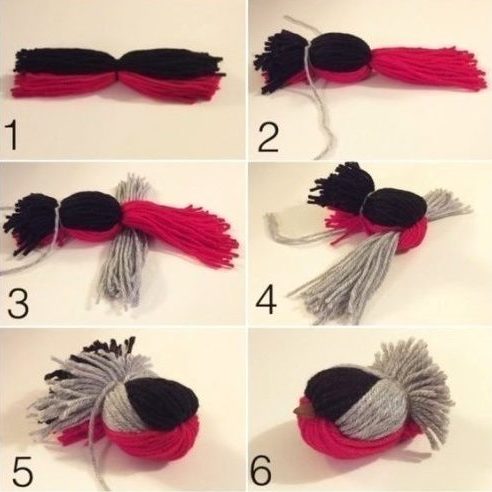
When you have prepared all the materials, you can start working.
- The first thing you need to do is cut the woolen threads into pieces thirty-five centimeters long, and the number of cut pieces will depend only on how thick the yarn is, but usually the number of cuts of any color reaches up to sixty pieces.
- Then take red woolen threads and put black yarn on top of them.
- Now you need to tie them using one black thread, you need to tie them very tightly.
- Now we bend all the black threads from one of the two sides to the other side. Let's put them on top of the black threads, and then knit them with red yarn using a gray thread (approximately in the center). Leave the end of the gray thread hanging freely.
- Now we take the remains of the gray yarn and put it under the red woolen thread.
- Then you need to wrap the red thread around the gray yarn.
- The next step is to tie it with the free ends of gray yarn to our future bullfinch tail.
- The next step is to wind the remaining ends of the gray yarn from the bottom up and at the same time back to the future tail. Then we even it all out so that it turns out symmetrically, and tie it with the remaining gray yarn. Align and tighten all the threads. Now we remove everything sticking out in different directions.
- The last step is to glue the eyes and beak-seed using instant glue.
The bullfinch is ready, you can place it anywhere, or give such a wonderful fake to your friends.
Bullfinch made of thread and cardboard
Also, a bullfinch can be made not only from threads alone, but also using cardboard.
What you will need
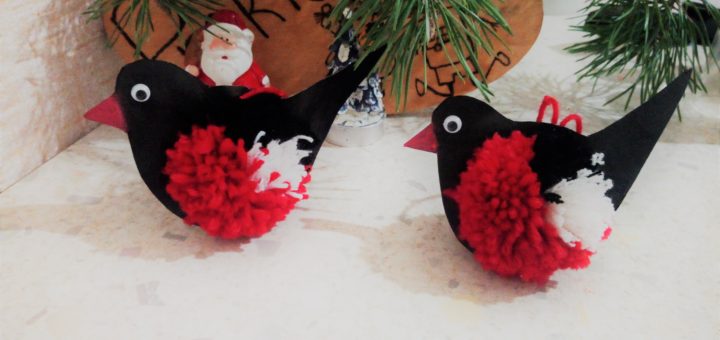
Actually, to make it you will need the following materials:
- Cardboard, you can use any box.
- A sheet of white A4 paper.
- Brush with watercolor paints.
- Compass.
- White, gray and of course red yarn.
- Scissors with sharp ends.
- Black pencil.
- Needle with a wide eye.
- Absolutely any glue will do.
When all the materials are ready, you can start working on the bullfinch, a truly winter bird.
How to do
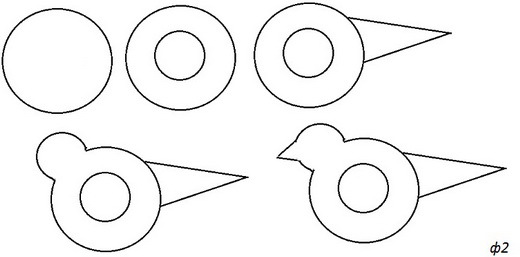
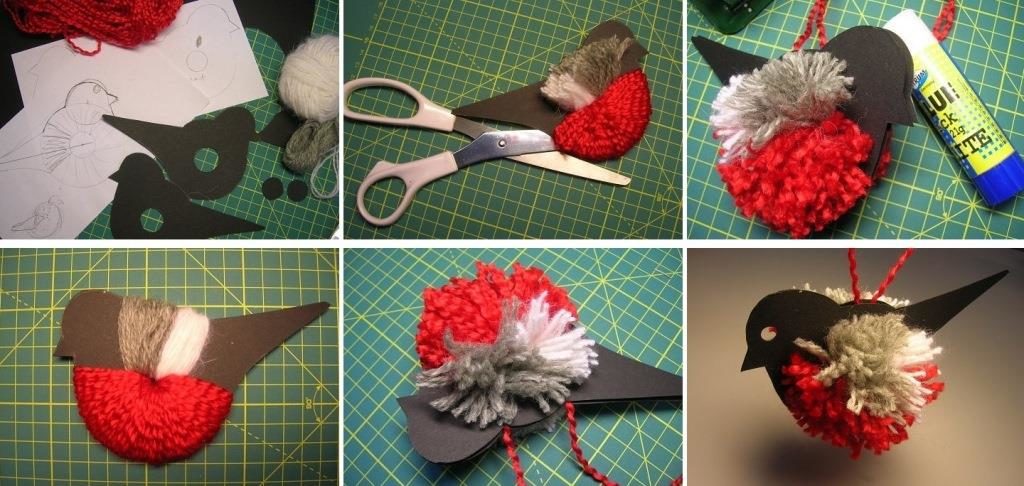
- First you need to prepare a template for the future bird. To do this, on a sheet of paper using a compass, you need to draw two circles of different diameters, one inside the other. Then we add a head with a beak to this circle, and on the other side, a tail. As in the photo above.
- The second step is to transfer the cut out template onto a sheet of cardboard. When it is ready, we need to cut out the resulting outline. We prepare two identical parts. We cut out a small circle from both blanks (carefully, you can ruin the base of the future bird).
- Now you need to coat one of the blanks on both sides with black acrylic paint. After the paint has dried, we draw the eyes, but you can also glue them on. DO NOT touch the second part!
- After the paint has dried, we put both blanks together, but so that the tails of the parts are at different levels, in the future - this can seriously make your work easier.
- We thread a red woolen thread through a needle with a wide eye and wrap it around the lower part of the bird, this is the breast of the future bullfinch. We wrap the back of the bird in the same way, with the two remaining flowers.
- The last step is to carefully insert the scissors between our two pieces of cardboard and cut the threads. Carefully remove the unpainted cardboard. Then you need to straighten the threads, then thread the thread in the middle and hang the bird.
That's it, your own bullfinch is ready! Let it please your eyes or your loved ones.
Tips and tricks for decor
The bullfinch or a whole flock of small birds is ready, now you can start decorating them.
One of the best ways to beautifully place our birds is to create a tree on which these cute creatures will settle for life. Or you can make a whole forest, thereby creating just a magical winter fairy tale, it all depends only on your imagination and skills.


 0
0