izi.ua
Every child has watched a cartoon about the famous deer Bambi at least once. This is the favorite hero of many girls and boys even today, despite the fact that the cartoon first appeared on screens in 1942. In 2006, the popular story was supplemented and updated in a modern way. Bambi entered the category of legendary heroes, with whom more than one generation of kids grew up. There is always a Bambi toy on the shelves of large supermarkets and children's stores. A plush deer or a doll of the main character is not cheap. Moreover, modern toys do not always meet all quality standards. Therefore, sometimes parents decide to sew or knit a pet for their baby themselves.
For those who have not yet mastered knitting, or are just beginning to get acquainted with the principles of the craft, making Bambi will be quite difficult. A master or an amateur crocheter can handle this task. Sewing a toy is much easier. It is done in the same way as a bunny, cat or other animals.A description of the process can always be found on the Internet; there are many videos on how to make a soft toy.
DIY fawn Bambi - how to sew a fawn
For sewing a deer, it is better to choose felt - it does not crumble, and you do not have to process the seams. Two sheets of fabric are enough - white and brown. The eyes can be made from beads, but the toy will look much nicer with purchased eyes. For the tongue you need a small piece of red fabric. If you want to dress a deer in a dress or decorate it with a collar, you will need additional materials.
For the pattern you will need paper, pencil and chalk. You can sew the toy with a needle and thread by hand or on a sewing machine. The Bambi deer pattern is quite simple. It consists of the following elements:
- Ears – 4;
- Head – 2;
- Torso – 2;
- Abdomen – 2;
- Tail – 2;
- Foot – 4;
- Hooves – 4;
- Tail wedge – 1.
From white felt we cut out two parts of the ears, the wedge of the tail, the abdomen, and the hooves. The remaining elements are made of brown fabric. Synthetic padding is suitable as padding. We sew all the parts together sequentially, do not forget to leave holes for stuffing. When all the parts are assembled, turned inside out, the toy has volume, you can move on to the face. We insert store-bought eyes, sew on a red tongue and make white dots on the sides of the body. They can be made from synthetic padding balls, attaching them to glue with a gun.
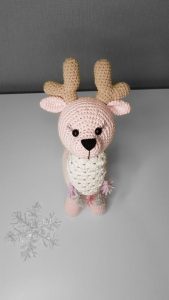
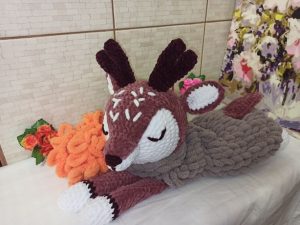
Crochet Bambi the deer - basic principles
olx.ua
To tie a deer, you need to prepare two colors of thread. The warp yarn can be pink, brown or beige. Additional coat – white, cream. She embroiders spots on the sides, the end of the tail, and the face of the toy. Colored yarn is used for the nose, ears and eyes. But the eyes can be replaced with store-bought ones, and the nose and mouth can be made from felt.Bambi is crocheted in parts. We do separately:
- Every ear.
- Head.
- Little muzzle.
- Nose.
- Torso.
- Tail.
- Four legs.
When the head is ready, move on to the nose, then to the muzzle. Then we sew the nose onto the finished muzzle and attach it to the head. Now we attach the ears to the head one by one. The next stage is combining the head with the torso, then the torso with the legs. The pattern for such a toy can be found on professional knitting sites, since the Bambi deer is a labor-intensive and complex product.
 0
0