crafta.ua
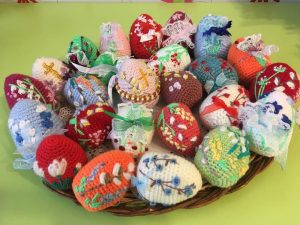
Easter eggs are a symbol of Easter. Every needlewoman in her house, in addition to paints, probably has eggs embroidered with her own hands.
Embroidering Easter eggs is an art as old as embroidery itself. Embroidery patterns can be very diverse.
Embroidered eggs can be made in different ways. You can use blanks made of wood, papier-mâché, foam plastic, or a real shell without contents as an egg. The simplest option for embroidery is eggs - “pinkip”. This is a flat version of making an Easter egg.
Let's take a look at a master class on making pinkie eggs:
Let's prepare the necessary materials:
- The most important thing is the ready-made embroidery, which is embroidered according to the pattern.
- We take thick cardboard as a blank.
- One piece of soft felt in the color of the canvas on which the egg is embroidered.
- The other two are for covering the back of the product. They can be of any contrasting color.
Let's get started:
- We wash and iron the finished embroidered fabric.
- When decorating with beads, we immediately sew on the necessary beads.
- We cut out a blank from thick cardboard in the shape of our egg. It should be 2-3 mm larger than the embroidered egg.
- We cut the canvas, leaving an allowance of 1 cm along the contour.
- We take felt that matches the color of the canvas and cut it out according to the cardboard template with a small allowance so that you can tuck it under the cardboard blank. To avoid the fabric slipping, glue it to the cardboard.
- On the reverse side we tighten the canvas with thick threads and secure it.
- We put 2 layers of felt on the back surface and sew along the contour with the canvas.
- We decorate the outline. For this purpose, you can use beads, narrow lace, or crochet lace.
Pinkie eggs look great as an Easter table decoration or as a gift for family and friends.
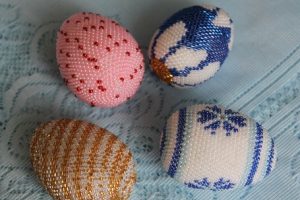
Easter eggs - cross stitch on a three-dimensional blank are also in great demand. It is not difficult to work with and looks simply gorgeous!
For work, prepare:
- Three skeins of floss threads in the same color scheme.
- Glue gun.
- 2 pieces of canvas with cross-stitched patterns. They should be equal in size to one quarter of an egg.
Let's get started:
crafta.ua
- We embroider 2 elements on canvas.
- We cut them into the shape of a petal, equal to a quarter of an egg.”
- Using floss, we begin to wrap the egg. Secure the end of the thread with a glue gun. We begin to make circles. Having approximately divided the egg into three parts, we change the threads, securing the ends with glue.
- Now we glue 2 pieces of canvas opposite each other.
- And lastly, use a thread of floss in the longitudinal direction to make 4 turns around the egg to hide unevenness when applying the canvas.Lay these 2 seams at each joint of the fragments.
The resulting creation will definitely please you. Indeed, such crafts look dazzling.
If you want to learn how to embroider an egg with beads, consider this using a simple example for beginners:
- We take a papier-mâché egg blank and glue a ribbon loop to it.
- We string the first bead onto a flexible thin long wire and secure the wire.
- It is better to choose pearl or holographic beads. We string the beads onto the wire and begin to wrap the egg tightly so that the workpiece is not visible.
- We attach the last bead at the top of the egg in the same way as the first.
Embroidered Easter eggs are very beautiful. And the embroidery process will give you real pleasure.
This is a great souvenir and a great decoration for your holiday table.
 0
0