creativecommons.org
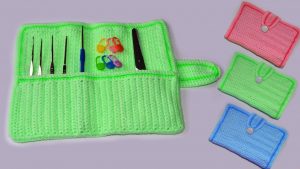
All knitters face the problem of storing tools. You constantly have to look for knitting needles and hooks in drawers and on shelves. Moreover, it is not always possible to find the necessary equipment on time. A convenient organizer – a pencil case with pockets and special compartments – helps to avoid the problem. Finding a comfortable item on sale is difficult. Size, number of pockets or design does not fit. It is much easier to take care of your own comfort. To do this, you can knit an original tool stand with your own hands.
How to knit a pencil case for knitting needles and hooks with your own hands: diagram
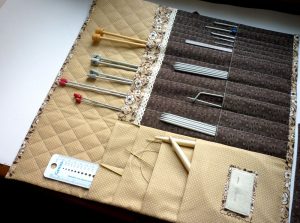
A non-standard knitted pencil case can be used not only for storing hooks. It is suitable for organizing pens and pencils on your desk. Before starting work, you need to select threads and choose a color, prepare everything you need. The basis will be a bucket in which the yarn will be stored. The size of the bucket is any, depending on the wishes of the craftswoman.There are convenient compartments on the sides of the pot. Each pocket is designed for one tool.
The idea is quite original. The bucket is easy to take with you, it is stable, and the hooks and knitting needles are securely held in place. The pencil case consists of three parts: a round bottom, a rectangular wall and a rectangular pocket. Each detail is made separately. When calculating the dimensions, the height and diameter of the pot are taken into account. The knitted product should be one centimeter larger. If the bucket expands upward, you should measure the width of the knitting along the widest possible area.
Let's start from the bottom:
- The product has the shape of a circle. For knitting, you can use any stitches - this is not important, since this element is not visible in the finished product. The main thing is to maintain the same style so that the part comes out neat.
- We use standard single crochets. The work process is standard. A chain of five loops is formed. A single crochet is knitted into each loop.
- Knitting each next row, add six columns.
- We continue working until the circle has a diameter that is one centimeter larger than the size of the base of the pot.
- We knit five rows, we do not increase.
DIY pencil case for hooks: pocket and walls
creativecommons.org
For the wall of the organizer you will need a rectangular shape made with cross stitching. A rectangle for a pocket is made using a similar principle, but its size is smaller in width. It should be taken into account that the pocket will start at the base of the bucket. It ends approximately three to five centimeters from the top of the pot.
- For the wall we use air loops. Length is equal to the height of the bucket.
- We begin to knit a rectangular shape. The height should be identical to the diameter of the top of the pot.
- On average, twenty-five loops are obtained.
- The pocket will need about fifteen loops - two-thirds of the height of the wall. The height of the parts is identical.
- To make the case exclusive, the outer pocket can be tied with stripes. In addition, multi-colored stripes are easier to sew in.
- The width of the strips depends on the type of thread used in the work. The density of the knitting is taken into account.
- When the pocket piece is ready, we tie one of the sides using single crochets. At the same time, we hide the ends of the thread that remain after changing colors.
- We connect two parts - a pocket and a wall - with single crochet columns. To do this, we apply two elements clearly along the contours.
- We turn one large pocket into separate pockets for hooks. To do this, we use simple connecting posts.
- Be sure to fasten all the threads after stitching the compartments. We tie a strong knot. Otherwise, the seams will begin to separate when using the pencil case.
How to sew a knitting needle cover with your own hands - connecting the parts
We sew the bottom with a crochet hook and use standard single crochets. This doesn't have to be done from the inside out. Side seams are best done on the wrong side. The bucket - the basis on which the work was carried out - can be inconvenient to use. Therefore, we replace it with a foam analogue. We cut out a circle and a wall similar in shape to the bottom from the material. Carefully connect and fix.
We put a knitted pencil case on a foam base. It must be secured to the bucket using a glue gun or thread. At this point the work is completed, the pencil case is ready.
 0
0