besplatka.ua
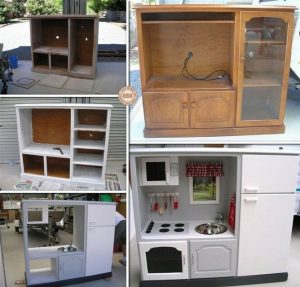
Very often we get furniture from our grandparents, which we would hate to throw out, but we can’t put it in the apartment. Interior items have long been outdated - scratches, cracks have appeared, the design does not correspond to modern trends at all. Then the question arises: how to update old furniture? Modern materials, an abundance of paints and wallpaper will allow any product to be given a second life. Remaking furniture with your own hands, ideas for which you can look for on various websites or in magazines, is a creative, interesting process. Every master is pleased to see the result of his work. For example, when an antique table or chest of drawers from Soviet times turns into a stylish design element. Before you transform old furniture, you need to develop your own design project. The owner of the house independently selects colors, materials, and fittings. As a result, he receives an exclusive product made to his own taste.
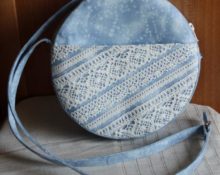
How to transform old furniture with your own hands - remaking old furniture using decoupage technique
Decoupage has long been in demand among fashion designers. This technique allows you to update furniture with your own hands, turning it into exquisite interior items. A paper napkin is glued to the top, pre-painted layer of the product. This way you can work with the facade or small details. This technique is relevant for furniture that you don’t want to completely redo. Remaking old furniture with your own hands using the decoupage technique requires the following materials:
- Decorative paper tape, can be replaced with ribbon;
- Acrylic varnish, alkyd product is also suitable;
- Several large brushes with soft fibers;
- Glue, regular PVA is enough;
- Paper napkins. Manufacturers offer a huge range of designs to suit every taste.
Before you decorate old furniture with your own hands, you need to prepare it. Then the drawing will lie perfectly on the surface and will be clearly visible. Preparing furniture for decoupage:
- Washing and degreasing of doors and facades;
- Take napkins for decoupage. They can be purchased in stores or ordered online. There is a drawing on the napkin, the composition of which can be changed by removing unnecessary details. Ordinary napkins with beautiful patterns will also work, but their downside is the limited selection of designs;
- When covered with glue, the napkin delaminates. Separate the top part of the paper napkin;
- We independently tear out unnecessary details of the drawing, if any, with our hands;
- It is not advisable to use scissors - the outline will be noticeable and uneven;
- The torn outline will fit well on furniture;
- If the pattern is symmetrical, a ruler or centimeter is used to measure its location. It is necessary to calculate in advance the location of fragments on surfaces;
- PVA should be diluted with water to make it more liquid. Otherwise, there is a high probability of the napkin tearing.
Now you can update old furniture with your own hands using prepared materials. Cover the pre-marked areas on the objects with glue, evenly and quite tightly. We do not apply the napkin completely. First we place one edge and stroke it with a brush on top, gradually continuing to apply the napkin. The brush should be in the glue. The main thing here is to act carefully and without haste. The stencil can tear with any awkward movement. We follow the instructions:
- The entire napkin lies flat on the surface. Use a lightly dampened brush to re-iron it. At that moment, it is possible to adjust the drawing, remove or glue additional parts. After achieving the desired result, you should wait until the glue dries;
- Ribbon or ribbon is used to decorate the edges. It is glued using acetate glue after the napkin is completely dry;
- The edges of the napkin are treated with acrylic paints and a sponge. This way the transition will not be visible. A dish scrubber will do.
Now varnish comes to the rescue. The use of an alkyd product is fraught with a long-lasting unpleasant odor in the apartment. In addition, it takes a long time to dry. It is much more convenient to work with acrylic varnishes - glossy or matte. The first layer of varnish is applied, the procedure is repeated after two hours. Then the furniture dries for approximately 13-14 hours. In this way, it was possible to update interior items using the fashionable decoupage technique.
How to decorate furniture with your own hands - update old furniture
besplatka.ua
Remodeling furniture yourself is not always a difficult process. Let's look at some fairly simple ideas on how to decorate furniture:
- Change the upholstery on upholstered furniture.In this way you can give a second life to an armchair, sofa or chair. There are many companies that do reupholstery and restoration. You can carefully disassemble the product yourself, remove the upholstery material with a knife and replace it.
- Wallpaper as a way of decoration. In stores you can find a wide variety of wallpapers to suit every taste and budget. There is also a special self-adhesive film. This is a great idea for giving furniture a new look. Before gluing wallpaper, the product is thoroughly cleaned, sanded, and prepared. The best glue for wallpaper is PVA. You can apply the renovation technique to walls, cabinets, chests of drawers, and nightstands.
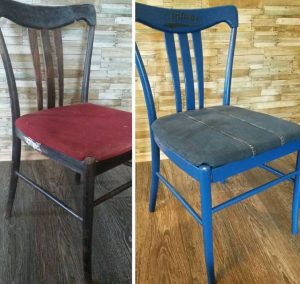
- Updating wooden chairs. Using a brush, you can create a real masterpiece from a boring, old chair. A bright yellow or black vintage chair will look like a fashionable highlight of the interior. The main thing is to sand the entire product before painting. The paint is applied in two layers.
- Replacement of accessories. Surprisingly, a new handle and fittings can give a cabinet or chest of drawers a completely new look. Modern pens are made using special technology using glass and metal. You can choose bright or minimalist fittings to radically change the appearance of old furniture.
How to update old furniture with your own hands using self-adhesive film
The simplest modification of furniture is carried out using various self-adhesive films. They come in various colors, plain, with ornaments, and different textures. Today it is fashionable to cover wooden products with films with a variety of patterns or plain finishes. The process itself does not take much time. It can't be called complicated. The main thing is to do everything consistently, carefully and accurately.Work algorithm:
- Furniture needs to be disassembled as much as possible, all elements separated, old fittings and door handles removed.
- Degrease and clean the surface using a soft cloth and dishwashing detergent. Afterwards the product is washed again. Add vinegar in a small amount to the water and treat the surface. Next you need to go over with dry cloths.
- Fragments are cut out of the film one centimeter larger than the size of the door or other part. It is convenient to use a stationery knife to remove film residues.
- The element that will be pasted over is sprayed with water. A spray bottle is used for this purpose. This allows you to move the self-adhesive if it does not fit correctly. The material will peel off wet furniture without damage.
- After removing the protective layer, the film is laid on the furniture. Levels out. Use a wet cloth for smoothing. She needs to drive from the center to the edge. It is important that there are no air bubbles left under the film. Avoid sudden movements.
- A thin needle will help get rid of the bubble. It is used to pierce the bubble in the center and expel the remaining air through the hole. This place is thoroughly wiped down.
- After gluing is completed, cover all parts with clean cotton material and iron with an iron heated to medium temperature.
- All that remains is to glue the finishing materials and install the fittings. This work is carried out with each element of the product.
 0
0