sdelay.sam.ua
The sunflower is truly a sunny flower, personifying the sun. He is treated with respect. The large Russian hypermarket chain Lenta even chose it as its logo. Why the sunflower ribbon logo? Yes, because it is a symbol of light, sun, hope and fertility.
Naturally, many needlewomen use his image in their embroidery. Tape technology is no exception. Sunflowers made from satin ribbons look unsurpassed. Ribbon embroidery adds volume to the flowers and makes them more natural.
How to make a sunflower from ribbons with your own hands - let's look at a sunflower from satin ribbons in MK.
Sunflower made of satin ribbons - master class
First, let’s try to understand how to make a sunflower from satin ribbons with your own hands using the “kazanshi” technique.
DIY sunflower made from ribbons, the master class for which we offer, is simple and accessible to beginning craftswomen.
What we need:
- Bright yellow satin ribbon, 1 m 20 cm long, 2.5 cm wide.
- Green satin ribbon 70 cm long and 2.5 cm wide.
- Black ribbon 2 meters long and 1.2 cm wide.
- Two felt circles, 4 cm in diameter each.
- Flat candle.
- Black thread with a needle.
- Glue gun.
DIY sunflower made from ribbons - master class:
- Let's make sunflower petals from satin ribbons.
- Let's cut our long yellow ribbon into 24 pieces, 5 centimeters each;
- Using a flat candle, burn the places where the ribbon is cut;
- Fold each piece in half lengthwise, shiny side out, and cut one side diagonally. You need to cut from the fold of the fabric - down to the edges. This cut must be scorched over a candle to form a glued corner;
- Turn the part over with the fold facing you and the ends towards the table;
- Now let's take care of the lower corners - bend the fabric at the bottom of the petal on both sides forward until it joins each other and also seal it with a candle.
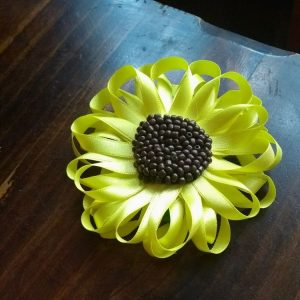
- The result is a finished, elegant sunflower petal with a sharp tip.
- Also complete the remaining 23 petals.
- We take one piece of felt and glue 12 prepared petals to it using a glue gun. We place them at the very edge of the green circle.
- On top of the first layer of petals we glue a second one, also of 12 pieces. But they need to be positioned with a shift relative to the first layer, so that the petal is located between the petals of the first layer.
- Next, you make a sunflower from ribbons with your own hands like this: we prepare the green leaves located under the yellow head of the sunflower. For this:
- cut our 70 cm of green ribbon into 7 equal pieces of 10 cm;
- We fold each segment in half across the tape and, using a ruler and a hot knife, draw a line diagonally, dividing the folded segment into two triangles glued together by the cut line;
- Having unfolded each detail, we get unique handbags, like those of a kangaroo. We should have 7 of them.
- Glue them with the short side to the felt circle under the yellow petals.
- In order for a ribbon sunflower to have a finished look, you need to fill its middle with something vaguely reminiscent of seeds. The easiest way to do this is with a black ribbon.
- In the center of the ribbon, place a seam along it using a needle and thread. Fasten one side securely and begin to pull the ribbon towards the fixed point. Pull as tightly as possible, twist and glue in the center of the flower.
- Our mini sunflower made from ribbons would not be complete without recommendations on how to attach our craft.
- Glue the 2nd felt circle on the bottom of the green leaves. This will strengthen your craft, and if you want to make a hairpin or brooch out of it, it will serve as the basis for attaching a clip, pin or hair tie.
- We showed how to make a sunflower from ribbons using the kazanshi technique.
- Some people make petals from corrugated ribbons. They are corrugated like this: heat a blunt knife over a candle for 3 minutes, quickly wipe off the carbon deposits and draw a stripe in the center of the leaf on the front side, then on the right and left. In this way, similar veins are created. We recommend that you first practice on a piece of ribbon, and then move on to the product.
- Then they cut off the upper edge of the part with a triangle, melt it slightly and stretch it slightly, bending it to the bottom.
- The two lower corners of the part are folded forward and also slightly melted.
- These petals look completely different.
- Different materials are also used to create the centers. Some people fill them by gluing black beads, while others fill them with coffee beans or make it colorful. There are no limits to your imagination.All in your hands.
Sunflower - embroidery tutorial
Sunflower embroidery is also a very popular handicraft. Let's look at it step by step:
- Transfer the pattern of the design onto the fabric.
- Insert the fabric into the hoop.
- Apply basting stitches along the outlines of the design.
- Insert the ribbon into a needle with a large eye, secure the knot and thread the needle from the inside out onto the face. Guide the ribbon to the upper edge of the petal and, pricking it, point it to the wrong side. Do not pull the petal, it should be relaxed.
- Using the second needle, straighten the ribbon without letting it curl.
- So we embroider all the leaves, leaving the middle of the flower free.
- We take dark brown and light brown ribbons and begin to make small loops. We fasten each separately on the wrong side. In the very middle we use lighter loops, and dark ones at the edges.
- All that remains is to embroider the leaves.
It is advisable to take 2 colors of ribbons - lighter and darker.
The stems are obtained by twisting the ribbon along its length, the edges are hemmed with matching threads. You need to attach it to the material with the seam down.
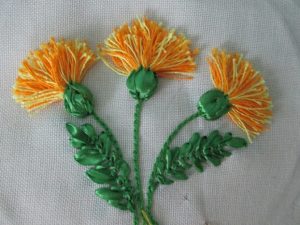
Ribbon embroidery – dandelions, master class
sdelay.sam.ua
It is better to choose a dark color for dandelion embroidery material. A white flower will look very expressive on it.
- Stretch the fabric over the hoop.
- If the matter is dark, you can even transfer the drawing with a ballpoint pen.
- We sew each line using a basting stitch.
- We bring the needle and tape from the inside out to the face and begin to pry it up and scroll it under each stitch of the seam. The result is a beautiful twisted green stem.
- Using Japanese stitch we make leaves.
- We embroider the flower umbrellas, just like the stem, but with white threads. We make thin fluffs with ordinary white sewing threads.
Ribbon embroidery is very popular among all age groups. Such needlework develops imagination, instills a sense of taste, promotes the development of perseverance and accuracy, and also develops fine motor skills of the hands.
This explains the popularity and undying interest in this type of creativity.
 0
0