skrynya.ua
The history of this type of needlework goes back far into the past. Even in primitive times, something like embroidery was used. Even then, women tried to decorate their clothes with primitive paintings.
Embroidery on fabric first appeared in the 5th century BC in Ancient China and gradually spread throughout the world. For a long time, this activity was an expensive pleasure and adorned the clothes and toiletries of noble people.
With the advent of Christianity, embroidery began to decorate towels that were used for icons. This was considered a kind of amulet. People believed in his supernatural powers.
Nowadays, embroidery is more of an activity for the soul, for relaxation, a women's hobby that brings pleasure from the process. You can embroider whatever your heart desires. In this article we will look at how to cross stitch a heart.
Cross stitch is the oldest and most common type. It is very beautiful and quite simple.Canvas is the best material for the base. Although in our time, materials with uniform weaving are also used, on which there are no cell markings. For thin fabrics, an overlay canvas, which is subsequently removed, is excellent.
Using a hoop, you can embroider on any material, but on canvas it is simpler and easier.
Shiny silk floss is most often used as thread, but you can also use wool, acrylic threads, metallized threads, and others.
How to embroider a heart on fabric with a cross stitch
Let's look at how to embroider a heart with a cross. We offer a master class for beginners below.
When performing work, the hand should be relaxed. Cross stitch is not difficult.
To embroider a heart, you need to prepare:
- A square of canvas 10x10 cm;
- A needle;
- Floss threads;
- Hoop.
So, heart - cross stitch, includes the following steps:
- We prepare the threads. The floss thread consists of an interlacing of six thin threads. We will be sewing together. It is necessary to separate them from the common thread, thread them into a needle and tie a knot at the end.
- We thread the prepared fabric into the hoop.
- We start from the upper left corner. We insert a needle from the wrong side of the canvas and stretch it onto the face; stick it into the hole in the lower right corner; from the inside out again to the upper corner of the square; again we thread the needle into the free hole of the square and pull it out where we will continue the pattern.
- Having completed the process, if the fabric is dirty, wash it in warm water and iron it on the lowest setting from the inside out.
- You can insert the finished product into a postcard or frame and use it as a gift or as a picture - a decoration on the wall.
This was a way to cross stitch a heart on canvas.But if you need to embroider a finished product, canvas will not help you.
In this case, you need to choose a drawing scheme. When choosing, you need to remember that the smaller the size of the crosses, the more beautiful the finished product will look.
Heart - cross stitch, the pattern is presented in our article and is available in abundance on the Internet.
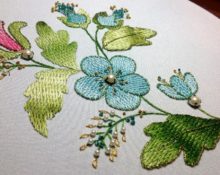
How to embroider a heart using satin stitch
Satin stitch is another type of embroidery that is very common and valued all over the world. With its help, real handicraft masterpieces are created.
There are different types of surface:
- The satin stitch is “simple” - the stitches lie close to each other, their length can be any, as well as the direction.
- Satin stitch “White” - embroidered with covering on very thin materials with white floss or silk.
- “Satin” - performed with very thin threads, short stitches, the next one coming out of the middle part of the previous stitch.
- “Alexandrovskaya tsvetnaya” is similar to “simple”, but differs in a variety of altered colors that do not correspond to reality.
- “Floral artistic” - without flooring, the stitches are laid obliquely. It appears voluminous thanks to the use of a special technique - darkening the center of the product.
- Satin stitch “Asian” is performed on a dark satin background. Most often these are images of plants and animals.
- “Russian satin stitch” style - first, the outline of the future pattern is embroidered along the front surface. Here the smooth surface is applied in long lines. The whole process happens from above, only short dotted lines are laid from the inside.
We looked at heart cross stitch above, now let’s try to understand how heart stitch embroidery occurs.
So, heart embroidery in satin stitch for beginners. Heart embroidery - use any pattern you like. Markings are made on the prepared material.It is best to do it with a water-soluble marker, which is easily washed off from the fabric after finishing work. We use the same materials as for “heart cross stitch”.
The sequence of work is the same as that of the “cross”, but the technique is different.
- Place the material in the hoop. It should be taut, like a drum. For beginners, it is better to use the Aida material.
- Thread the thread into the needle and make a knot.
- Draw stitches along the outline of the future design.
- Now we embroider the inside - densely, without gaps. Each stitch should be parallel to the other. We start sewing from the tip of the heart.
- When finished, wash your product and iron it from the inside out, placing it face down on a terry towel. This will allow him not to lose volume.
We are convinced that heart embroidery is not particularly difficult and can be done by beginner needlewomen.
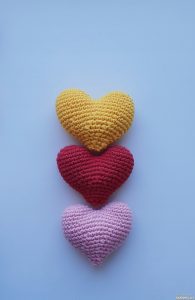
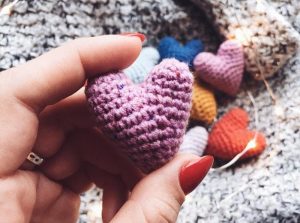
In addition to embroidery, you can also use knitting techniques to make hearts. You will learn how to crochet it in our master class.
How to knit a heart
crafta.ua
Let's look at the example of making a heart measuring 6 centimeters. We will need red acrylic and a 3.5 cm hook.
- We make a ring, knit 3 air loops.
- From the ring we knit nine double crochets.
- Combine with the 3rd air loop.
- Again we knit 3 air loops.
- We knit columns with nikid between the loops of the circle columns. There will be 10 of them.
- We knit a column with 2 n., a column with 3 n. and a column with 3 n.
- Column with 3 n. + st. with 3 n. + st. with 2 n.
- Next is a column with 2 n. + column with 1 n. + column with 1 n.
- Column with 1 n + column without n
- Art. without n. + st with 1 double crochet.
- Art. single crochet + double crochet
- Art. double crochet + tbsp. double crochet + tbsp. with 2 yarn overs.
- Art. with 2 n. + st. with 3 double crochets + tbsp. with 3 n.
- Art. with 3 double crochets + tbsp.with 3 n. + st. with 2 n. The base of the product is ready.
Such crafts can be used as small souvenirs, like valentines, you can decorate them along the contour with lace, trim them with beads, and use them as table decorations.
They always look very cute and beautiful.
 0
0