The history of the origin of the bonnet (bonnet) goes back centuries. They were very popular until the beginning of the 20th century. They were sewn in different styles, with different finishes, and from different materials.
Caps were used as elegant walking headdresses; as sleep caps that protect your head from drafts and for neat hair styling.
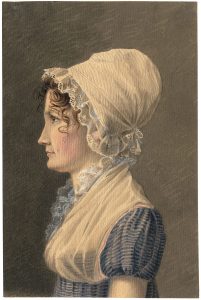
Nowadays such a headdress is rarely used, but sometimes there are cases when it is necessary.
How to sew a cap for an adult for a competition
Anyone can sew a cap for an adult for a competition. Just read our master class and understand the intricacies of sewing.
What you need to have:
- 50 centimeters of fabric, 80 cm wide;
- 80 centimeters of lace or braid, 6 centimeters wide;
- 50-60 centimeters of elastic, 8 mm wide.
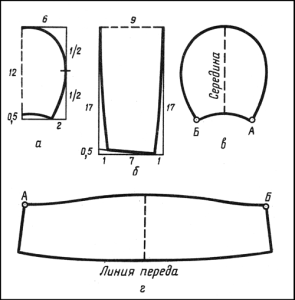
Constructing a product pattern:
- We measure the distance from the middle part of the forehead to the middle part of the neck + two centimeters for allowances. We get the size of the upper circle of the cap - 42 centimeters.Circumference – 126 + 2 centimeters for allowance + 1 centimeter extra = 129 centimeters. This will be the length of the lace strip around the cap.
Thus, the cap pattern represents 2 circles of different diameters located inside each other. We use lace as the second circle.
Master class on how to do the work:
- Let's start cutting out a cap for adults. Place a pattern on the fabric in the form of an inner circle, 42 centimeters in diameter, and cut it out.
- We make a mark to identify the back of the product.
- We prepare 129-130 cm of lace.
- From additional material we cut a drawstring for the elastic band. This is the perimeter of the inner circle + 3 centimeters to its center.
- Sew the main circle with the lace, connecting its ends.
- Iron the drawstring, directing it to the center of the product.
- We adjust the drawstring.
- We insert an elastic band into the cap and straighten the lace frill.
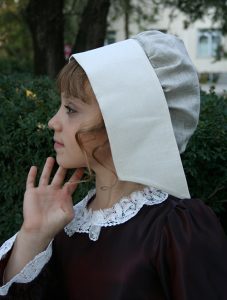
The cap for an adult for the competition is ready. Looks very nice.
A pattern for a cap for an adult for a competition, which you can also print from the Internet, makes it possible to cope with sewing very quickly.
Pattern of a cap for Cinderella
Let's consider a master class on sewing a hat for Cinderella using Method No. 1:
- We take cotton fabric that holds its shape well.
- We cut out a rectangle with a length twice as large as its height.
- Fold it in half and get a square. The top of the cap will be a fold of fabric.
- We make one seam by stitching two parts of the material. The other two sides of the square are not covered.
- We turn the cap inside out. We do not turn out the top corner completely.
- Cinderella's cap is ready. Now you need to starch it well and iron it.
- When putting it on your head, turn the side corners of the cap up.
The charming hat is ready. This cap will suit Cinderella and Little Red Riding Hood.Only in the second case, make it from red fabric.
Now we’ll make a cap for Cinderella of a slightly different model, which can also be adopted:
- We make a paper pattern consisting of the bottom of the cap, shaped like an arch. Select the size yourself based on the head of a child or an adult.
- We make a pattern for the fields - a rectangle with a fold, the width is as desired, and the length is equal to the perimeter of the bottom arc.
- We cut out the bottom and fields (with a fold) from the fabric.
- We secure the bottom with glue.
- We turn the strip inside out and stitch the narrow sides. Turn it inside out and iron it.
- We sew the bottom to the brim.
The cap for Cinderella, sewn using Method No. 2, is ready.
Choose which one you like best. They are both simple to perform and can be done by any novice craftswoman.
 0
0