Raccoons are very cute animals that, along with cats, bunnies, dogs and foxes, are very popular with children. It is quite possible to please your child and sew a toy yourself using our master class on how to make it.
Our article gives the exact pattern of a raccoon. It is very simple, consists of only 4 elements:
- The large main element is divided into 2 parts: the back and half the front;
- Tail;
- Tummy;
- Black stripe on the muzzle.
Let's look at what you need to purchase to start working on the toy.
- Black and gray fleece fabric;
- Synthetic winterizer or holofiber as a filler;
- For the eyes – doll eyes.
Manufacturing master class:
- We place the paper template of the back on the material and trace it.
- Fold the gray fleece face to face and apply the front and tail template.
- In the front template, we stitch together half - the part opposite the raccoon’s paws, and do not touch the rest for now.
- We sew the tail together, leaving one narrow edge unsewn.
- We put the front on the back, face to face, connect and stitch.
- Carefully trim the fabric along the edges, leaving 3 millimeters to the edges.
- We make a small incision on the tummy for filling.
- Turn it onto your face using a thin stick.
- We fill the holofiber and sew it up.
- We cut out a strip of black fleece fabric for the raccoon's face and belly and sew it on. On the stomach we leave a small piece unstitched.
- We stuff the tail with holofiber.
- We attach the eyes, sew on the mouth and nose with threads.
- We use black thread to make several stripes on the paws, imitating fingers.
- We push a small amount of holofiber under the black belly of the raccoon and sew it up.
- Using gray threads we make a cross on the tummy, playing the role of a navel.
- To decorate the tail, cut out 3 black stripes and sew them onto the tail.
- Sew the tail to the back.
Adorable baby raccoon is ready!
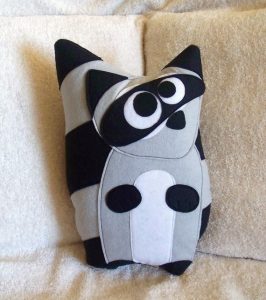
We will make the second raccoon from felt. There will be more small details here, but if you follow our master class, everything can be easily figured out.
You will need:
- White, gray and black felt fabric;
- For decoration – bright thin ribbon;
- For filler – holofiber;
- Three black beads;
We transfer the patterns of 10 elements onto paper.
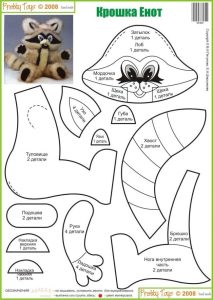
Manufacturing master class:
- Having placed paper patterns on gray felt fabric, we cut out 2 blanks of the body, ears, head and tail and 4 blanks of paws.
- From white felt fabric we cut out 2 ear blanks, 1 - chest, 1 - muzzle.
- From black we make stripes on the tail and pupils of the eyes.
- We sew black spots under the eyes to the head and tail stripes to the tail.
- We sew a white chest onto one part of the body.
- Making ears. The front is white, the back is gray. Sew across the top.
- Sew a white muzzle to the head with black spots. We place it slightly overlapping the spots.We sew at a distance of 3–5 mm from the edge.
- Sew the nose bead in the middle of the top of the white muzzle. From it we will draw a black line down to the end of the white circle.
- Cut out 2 small white circles from felt fabric and sew them into the center of the black circles. We sew a black bead into the middle of each circle.
- We sew together 2 head blanks, inserting the ears. We leave a hole on the neck.
- We sew up the torso, but do not sew up the neck.
- We sew the tail, but do not sew the base.
- We sew the legs together, stuffing them with filler.
- We push the filler into all parts of the raccoon, sewing up the holes everywhere except the head.
- We sew the body to the head, sew on the paws and tail.
- Decorate with a bow.
We assure you that this craft will become your baby's favorite toy.


 0
0
