Apron – an irreplaceable detail in the life of any woman. It is clear that the doll should also have such a wardrobe detail. Its purpose is different:
- a kitchen apron that protects clothes while cooking;
- school apron – part of school clothes;
- elegant element of a doll's dress.
In our article we will look at how to make an apron for a doll with your own hands.
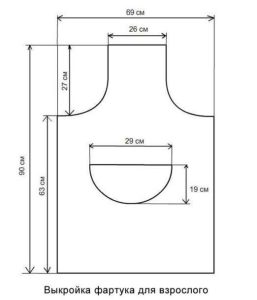
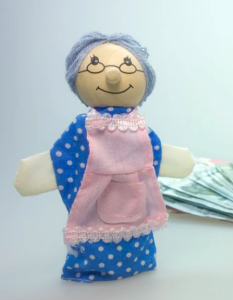
Apron for a doll, pattern, sewing master class
You need to decide on a pattern. You can download it from the Internet or build it yourself. It is very simple, you can cut it out “by eye”:
- Cut out the expected shape of the apron from paper, attach it to the doll, and adjust it.
- Similarly, cut out a pocket, attach it, adjust it.
- There will be a frill around the circle of the apron, from tie to tie - choose its width at your discretion, and the length will be 1.5 times longer than the perimeter of the bottom of the apron.
The first part of the work is done - the apron for the doll, the pattern is drawn.
How to sew an apron for a doll - we offer a master class below:
- Place the paper pattern on the fabric and trace with chalk. At a distance of 0.5 centimeters from these lines, draw another line for allowances. Cut the frill along an oblique line.
- We cut out the parts with an allowance.
- Make a pocket.
- Place the pocket on the main part of the apron, baste, and stitch.
- Frill – on one long side and on the sides, fold in the seam allowance, baste, iron and stitch. Gather the other edge of the frill and pull it to a size that matches the perimeter of the apron.
- Sew the frill. If you use a strip of lace or a satin ribbon as a frill, it will be easier.
- On the front side of the product, make a stitch that catches the hem of the frill, directed towards the center of the apron.
- Baste bias tape to the top of the product and stitch.
- Take a long piece of binding, baste it, leaving a free piece for one apron tie, sew around the raw cut, make a loop to go around the head, cut again and bring it to the second tie.
- Topstitch the backstitch. The apron is ready!
Now let's look at how to sew a school apron.
School apron for a doll
Sewing a school apron is even easier. All you need is lace of different widths.
- We take wide lace and gather it on a thread, making a knot at the desired length. The result was wings for an apron. You need to make 2 of them.
- We attach the wings to a square of wider lace, previously trimmed on the sides.
- The third type of lace, the thinnest one, we put it along the seam of the wings and attach it.
- We take the 4th grade of lace - the widest. If one is not available, you can make it from 2 narrower ones. We make the lower part of the product, slightly gathering at the top.
- We sew together the top and bottom.
- We make a tie from the thinnest lace and attach it at the waist.
- We sew the finished wings to the back of the ties.
Ready!
Apron for Barbie
It makes it even easier. All you need is a piece of bright fabric, a thin elastic band and brightly colored tulle.
- Transfer the finished pattern to the fabric, folding it in half with the right side inward.
- Cut 2 layers of fabric, leaving a 0.5mm seam allowance.
- We cut out pockets from another fabric. Don't forget about seam allowances.
- Prepare 2 elastic bands (4 and 3 cm).
- We add pockets to one part of the apron.
- Place the two bases face to face and stitch them together by inserting elastic bands up and into the sides.
- Turn it inside out and iron it.
- We sew the gathered tulle frill down and attach it.
Nothing complicated, but a new thing for your pet, a new part of her wardrobe, is ready!
 0
0