creativecommons.org
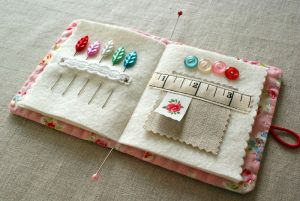
A pincushion-book, a master class on how to create which will help you create the perfect product the first time, is an indispensable accessory for a seamstress. Many people still use various pads and stands to this day. This is a convenient option for those who work at home at a desk. Another reason to make a book is the presence of children in the workplace. Kids love to explore new objects, and a cute hedgehog with quills may well attract their attention. Even an ordinary pin can cause harm. But the book-shaped pincushion will reliably store sharp little things. You can always take it with you on a trip or just to nature to work in the fresh air. Next we will look at two ways to sew a pincushion book from felt.
DIY book pincushion - master class
To create a product with an original design, you need to prepare the following materials:
- Scissors, satin or rapeseed ribbon.
- Brown button. A beige shade would also work.
- Several types of threads for embroidering decor. Yellow, green, pink and light green harmonize well.
- Special needles for embroidery.
- A piece of pink, brown, orange material. The size is small, the remnants from previous work are quite enough. The finishing will be created from them.
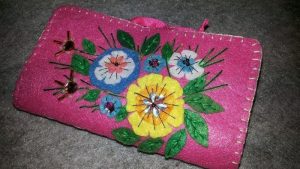
- A do-it-yourself book pincushion is best made from felt. You will need at least seven pieces of material of different sizes. The page of the pincushion is made in size 9 X 13. Based on this, we select fabric of beige, dark and light green, yellow felt.
A book pincushion can be decorated with rhinestones, beads, beads and other decorative elements. They should also be prepared in advance. Step-by-step instructions on how to make a book for needles:
- The basis of the product will be felt. We take green and beige material. You need to cut out two rectangles.
- Experienced craftsmen advise processing the felt on the edges with a zigzag. We apply the beige material to the green one.
- Place a ribbon of suitable length between the pages and secure with a pin.
- Next you need to sweep away the pages.
- Take yellow felt. You need to cut two rectangles from it. They should be smaller than the base. A difference of 1-2 centimeters is enough. The number of rectangles depends on the desired number of pages.
- Place the pages inside the cover in a stack. We cut out strips from yellow fabric and attach them horizontally to each inner page.
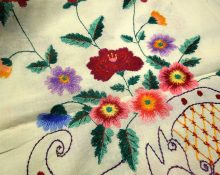
- We close the book and move on to decorating the cover. We cut out flowers from brightly colored material. Different plant options will look good. You can make one flower with three petals, another with five, and so on.
- To fix and preview the result, we use pins. If you like the composition, you can sew on the decor.The stitches should be smooth and beautiful.
- You will need embroidery thread to create the illusion of stems and buds.
- The use of beads, sequins, and rhinestones is the individual taste of each master.
DIY felt book pincushion
creativecommons.org
The second version of the pincushion is also made from felt. In this work you will need:
- A special printout with a monogram and a piece of tracing paper.
- Rulers, scissors, hoops.
- One button for fastening.
- Needles and paper for embroidery.
- White or milky felt.
- Blue felt.
Sewing the product will not take much time - the process is quite simple:
- Creation of blanks. On blue material we cut out a thin arched figure. From the same material you need to cut out a rectangular figure measuring 8 X 10. This will be the cover of the book. You can choose any size.
- For the pages, take white fabric and cut out two rectangles slightly smaller than the cover. With parameters of 8 X 10 centimeters, it is optimal to make the inner sheets 7 X 9 centimeters.
- We do embroidery. To do this you will need a printout of the template. We take adhesive paper, print the design, and embroider it according to the template. These could be initials, a name, other inscriptions or figures.
- Fold the blue fabric in half, leaving the embroidery on top. We sew an arch from the bottom and make a loop in its center. Attach a button to the side with the monogram.
- Using bright threads, we sew the cover of the pincushion using a basting stitch.
- We sew white sheets into the cover.
 1
1