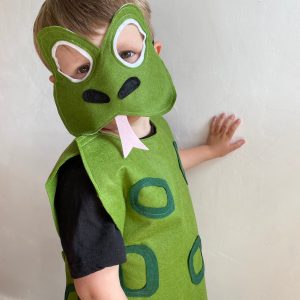
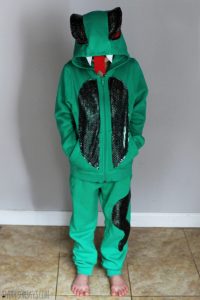
Creating a snake costume is not an easy task. It’s much easier to make costumes for bunnies, foxes, and cats—you buy a mask, attach a tail, ears, and you’re done. And the snake? We need to think about this.
Let's give an example of how you can turn this task into reality and sew a snake costume for your child with your own hands.

How to make a snake costume with your own hands
Let's consider what colors the suit will be made in. It can be black, yellow, all shades of brown.
The set consists of:
- A voluminous hood, to which the eyes, teeth and tongue of the future snake are sewn;
- Long apron-shaped overlay;
- Wide belt;
- Masks.
What is needed for production:
- Black satin fabric;
- Snake skin print material;
- Red and white felt pieces;
- Non-woven fabric;
- Adhesive;
- Not a hard wire;
- Duct tape.
How to make a snake costume.

We will consider a manufacturing master class in our article:
- As the basis for the hood, we take a jacket or jacket, fold the hood in half and trace it along the outline on paper.To increase the hood, we add larger tolerances on 3 sides, except the bottom.
- Using the resulting pattern, we cut out 2 halves of the hood from satin fabric and 2 from material with a snake print.
- On the blanks made of material with a snake print we glue a strip of non-woven fabric - 10 centimeters wide.
- On all 4 pieces we sew darts close to the front cut. Let's make amends.
- Sew together the central seams of the cape.
- Using adhesive web, glue the prepared eyes onto the black hood using an iron.
- We cut out teeth from white felt and a forked tongue from red. We attach it to the cape-hood.
- We fold the 2 parts of the hoods inside out and stitch them, leaving an unstitched area for turning the cape inside out. Turn it inside out and stitch around the edge.
- We insert a wire into the edge of the hood to give the shape of our design.
- At the bottom we attach strips of adhesive tape to secure the hood to the other part of the costume.
- We sew an apron. It consists of two elements connected at the shoulders by strips of fabric. The front and rear elements are the same in shape, reaching the child’s knees in length. The front side of the elements is made of fabric with a snake print, the back side is made of black. You need to cut out 2 blanks - black and 2 - snake.
- We cut out two strips of black material - 8 x 40 centimeters. We fold each one in half, stitch it together, turn it inside out and press it.
- We assemble the main parts of the apron. We fold them face to face, attach strips of straps to one side, stitch them together, leaving an open area for turning inside out. Turn it inside out and stitch along the edge. We do the second part in the same way, but first adjust the straps.
- We put an apron on the child.We put the cape on our head and mark where we need to attach the pieces of adhesive tape sewn to the hood to the apron. Attach the second parts of the adhesive tape.
- We make a belt: 12 cm x the volume of the child’s torso + 5 cm. We perform it in the same way as straps. The belt will be fastened at the back with adhesive tape. Attach the clasp.
The belt is worn over the apron and attaches it to the child's body.
The suit is ready. To complement it, wear black leggings or tights, and under the apron - a black T-shirt or knitted sweater, depending on the time of year. You can buy a knitted black mask in a store, or you can sew it yourself.
You see that it is quite possible to sew such an interesting suit, and taking into account our recommendations, you will definitely succeed!


 0
0


