Making a soft pyramid for your child is not difficult. The main thing is to want it.
With the help of such toys, a child learns about the world. They develop logical thinking, learn to contact the world and feel various materials and objects by touch, and practice grasping movements.
Using toys, the baby quickly develops and learns.
It is better to use brightly colored materials when sewing, this will attract the child’s attention. But the beauty of a sewn product interests him the least. The most beautiful expensive toy may not interest him at all, but the “crooked” one, but sewn by his mother with love, will always be the most beloved.
So, let's try to sew a pyramid for a child with our own hands.
DIY fabric pyramid
The pyramid pattern is taken from the Internet or made independently. There is nothing complicated about tailoring. It’s just that each subsequent element should be slightly smaller than the previous one.They can be fastened with Velcro or put on a soft stick attached to the base of the toy.
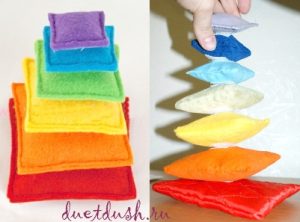
Let's consider the simplest version of a soft pyramid with Velcro. It is sewn very simply and quickly.
Materials:
- Multi-colored felt scraps - 6 pieces;
- Adhesive tape 2 x 10 centimeters;
- As a filler - holofiber, buckwheat, pieces of padding polyester.
Manufacturing master class:
- A pyramid pattern is not needed here. We simply cut out squares from multi-colored pieces of felt with sides 4x4, 5x5, 6x6, 7x7, 8x8, 9x9 centimeters - 2 pieces of each size and color.
- We cut the adhesive tape into 5 pieces of 2 centimeters each.
- Attach pieces of adhesive tape to each square. To the top - the hard half, and to the bottom - the soft half.
- Sew two squares of the same color, leaving a small hole. Turn it over to the other side.
- We push the filler into the squares. We fill the bottom square with cereal so that it is heavier than the rest and does not allow the structure to fall.
- We sew up the holes.
The simplest pyramid is ready.
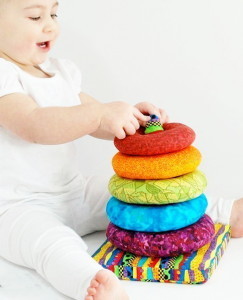
Let's try to sew a toy of a different, classic design from thin fabric.
Fabric pyramid, pattern
Finding a pattern is not a problem - you can use a website pattern, take it from the Internet, or make it yourself.
The shape of the pyramid is classic: a base with a stick on which soft rings of multi-colored fabrics will be strung. It looks very interesting and “soulful”, like all crafts made independently.
Determine the number of rings (donuts) yourself. In the classic version there are 5-6 of them. Any fabrics can be used, but only natural ones. Keep in mind that the child will most likely put the toy in his mouth.
Make the base and stick the same color. The main part can be round or square. It’s better to fill it with buckwheat to make it heavier.
The toy manufacturing scheme is as follows:
- Making the base of the pyramid. Cut out two squares and a strip of fabric. The strip is needed to connect the squares together - this is the sidewall. We put all the parts together and turn them inside out. Fill with buckwheat and use a stick.
- We cut out a tube from the same color fabric, sew it on 3 sides, and turn it inside out. We take a plastic tube, wrap it with padding polyester and push it into the stick.
- We sew the base and the pyramid stick.
- We make rings. We cut out 5 rings of different diameters, from different fabrics. Two of each. Leave seam allowances.
- We sew it together, turn it inside out, fill it with stuffing, and sew up the hole.
- We place the rings on the pyramid stick.
Everything is very simple. And how much joy and delight there will be in the eyes of your kids!
 0
0