In this article you will learn how to easily sew a dress with wings for a young beauty at home. At first glance this may seem difficult, but it is not. The main thing is to follow the instructions.
Silky fabric (companion) will be used for the bodice of the outfit. The lining will be made of cotton. We will cut the back with a middle seam, and a zipper will be sewn inside. The skirt is double, with two linings. This will make it more magnificent.
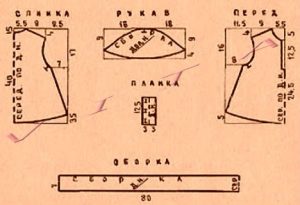
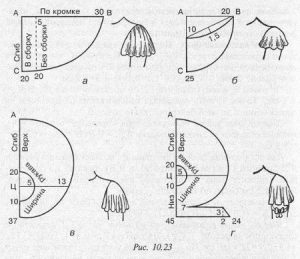
Pattern
Lining Let's start with him. You will need a piece of white 100% cotton fabric. The front and back must be laid on top of the material. We'll hide them in advance. You can outline the details with a simple pencil and carefully cut out the details along them.
Duplication. Next, you need to wrap the neck with a gasket and stitch it. The lining is laid out on a fabric with an adhesive surface, and the neckline is outlined. Measure 4 cm (width) from each line and trace the lining. You need to step back 2-3 cm from the line with the cutout and carefully cut out the part.
Once glued to the neck it should not be noticeable that it extends beyond the limits.Subsequently, the neck and gasket are sewn along the cut.
Connect the seams of the lining (side lines and shoulders) with a seam of 1-2 cm. Wrap the seam allowance and iron it towards the back.
Preparation of the back and front parts
Fold the cut of the half-belts lengthwise into two parts. The cuts need to be well aligned. The seams are hemmed from 0.9 cm on both sides. From the angle and length side.
Next you need to turn all the belts inside out. The edges are swept along the edge. Attention! There should be no edge formation!
All received parts are thoroughly ironed. After this, excess threads and other parts remaining from sweeping are removed.
Let's start with the front workpiece. Place the side and waist sections facing each other. The waist area should be moved upward by 1 cm. The belts are secured using a machine line.
The side bodice sections must be swept away and then stitched. The seam should be 1 cm. The half-belt is tucked inside. The shoulder section must be stitched with a double line. We remove unnecessary details.
Compound
Now let's get to the hard part. You will need to combine the children's dress with a lining.
Carefully place the lining inside. Make sure that no parts stick out. If there is a lot of excess layer, you can cut it off with sharp scissors.
Next you can do the running stitch on the central part.
The cuts of the cutout should be slightly seated on the front part. Highlight rounded areas.
After this stage, we begin ironing. The neckline needs to be sewn on both sides. We make cuts in the cutout area and remove the threads.
How to make wings?
We sew the lower edge of the resulting sleeve with “oblique” markings. The resulting cut is carefully wrapped with folded tape.
Using your fingers, try to see if the fold of the bottom and top of the braid match. If yes, continue stitching, retreating from the edge by 1-1.5 mm.
We lay two lines parallel to each other (from 0.5 cm from the rolled part of the sleeve until a full assembly is formed).
Distribute the resulting fit. The main part should be located in the center of the coverage.
After this, we attach first one wing to the top of the sleeve, and then the other. When cutting, be sure to line up the center sleeve mark with the shoulder seam. We distribute the assembly.
Move from the shoulder in one direction and then stitch in the opposite direction.
Bottom line
Take another look at the finished dress. If there are uneven parts somewhere, cut them off (protruding threads too). In order for the dress to be worn for a long time and not come apart, we recommend passing the needle along the line 2-3 times. This is necessary to strengthen matter.
 0
0