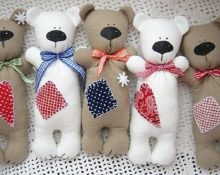
Everyone knows that small children cannot concentrate on one detail for a long time. The more toys they have, the better. Of course, parents can't buy toys every day. A great way out is to make them yourself.
Today we will look at how to sew a giraffe yourself.
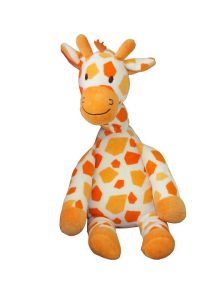
Giraffe toy - pattern, making master class
The simplest giraffe pattern is one-piece. It consists of 1 element and a tail, which can be woven from thick threads.
Our giraffe, the pattern of which is attached below, is exactly like this.
It's very simple to do:
- Cut two identical pieces from any fabric according to the pattern, leaving 0.5 cm allowance.
- From the wrong side, stitch these 2 elements, leaving a small hole in the tail area.
- Turn it right out.
- Fill with padding polyester.
- Insert the prepared tail and sew it up.
The whole giraffe is ready!
Now let's take a more complicated model.
The pattern has 5 elements: torso, lower legs, ears, hooves, horns.
The height of such a giraffe is 55 centimeters. You can do it in natural colors (yellow, brown), or in cheerful, bright colors.
The giraffe teddy pattern is attached in our article.
Materials for sewing the product:
- A piece of fabric with polka dots. It will be needed to make the mane, tail, ears and hooves. With a width of 140 cm you need 20 centimeters of fabric.
- Patterned material. Used for sewing the body. With a width of 140 cm - 50 centimeters.
- Bright burgundy fabric for making horns - 18 cm x 18 centimeters.
- Sintepon.
- Floss threads.
- 2 black buttons.
Sewing master class:
- We cut a strip of 140x7.5 centimeters from the polka dot material.
- We attach the long side to the same long side of the material with the pattern, aligning them with their faces inward. We fold the finished element crosswise in half, the seams should match.
- We transfer the pattern of the lower part of the legs and torso onto the prepared two-color element so that the hooves are on the polka dot material. Cut out 2 parts of each element.
- Face to face we add 1 leg element and 1 body element. Sew it together.
- We sew the body element to the leg element, sweeping the edges of the opposite sides. We do not sweep away the bottom of the hooves. Round the edges by cutting off the corners.
- We do the same with the two remaining elements.
- We cut out a strip of 60x6 centimeters from polka dot fabric. Fold in half lengthwise, facing inward. Iron it with an iron. We make a basting stitch along the long side, tighten the fabric and get a frill - a mane. Its length is 28 centimeters. Let's sew.
- Sew the mane to the giraffe's neck.
- We fold the parts of the body facing inward and sew them together, leaving slits.
- Turn it inside out and fill it with padding polyester.
- Sew up the slit.
- Cut out horns from burgundy fabric, leaving seam allowances and a slit for filling.
- We fill the horns with padding polyester, bend the edges inward and sew them to the head at a distance of 8 millimeters to the right and left of the mane.
- We make the ears from polka dot fabric - sew them together, leaving a slit for filling. Turn it inside out. We pull it together with a thread on one side and sew it to the head at a distance of 10 mm from the horns.
- Sew on the eyes.
- Making the tail. We cut out 2 elements of 5.5 x 3.5 millimeters from polka dot material. We take 16 pieces of floss, 14 centimeters long, and place them between the elements of the tail. The ends of the threads should come out of the tail from the side where it tapers. Sew the tail and sew on the giraffe.
The charming toy is ready. You won't find another one like it. And the grateful eyes of a child will be a worthy reward for you.
Everyone knows that small children cannot concentrate on one detail for a long time. The more toys they have, the better. Of course, parents can't buy toys every day. A great way out is to make them yourself.
Today we will look at how to sew a giraffe yourself.
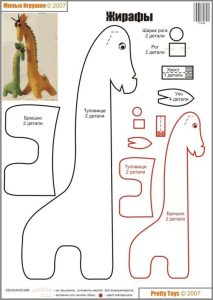
Giraffe toy - pattern, making master class
The simplest giraffe pattern is one-piece. It consists of 1 element and a tail, which can be woven from thick threads.
Our giraffe, the pattern of which is attached below, is exactly like this.
It's very simple to do:
- Cut two identical pieces from any fabric according to the pattern, leaving 0.5 cm allowance.
- From the wrong side, stitch these 2 elements, leaving a small hole in the tail area.
- Turn it right out.
- Fill with padding polyester.
- Insert the prepared tail and sew it up.
The whole giraffe is ready!
Now let's take a more complicated model.
The pattern has 5 elements: torso, lower legs, ears, hooves, horns.
The height of such a giraffe is 55 centimeters.You can do it in natural colors (yellow, brown), or in cheerful, bright colors.
The giraffe teddy pattern is attached in our article.
Materials for sewing the product:
- A piece of fabric with polka dots. It will be needed to make the mane, tail, ears and hooves. With a width of 140 cm you need 20 centimeters of fabric.
- Patterned material. Used for sewing the body. With a width of 140 cm - 50 centimeters.
- Bright burgundy fabric for making horns - 18 cm x 18 centimeters.
- Sintepon.
- Floss threads.
- 2 black buttons.
Sewing master class:
- We cut a strip of 140x7.5 centimeters from the polka dot material.
- We attach the long side to the same long side of the material with the pattern, aligning them with their faces inward. We fold the finished element crosswise in half, the seams should match.
- We transfer the pattern of the lower part of the legs and torso onto the prepared two-color element so that the hooves are on the polka dot material. Cut out 2 parts of each element.
- Face to face we add 1 leg element and 1 body element. Sew it together.
- We sew the body element to the leg element, sweeping the edges of the opposite sides. We do not sweep away the bottom of the hooves. Round the edges by cutting off the corners.
- We do the same with the two remaining elements.
- We cut out a strip of 60x6 centimeters from polka dot fabric. Fold in half lengthwise, facing inward. Iron it with an iron. We make a basting stitch along the long side, tighten the fabric and get a frill - a mane. Its length is 28 centimeters. Let's sew.
- Sew the mane to the giraffe's neck.
- We fold the parts of the body facing inward and sew them together, leaving slits.
- Turn it inside out and fill it with padding polyester.
- Sew up the slit.
- Cut out horns from burgundy fabric, leaving seam allowances and a slit for filling.
- We fill the horns with padding polyester, bend the edges inward and sew them to the head at a distance of 8 millimeters to the right and left of the mane.
- We make the ears from polka dot fabric - sew them together, leaving a slit for filling. Turn it inside out. We pull it together with a thread on one side and sew it to the head at a distance of 10 mm from the horns.
- Sew on the eyes.
- Making the tail. We cut out 2 elements of 5.5 x 3.5 millimeters from polka dot material. We take 16 pieces of floss, 14 centimeters long, and place them between the elements of the tail. The ends of the threads should come out of the tail from the side where it tapers. Sew the tail and sew on the giraffe.
The charming toy is ready. You won't find another one like it. And the grateful eyes of a child will be a worthy reward for you.


 0
0