creativecommons.org
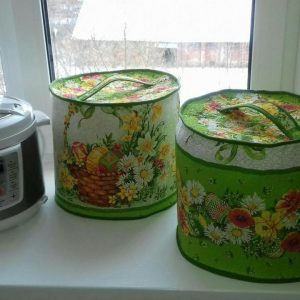
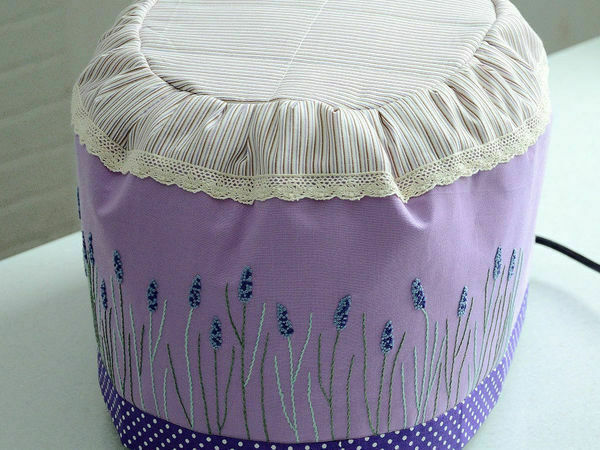
Knitting is not suitable for creating a cover for a multicooker; it will have to be sewn from fabric. It is recommended to give preference to cotton or linen. For one cover you will need three colors of material and fabric for lining. The work also uses filler, a little tracing paper, floss threads, and a piece of non-woven fabric. Such packaging for equipment will help protect it from dust, external contamination and humidity. Let's take a step-by-step look at the process of creating a product.
How to make a cover for a multicooker - pattern, getting started
Before you start sewing, you need to measure your household appliance. We lower the handle and measure the length from the right handle to the left handle. We get 80 centimeters. We measure the height of the multicooker - 25 centimeters. These are the parameters of the main element of the case. We measure the back of the equipment - 22 centimeters. To measure the lid, it is better to use tracing paper. We outline it, we get an oval pattern.
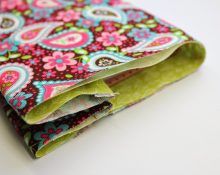
To decorate the main fabric we use embroidery. We cut out a piece of fabric from the main part, taking into account seam allowances.We glue interlining to it. We embroider any design to your liking. Next we proceed as follows:
- From a fabric of a different color, cut out a strip with sides of 90 and 7 centimeters for the bottom of the product.
- For the upper part, we cut out a strip from the third type of material. Dimensions – 90 and 8 centimeters. The parameters are calculated individually, depending on the size of the multicooker.
- We take a padding polyester, cut out a figure 25x90 centimeters, and cut out a similar part from the inner material.
- Sew the bottom strip, the main part with the decor, and the top strip. Sew the lining fabric to the bottom strip. We go over each seam with an iron.
- Fold the front and lining sides, insert a padding pad between them. Sew the layer next to the tacking seam. Similarly, we sew the area next to the basting stitches near the bottom strip.
Do-it-yourself multicooker cover - back part
creativecommons.org
The process of creating a back fragment consists of several stages:
- We make a square pattern on fabric, padding polyester and lining of the same size, do not forget about the allowances. On a flat surface we place a layer of padding polyester, then lining material and colored fabric. In this case, the lining and fabric are placed with their front sides facing each other. Stitch the bottom edge. We turn the material to the front side and go over it with an iron.
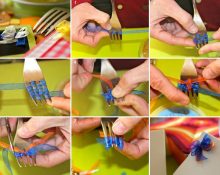
- Insert a hidden zipper. This will make the packaging easier to put on and take off. One side of the snake is located in the side section of the base, the other - at the back of the cover.
- We connect the right side section of the base with pins to one part of the snake. First, unscrew the lining and filling. We attach the part using a special foot.We proceed in the same way, inserting a snake onto the left cut from behind. To do this, we combine the lower part of the cover, unscrew the filling and lining.
- We cut off a centimeter from the padding polyester along the snake braid, fold it in about five millimeters, and use a needle to make a hidden seam.
- Place the raw edges of the product with right sides facing each other. We sew all the layers except the lining material, connecting the side and the base with a machine seam, and go over it with an iron.
- We fold the edge that is not sewn to the lining at the back and make a blind seam.
Cover for dishes or multicookers - upper part
- We sew three layers of materials with diamonds - padding polyester, lining, fabric.
- We process the edges.
- We tighten the base to the diameter of the upper part of the multicooker. We retreat five millimeters from the top and sew with the longest stitches possible. Insert pins in the middle of the base and back fragment. Select the center of the top. We connect the base and top with right sides along the central lines.
- We pull the main part to the size of the top and sweep it away.
- We make a seam. We process the cuts with bias tape. We go through the iron. We finish connecting the parts. The case is ready.
 0
0