shafa.ua
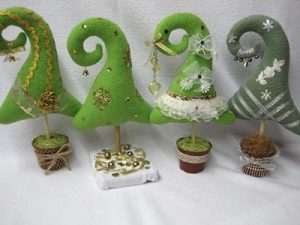
A textile Christmas tree, the pattern is publicly available on the Internet, is an excellent New Year's accessory that will bring a festive mood to your home. This craft is often found in cafes and restaurants, shops and shopping centers. Original and simple decor can do wonders. Nowadays such products look fashionable and stylish. Maximum simplicity - minimalism remains popular even in New Year's decorations. A DIY Christmas tree toy allows you to give free rein to your imagination. You can make it in a few hours, but this decoration will delight the eye for many years. The Tilda Christmas tree can be of any size, but most of the crafts are small. They decorate gifts, apartments, and store windows.
Textile Christmas tree tilde - pattern, materials, sewing guide
To make a beautiful Christmas tree, the pattern must be drawn carefully, with all the details. It must be cut out of paper and outlined on felt. Tools you will need:
- Filling – padding polyester or any other;
- A wooden shelf or pencil for stuffing a toy;
- Chalk. With its help, the contours of the pattern are transferred to the fabric;
- The actual pattern of the product, made independently or taken from the Internet;
- A piece of felt. To make a toy measuring 20x20 centimeters, you will need a piece of felt 22x43 centimeters;
- Threads of a suitable color;
- Small pot for indoor flower;
- A stick from a tree. It will play the role of a trunk. A thick branch from a street tree will do. It can be decorated with paints or wrapped with brown felt;
- A little moss to decorate the soil in a pot;
- Iron, scissors, sewing machine;
- Floral sponge or foam.
Master class on how to make a Tilda Christmas tree with your own hands:
shafa.ua
- Fold a piece of felt in half, facing inward. Iron.
- Trace the outline of the Christmas tree on the fabric.
- Machine stitch along the edges. The stitch is one and a half millimeters. The seam must be reliable so that the toy can be stuffed well and not come apart.
- Use scissors to cut a pattern from the fabric. Leave an allowance of three millimeters. Make an extended allowance near the base of the product.
- Make small slits in the corners so that the tree will not come together after turning it inside out.
- To carefully turn the product out, use a wooden stick. We fold the fabric left at the base for the seams inside. To smooth out the stitches, use a wooden stick and go over all the seams on the inside of the product.
- Carefully push the padding polyester into the Christmas tree. We use a wooden stick. It is especially important to push the stuffing well into the corners, making them as hard as possible. The inner part can be stuffed less so that it is a little soft.
- You can add flavoring to the middle. For example, a little cinnamon, various herbs or mint.
- Insert the trunk - a previously prepared stick from the tree - and sew up the gap between the base with a blind stitch.
The toy is ready. For decoration you can use beads, rhinestones, sparkles. Sew a star or other shape onto the top. Braid or light rain will look beautiful.
 0
0