creativecommons.org
If you think that ties are made only from fabric and leather, you are deeply mistaken. Recently, beads, beads and various stones have increasingly begun to be used for this purpose. And this is quite justified - after all, any thing made with your own hands is unique and unrepeatable. And using the beading technique, it becomes simply a work of art and will decorate any outfit.
Using various weaving techniques, you can make a beaded tie with your own hands in exactly the color, shape and length that you need.
The article provides a pattern, diagrams and a description of the weaving technique.
A beaded tie, the master class of which we will now look at, can be made by novice needlewomen.
You will need:
- Beads.
- Nylon thread.
- Special needles for stringing beads.
- Scissors.
- Ring-shaped clasp with lock.
Weaving a tie from beads
A beaded tie, the weaving pattern of which is presented below, is not particularly difficult to make.Let's divide the work into several stages:
1. Perform row 1:
Cut 1 meter of nylon thread and attach a bead to its end.
String 5 more beads. We collect in a circle and thread a thread through the first bead and 3 more beads in the circle.
We string 5 more beads and thread them again in the same way. We repeat again and again.
To set 1 row you need to make 28 such rings.
Tie all the threads into two knots.
2. Weave a tie from beads, diagram:
We start the second row with a bead located to the left of the center of the last ring. This will allow you to arrange the pattern in a checkerboard pattern.
We string 4 beads and thread the thread through the ring of the 1st row into the second bead.
Then back - through the 1st, and then again through the circle obtained earlier.
After creating the 1st circle for row #2, string 3 beads for the next ring.
After finishing row No. 2, start row No. 3 in the same way (+ 4 beads in the first circle and +3 in all others).
Having completed 3 rows, return to row No. 1 and perform 2 more rings. In this case, the 1st ring should be located in the center between the 1st and 2nd circle, and the 2nd between the 2nd and 3rd.
We weave the last ring between these two rings. As a result, you will have a corner at the bottom of the tie. The main fabric of the future tie is ready.
3. We perform the upper “knot”:
We string 1 bead onto a long thread and tie it into a knot.
Add 3 beads and collect them into a ring, while inserting a needle through the first and two subsequent beads.
We add 3 more pieces and go back through the last bead of the last loop and then the next 2 beads.
Complete 9 rings. In the final circle, pull the thread through all 3 beads.
To knit the next row, again add 3 beads and pull the thread back into the last bead of the previous row and again into the first bead of the loop just knitted.
We put 2 beads on a thread, thread it through the ring coming out of the 2nd loop of the previous row and through the last bead on the final circle. So we weave until the end.
We knit the next row similarly to the second. You will need 7 such rows.
4. Attaching a “knot” to a tie:
We connect the two sides of the second row of the “knot” with two beads threaded on a thread. We tie the strings with double knots.
In the 3rd row we add 3 balls, in the 4th row - 4, etc. (each row is 1 more).
We tie the top with a double knot.
5. To keep the tie on your neck, you need to weave a rope out of beads and decorate it with a clasp for easy unfastening of the product.
We string 40 beads onto a nylon thread. We make 2 ropes. We sew a connecting ring and a lock to one end, and the other is secured to the “knot” of the tie.
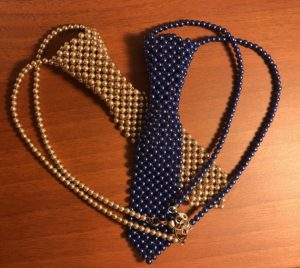
The beaded tie, the photo of which you see below, will be a worthy decoration for your outfit.
A variety of beaded ties with patterns can be found on the Internet. Such accessories are very popular now. In this case, various execution techniques are used.
A beaded tie is made:
creativecommons.org
- Using lace weaving technique.
- Cross weaving.
- Mosaic technique.
- Hand weaving.
- Weaving on machines.
The beaded bolo tie looks interesting. This stylish accessory is not very well known among us. It appeared in America and therefore is often called a Texas or cowboy tie. Previously, it was a purely masculine decoration. Now women often use it too. What is a bolo tie?
The word is translated from English as “lace with a clip.” And it really is a piece of braided leather or suede cord, decorated with various decorative clips and fasteners.
Bolo ties in the form of a cord decorated with a brooch are now popular. Precious metals and stones are used as inlay. Usually these products are very expensive and are sold in fashion boutiques. But if you have the desire, you can make them with your own hands using beads. You can use beads to weave a cord into a bolo tie and make a beautiful brooch for decoration.
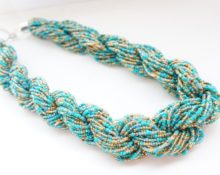
A necklace, a beaded tie, a necklace, various beads and baubles - all this can be made with your own hands. The originality and variety of such products cannot be described. Each one is unique and inimitable.
 0
0