creativecommons.org
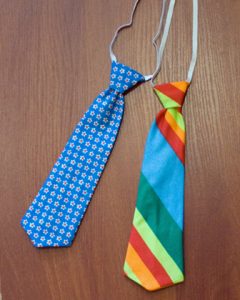
An original women's tie is a fashionable accessory for a business woman. This is a great way to highlight your style. The set looks great - strap, tie and shoes in the same color scheme. This is how modern ladies diversify the classic black and white suits they wear to work. There are a number of differences between men's and women's ties:
- Tying an accessory. Today, various types of knots are in fashion, which are used by both sexes. The difference is that men tie the knot very tightly, women make it loose.
- Design features. A woman's tie is not always a classic. There are a lot of bright, multi-colored models with patterns, rhinestones, embroidery and other decor. Men's accessories retain rigor and classical restraint.
- Size. A woman's tie is sometimes shorter and wider than a man's. The men's accessory is always long - 140–150 centimeters, with a width of three to ten centimeters.
The principle of sewing the product is not particularly different. The tie remains a thin strip of material with a supposed tie at the neck. It doesn't matter who will wear it - a woman or a man.
How to sew a tie from ribbon - kanzashi
Kanzashi technology is used not only when creating fabric flowers and compositions. Ribbons can be used to create a stunning tie. It is suitable for special occasions, business meetings and working days in the office. To sew the top part of the product you will need:
- Black rep ribbon. Width – four centimeters. Length – calculated from the sum of the lengths of the four required segments. You need one piece of tape measuring 15, 25 and 30 centimeters, and two pieces of material measuring 28 centimeters.
- White lace. Width – two centimeters. Length – the sum of the lengths of the segments. One part is 25 centimeters, two parts are 28 centimeters each.
- A stone, a beautiful button or other decoration. Diameter – centimeter.
- Black square felt. The edge of the square is two centimeters.
- Pin.
The lower part of the product is made of the following materials:
- Black grosgrain ribbon similar to the one used above. Width – four centimeters. Length – the sum of the lengths of the segments. Six parts – 13 centimeters, three parts – fifteen, one part – 26 centimeters.
- White lace. Width – two centimeters. Length – three parts of 15 centimeters each.
After completing the preparation of materials, we move on to creating a tie:
- We make the base for the bottom of the accessory. We cut 26 centimeters from the rep, bend the piece so that a loop is formed. To do this, we combine the two ends of the tape. Glue them together. A semicircle remains on the fold; it does not need to be smoothed.
- We measure and cut six pieces of 13 centimeters each from the tape.We collect six small loops and glue all the ends together.
- We make three pieces of tape 15 centimeters long. We cut similar pieces from the lace roll. We combine both strips in length.
- We make loops from two connected ribbons.
- We begin to attach all the loops made to the largest loop on the fold. We glue two elements from the bottom side and separate them on different sides. Between them we insert a black and white detail with a lace ribbon. Moving higher along the base, we secure the next two parts. The bottom of the tie is ready.
- To make the top fragment, take three parts of lace and black ribbon. You will need one 25 centimeter part and two 28 centimeter parts. We combine the strips and make loops on both sides. We close them at the back in the center.
- We put the resulting elements into a bow. We cross the two according to the X principle. Leave the upper part in a horizontal position.
- Another identical loop is made from 15 centimeter tape. It is fixed in the middle, in a horizontal position. We get a bow that needs to be rotated 180 degrees. Here we attach the bottom of the product.
- We use a ribbon of maximum length to hide the fastening. Before this, the two opposite ends of the ribbon are closed into the shape of a bow.
- A pin is glued to the back using a felt square. The moving part should not be limited in movement so that the accessory can be easily attached to the fabric.
- Turn the product over. Glue the decoration in the middle. If desired, frame the button or stone with fabric.
With such a tie the most daring design idea can come true. It looks original. The product is exclusive, so it will certainly cause a lot of admiration from others.
How to make a women's tie - pattern of a women's tie from fabric
The process of creating a pattern for a women's tie is no different from working on a pattern for a men's accessory. The difference lies only in size. First you need to choose a model, choose the appropriate length and width. The standard width of a women's tie is from 12 to 17 centimeters. Length - from 60 to 140 centimeters. However, these restrictions are conventions. Each representative of the fair sex chooses the parameters of her own tie herself.
The product consists of three parts:
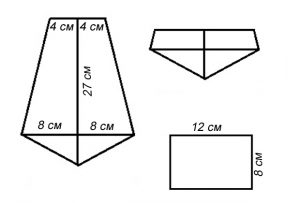
creativecommons.org
- A – lower part and triangle.
- B – middle of the product.
- B – top of the accessory.
According to statistics, A accounts for 70 centimeters, B - 10, the rest belongs to C. It will be easiest to sew the product if you have an unnecessary tie in front of your eyes. It can be split open and laid out element by element. Then proceed by analogy. To create a pattern:
- We take a strip of material 140 centimeters long. We tie it like a tie. Align the length. The triangle should be located next to each other a few centimeters lower than the waist. The length of the narrow end is always less than the wide part.
- We mark the endings and location of the node on the material. This will help prevent future seams from getting into visible areas. We remove the material and take measurements. A low angle is straight, just like a wide angle.
- After transferring the details onto paper, we double them. Add half the width at each edge.
- During the cutting process, the guideline for laying out the pattern pieces is an oblique line. Be sure to leave one centimeter seam allowances.
- Similar elements need to be cut out on non-woven fabric. No magnification is required here, nor are allowances.
- We take the lining material and cut out analogues of the triangles at the bottom and top of the product. A fragment of a pattern is used.Add a centimeter to the allowance, but only on the slanted edges.


 0
0