creativecommons.org
A pincushion is an indispensable item for those who love to sew, knit or embroider. There are special product models designed not only for storing needles. The special pocket fits a knitting needle or crochet hook perfectly, and the side compartment is suitable for a ruler or scissors. It turns out to be a real tool case that you can make yourself. But an ordinary needle bed is also necessary in the household. Its main part is the pad where the needles will be inserted. The product can be interpreted in various ways. This could be a toy or doll with a special pillow on its stomach, or a flower with the middle as a place for needles.
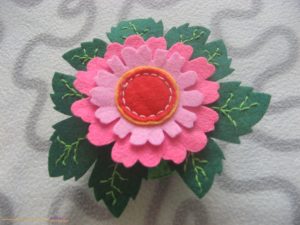
A stylish felt pincushion is a flower with bright petals, made according to a special pattern. Felt is very easy to work with, it is not for nothing that it is widely used in needlework and crafts. You can safely cut it without fear that the fabric will begin to fray or come apart.Felt glues well and combines with other materials. Simple felt pincushions can be sewn in a few hours.
Felt flower pincushion - master class
To make a cute flower pincushion you will need to prepare:
- A small jar as a base.
- Five sheets of felt: beige, yellow, green, orange and brown.
- Decorative elements.
- Sintepon or other type of filler.
- Threads with a needle.
The product pattern consists of four parts. On paper we draw a flower with petals in semicircles. Next we depict a similar figure, but smaller. The difference at the edges is about one and a half centimeters. The third detail is a small circle, the middle of the flower. The last element is the leaf of the plant.
We cut out all the details and transfer them to the fabric. We cut out flowers in one copy, two in the middle, and four leaves. We measure the dimensions of the jar. You will need the height and length of the container. Based on them, we set the parameters of the rectangle, draw it on the fabric, and cut it out. This will be the side part of the product. Progress of further work:
- Cut a strip of felt. The width is one and a half centimeters, the length is determined in accordance with the diameter of the jar. Trim the long edge on one side, drawing a zigzag with scissors.
- We sew a stripe to the side from the top edge, this is a decorative element. We sew the part at the edges, forming a circle.
- Let's move on to working with the flower. We sew two small circles and stuff padding polyester inside. We fix the middle on the smaller flower with threads.
- On a large flower, lightly grab the petals in the middle from the wrong side. They will become voluminous and convex. Then we connect the large small flower model.
- We are working on the bottom of the foundation. To do this, place the jar on the fabric and draw a circle around the bottom.Green felt is suitable for the top, brown material is suitable for the bottom.
- On the upper base you need to sew leaves and the needle bed itself in the form of a flower. The top part is sewn with the side elements.
- The resulting product is put on the jar, then the bottom of the needle bed is sewn on. You can glue decorative decorations.
DIY felt pincushions – photo
creativecommons.org
To make a needle bed using the second method you will need:
- A little padding polyester, beads or beads;
- Needle and floss thread;
- PVA, scissors, a jar containing cotton swabs;
- Small colored pieces of felt.
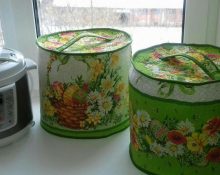
Step-by-step instructions for creating a needle bed with your own hands:
- We cut the jar approximately in the middle, making something like a cup.
- Draw leaves on green felt and cut them out with scissors.
- Using threads, we add veins to the leaves to make them look natural.
- Glue the finished leaves onto the inside of the jar.
- Fill the jar with padding polyester and leave the glue to dry for several hours.
- We draw a flower pattern on paper, cut it out, transfer it to felt, and cut it out of fabric.
- We get a large flower, a smaller layout and a middle one.
- We assemble the flower, add naturalness with thread veins, and sew on beads.
- Take green felt and cut out a strip. Width and length are 1.5 times the parameters of the can.
- We connect the strip at the ends and sew it together.
- We make three seams along the length of the strip. We use the needle forward technique. The function of the top and middle stitching is decorative. Using the bottom seam, we collect the material at the bottom of the can. We stretch the fabric over the jar. Using glue, fix the flower.
 0
0