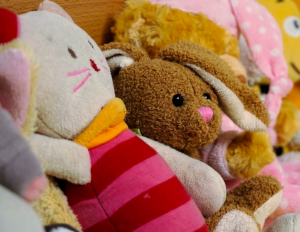
Little children love soft toys. They play with them, cuddle, sleep. Is it just the little ones? The love for cute toys is also inherent in adults - as interior elements that give the home warmth and comfort.
The stores are filled with a variety of soft toys. But a soft toy sewn by one’s own mother is the most expensive and beloved. And if the child has seen how it is done or took part in the manufacturing process, 100% success is guaranteed.
Patterns of soft toys can be downloaded for free from the Internet. There are many of them. Or you can start by sewing an easy-to-make soft toy, for which you don’t even need a pattern.
Find the picture you like and roughly, looking at it, cut out the toy patterns. When sewing, it is not at all necessary to follow given proportions - this is a creative activity and images can be very stylized. This will not spoil them, but will only add charm.
Sewing and patterns of beautiful toys
Let's start with the simplest ones.Patterns of round toys can be downloaded from the Internet, or you can, looking at the image, completely do without them.
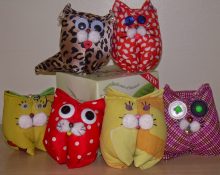
Let's try to make a soft "kote" toy.
Let's prepare materials:
- Plush fabric of any color (pink, blue);
- Filling: synthetic winterizer, holofiber or cotton wool;
- Pieces of black felt for the eyes and nose (can be replaced with buttons);
- Glue gun;
- A stick for convenient filling of the toy (from sushi).
The master class is as follows:
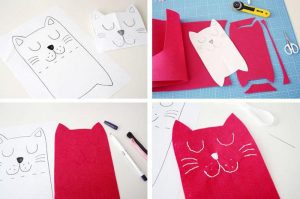
- On paper, cut out a shape resembling an egg;
- At the top and bottom in the middle of the egg we make cuts with concave lines, shaped like triangles. Their depth is approximately ¼ of the height of the egg;
- Place the pattern on the folded fabric and cut it, being sure to leave small seam allowances on all sides. We do not cut out the triangular cutouts yet;
- On paper we draw other elements: a long stripe rounded on one side (tail) and two rounded triangles (ears);
- We fold the fabric in half, face to face, and trace out the templates for the tail and ears. Cut out, leaving seam allowances;
- We sew together the ears and tail, leaving the lower parts open for filling;
- We turn these parts inside out and push the filler inside using a stick;
- Let's start assembly. We sew the ears to the face of one part of the body. Place the two parts of the body face to face. We sew together the upper outlined triangles and trim off the excess fabric. Sew the sides to the beginning of the lower triangle;
- We cut the fabric vertically along the lower triangle and insert the tail there. We make a triangle with a tail on one side;
- Trim off the excess. We turn the toy inside out and fill it with filler;
- Sew up the hole;
- Glue the eyes and nose cut out from felt onto the muzzle;
- We embroider the mouth with black thread;
- Let's make small paws - cut out two circles from plush, tie them together with a thread around the perimeter, stuff them with padding polyester, and sew them on.
Our “Kote” is ready! And we didn’t need animal patterns.
If it’s difficult for you to make patterns yourself, you can always print toy patterns from the Internet.
Using this principle, you can sew any toy. You can download a diagram with dimensions or life-size toy patterns. Here everyone chooses for themselves what is more convenient for them.
Life-size attic toy patterns
Many people probably don’t know about this type of soft toy. But its history goes back to the first American settlers. The origin legend is this: a woman made such a doll for her daughter, and she forgot it in the attic of a coffee factory. The toy absorbed all the aromas of coffee, vanilla and cinnamon, and managed to grow old and dusty.
The main thing in making attic dolls is the smell of childhood, home and holiday. They are necessarily given some “oldness”. They sew only from natural materials in soft, muted colors. They are usually decorated with buttons.
Toy patterns can be downloaded for free from the Internet. They should be as simple as possible. Legs and arms are elongated.
What you will need to make a soft attic toy:
- Ground coffee;
- Cinnamon powder and vanilla;
- Pieces of natural fabrics;
- Sintepon, holofiber - for filling.
Operating procedure:
- First, we cut out the details of the future toy. Particular precision is not required. Proportions aren't important either;
- Next, we make the impregnation: two teaspoons of ground coffee + the same amount of cinnamon + 1 packet of vanilla. Pour boiling water over the mixture, bring to a boil, remove from heat and drain through cheesecloth;
- We carefully soak the material for sewing the toy in this mixture and dry it. We do this 2 times;
- We iron out the pattern elements;
- Sew;
- Fill with filler;
- We embroider eyes, a mouth, and decorate with buttons.
Nowadays, interior toys have become especially popular; life-size patterns of such crafts are available in abundance on the Internet.
They can be purchased in stores, or you can also make them yourself. But this requires time and, of course, a flight of imagination.
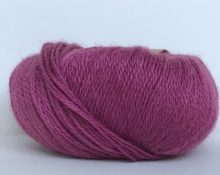
Such crafts are made from clay, knitted fabrics, and knitted from threads. The dolls are dressed in a variety of outfits and have their hair and makeup done. Downloading toy patterns from the Internet is not a difficult task.
And then your limitless imagination comes into play and everyone can give their doll what they themselves lack.
 0
0