pinterest.com
Every little girl spends a lot of time playing with dolls. The best gift for a baby is a dollhouse, clothes, shoes and other accessories. You can buy a ready-made house for the toy or make it yourself. If you have the opportunity and desire to create your own masterpiece, this option will be even more interesting. After all, no one will have analogues of a self-made mansion. The main materials for the house are cardboard and paper. Any boxes of household appliances, postal parcels and sheets of ordinary Whatman paper will do. Detailed information on how to make a doll's cottage is available on the Internet. All that remains is to cut out the main parts and glue them together correctly. After finishing the exterior of the house, the question of filling it arises.
You will need a table for the doll, a bed, a bedside table, chairs and armchairs. Buying all the furniture for a children's playhouse is quite expensive. Therefore, if parents have free time, they can become interior designers themselves.To create objects, you do not need to look for special components or select a tool. It is quite possible to make do with improvised means. Next, we will tell you how to make a chair for Barbie that will be better than factory products.
Wire chair - how to make a chair for dolls with your own hands
Everyone probably has wire, at least in small quantities. Considering that the furniture in the house is miniature, like the doll itself, a small piece will be enough. Chair for a doll – MK:
- To make a chair for a doll with your own hands, you will need a small piece of cardboard, a regular sponge, twine and wire. Instead of twine, you can use plain yarn.
- The doll's chair will be wicker, which makes it even more cozy and special. First of all, cut out the back part from a cardboard sheet. We make holes along the edges of the back using a needle.
- We insert the wire into the holes and first fold it in half.
- We intertwine the top parts with yarn or twine.
- After this, we secure the yarn with wire, bending it.
- Let's move on to working with the bottom. Similarly, we weave the doll chair along the bottom part, securing it with wire upon completion.
- Checking the stability of the chair.
- We make braids from wool or twine. The weave must be of a matching color. We cover all curved sections of the wire with a pigtail. We decorate a chair for a dollhouse with our own hands.
- We use the same wire for the chair legs and make four supports.
- We take a sponge, glue it or cover it with material, and place it on a wicker chair.
This completes the “Chair for a doll” master class. The result is a stable wicker chair on legs with a removable seat. You can make several pillows so that your child can change the colors of the interior.Wire technique is also the best option for making a hanging chair for dolls.
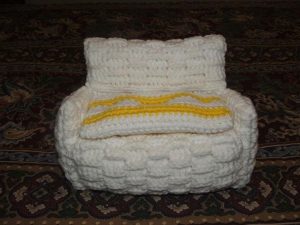
How to make a crochet chair for dolls - knitted furniture for Barbie
pinterest.com
You can make an original chair for Barbie with your own hands using knitting. For craftswomen who are passionate about crocheting and knitting, this is a great way to fill a dollhouse with exclusive furniture. To work you need to prepare:
- Two types of threads. You need to choose different colors - one lighter, the other dark. Half-wool or wool yarn is suitable.
- Number two hook.
- A piece of thick cardboard.
- Thread and needle.
- Filler material. You can use padding polyester, foam rubber or a sponge.
When choosing wool, it is advisable to choose material from the same production. Otherwise, there may be discrepancies in yarn thickness. Let's start knitting a doll chair with our own hands:
- The chair will be round, so we make the base in the shape of a cardboard circle. A sleeve from adhesive tape can also serve as a base.
- Draw a circle on the cardboard twice. We cut out both shapes along the contour.
- We glue the circles onto the blank.
- To create a chain from light yarn, we take six air loops, they need to be tied with a ring. Then knit twelve single crochets.
- By the second line the number of columns doubles.
- The third row is adding through a column. The fourth row is two columns apart. The fifth row is through three columns. We get a completely smooth, knitted circle.
- We make a couple of air loops for lifting, and proceed to knitting the walls. We don't add any more loops. We carry out internal gripping of the loops of the main circle. We grab until the canvas reaches the height of the blank.
- We put the knitting on the base. We begin to knit a wool circle according to the previous pattern.
- Using a needle we sew the product to the blank. Let's move on to working on the back.
- We make a chain of four air loops from dark threads. We connect it with a ring and tie it with 8 single crochets.
- The second row consists of sixteen columns.
- We knit the columns according to the same principle as when working with the base. We are not making an increase. We grab the inner loops and move in a circle.
- When lengthening the element, we simultaneously fill it with padding polyester or cotton wool.
- We knit the second circle in two rows. We attach it to the back of the chair. We connect the chair to the back using a thread and a needle, and at the same time bend the back.
Handmade knitted chair for a doll! It remains to choose other interior items to match it.
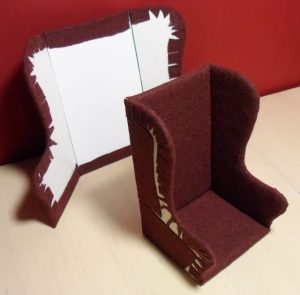
Do-it-yourself chair for a doll - master class
A standard upholstered chair is made using PVA, upholstery material, filler and cardboard. The manufacturing process is as follows:
- If the doll is a standard size Barbie, take a piece of cardboard with sides 21 by 12 centimeters, cut out equal squares on the left and right and bend them, making the shape of a chair.
- The cut material will be useful for seats. We work with the lower part, glue it, try it on. At this stage we do not connect the base and bottom.
- We glue a piece of sponge cut to the shape of the part to the seat. Then the back is glued.
- We unfold the craft, we also put soft material on the armrests - we sew it or use glue.
- We wrap the fabric around the back and glue the material.
- We insert the bottom of the chair and glue the fabric onto the armrests.
- We unfold the product and cover all open areas with upholstery with the material.
- We decorate the back of the chair. Now the product can be completely assembled and glued.
- Along the lower part we decorate the furniture with lace or fringe, flounces. The chair is completely ready!
DIY rocking chair for a doll - how to make a doll chair
The most convenient way to make a rocking chair is to use ordinary wooden clothespins. Twelve pieces and regular glue will be enough. Step-by-step instruction:
- We disassemble all the clothespins, removing metal parts.
- Glue the eight pieces together like a fan. This will be the back of the product.
- We glue another eight elements in the shape of an even rectangle. The piece will become the seat of our rocking chair.
- We make the side parts from two parts glued together in the shape of a house. We attach another element on top with the rounded part facing outwards. Attach the clothespin to the base with the rounded part down.
- We collect all the elements. The rocking chair for Barbie is ready.
 0
0