crafta.ua
Toy dogs and cats are not only children's favorite friends, but also a wonderful interior decoration. A soft toy dog will bring an atmosphere of kindness and comfort to any room. You can do it with your own hands in several ways. The craft will serve as an excellent gift for relatives and friends. Many adults keep toys that were carefully made by their parents throughout their lives. They are precious, like a memory of childhood, one of a kind.
Pattern of a dog toy from fabric - how to sew a soft toy dog
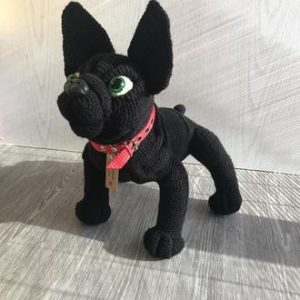
At the initial stage of work, a dog pattern is selected - the soft toy can be made in the form of a dachshund, a large bulldog, a cheerful cartoon puppy, and so on. The set of necessary materials depends on the size and breed. Let's look at the work process using the example of a toy terrier. Before sewing a dog toy with your own hands, you need to prepare:
- Threads;
- Two buttons or beads for eyes;
- Ribbon, bell for collar;
- Stuffing material;
- Cotton;
- Five pins;
- Scissors;
- Threads for working on a machine;
- The material from which the bags will be sewn;
- A little buckwheat or rice.
The pattern of the dog toy is taken from the Internet, printed on a printer, and transferred to the material. Depending on the pattern of the puppy, the soft toy changes parameters.
DIY soft toy dog - step by step guide
crafta.ua
Before starting work, the material must be ironed well and get rid of wrinkles. Then we proceed according to the scheme:
- The pattern of the toy dog is transferred to the material, all fragments are cut out along the contour.
- We work with two parts of the legs. We use them to insert them from the inside, aligning them on the flat side. Mark a line in the center. The length should allow the master's hand to pass inside. The filling will be carried out through the hole. We secure the fragments with pins and make a seam near the edge. We do not sew the marked gap.
- We open the paws from the inside out, placing one side on the part of the dog’s body. We fasten with pins and make a seam near the edge.
- We proceed in the same way with the second element of the body and the other part of the paw.
- From each leg we remove the material in turn from all corners and sides. Carefully press the stitching on the sides and bottom. We make marks on the sides and retreat a centimeter from them. We draw a segment and make a seam along it. This will increase the stability of the toy.
- We attach the ears with pins to the head on the dog's body. We make seams on both sides, leaving a centimeter at the end of the unstitched material. We connect and sew the triangular fabric of the crown.
- We attach the lower part of the head to the body, sew on both sides, leaving a free centimeter of fabric at the end.
- We connect and stitch all the elements.Only the gap for stuffing the toy remains unsewn.
- Turn the product onto your face. Using a crochet hook, carefully draw out the details of the tail and ears.
- To fill the legs we use cereal. It can be replaced with sand. This gives the toy stability. We make four bags for filling. You will need four pieces of material 16x8 centimeters. They need to be folded in half, sewn along both edges, filled with cereal through the unstitched side and sewed up.
- We stuff the dog with padding polyester, holofiber or other material. Initially, insert one bag of cereal into each paw. After filling the main part, similarly insert the filler into the tail and ears, then into the remaining elements.
- We manually stitch together the filling gap left earlier.
- All that remains is to decorate the toy with a “noble” bandage around the neck. We put a bell on the ribbon. We sew the ribbon and hide the seam under the pendant.
- From threads, beads or other materials we make the animal’s eyes and sew in a nose.
The DIY decorative soft toy dog is finished!
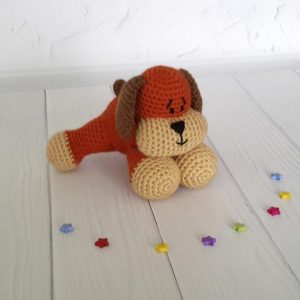
How to sew a soft toy dog - pattern of a soft toy - dog
Let's look at another way to sew a toy for a dog. It will appeal not only to your pet, but also to your children. This original craft can also be a wonderful decoration for your home. The pattern is printed on a printer and transferred to cardboard. To work you need to prepare:
- Multi-colored sheets of felt. You can choose any colors, depending on the wishes of the master.
- Scissors, needles, pins.
- Threads and buttons.
The dog is very easy to make. You can work on a craft with your child, trusting him with some simple tasks. This not only develops motor skills, but also stimulates creative thinking. Step by step guide:
- We cut out the body from fabric in duplicate, using a pattern taken from the Internet.
- We attach the ear part to the material and cut out two fragments. They can be multi-colored or plain.
- We also cut out a spot for the dog’s body of any shape, a nose.
- We are working on the collar. We draw one strip measuring from eight millimeters to twelve centimeters, cut out the part.
- Select the front element of the main fragment, sew in a spot, then make a nose.
- Using embroidery or a marker we designate the mouth and eyes. You can use purchased blanks for the eyes, and sew the nose with thread.
- Putting the elements together. For convenience, it is better to pin them together with pins so that the parts do not fall apart.
- We sew the edges of the dog, leaving a small gap for stuffing. We fill the product with padding polyester, holofiber or cotton wool, then sew up the gap.
- Sew on the dog's ears.
- Now let's put the headband around the neck. Don't drag it out too much. We fix it with a pin and sew on a decorative ornament or button.
 0
0
Where's the pattern?