creativecommons.org
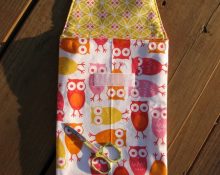
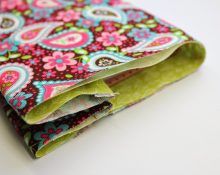
For a long time, origami has been in demand, not only as a separate branch of paper creativity, but also as a way to create interesting things from fabric. The essence of the technique does not change, regardless of the material taken. The masters act identically, collecting fancy patterns that can be used to decorate clothes or interiors. Using an origami flower you can add personality to a bag, dress, pillow or other things. In most cases, fabric origami consists of two colors.
Fabric origami - history
The Japanese first started doing origami. The point was that the craft was created from paper, which was folded in a special way. The result was a non-standard flower, toy or decoration. Using this technique, experienced craftsmen created a variety of birds, animals, plants and much more. According to one version, the technique appeared much earlier than knitting, embroidery and other needlework.The basis for the development of origami was a special technique that the Japanese used to drape materials.
Considering that paper appeared in the state of China, according to some theories, this country is the progenitor of origami. The Chinese carefully kept the secret of paper production for many years. It was incredibly expensive and very rare material. This explains the fact that paper crafts were used only in Buddhist religious events.
Patchwork origami made from fabric appeared much later. Its essence is also to create flowers, but it uses fabric instead of paper. Fabric origami is a more modern technique that allows you not to limit yourself to colors. With its help you can make a luxurious butterfly, a cute bird, an exquisite animal. The fashionable trend of patchwork is origami made of fabric, used in the design of stylish clothing and interior items. It is based on the intricate draping techniques used in ancient times.
Fabric origami, the patterns of which can now be found in huge quantities, was previously a narrow focus of the technique. People preferred to work with paper, considering it the traditionally correct way to create masterpieces. Do-it-yourself fabric origami is based on many principles and rules, and products are created in accordance with them. These rules are different from those that should be followed in paper origami.
Origami clothes made of paper - diagrams, origami pants

creativecommons.org
The paper technique does not use fabric, hooks, needles or threads. Everything is made exclusively from paper. These products can be used to beautifully decorate gift cards, advertising brochures or crafts for labor lessons at school.Instructions on how to make a dress out of paper:
- Take a paper square with any pattern, fold it in half with the white side inward, unfold it and fold it on the sides towards the midline.
- We unfold the square again and get a figure divided into four equal parts. Gradually fold the side folds towards the midline.
- We bend the model of the dress in half, retreating one centimeter from the top, and turn the paper over. Let's start making the skirt for the dress.
- To open the folds on a paper product, you need to pull the paper by the area of the right inner corner in the opposite direction until it stops. The fold should be held by the index finger in the central part at the top.
- Extend the second side in the same way. In origami, when straightening folds, you should pull the material as far as possible. Let's move on to the next element.
- To create a neckline, fold the corners from the top downwards, maintaining a right bend angle. We bend the paper, getting a visual reflection of the collar. Turn the product over to the reverse side. We pull back the upper part of the dress, while opening the pockets obtained during the last step. We straighten and smooth out these pockets.
- We bend each side of the upper part of the product in turn. Not only the top of the product is folded, but also the paper on the sides of the bottom. The bend distance on the top and on the skirt is identical. One of the conditions for creating the right origami dress is the symmetry of its sides.
- To make a sleeve, bend the upper corners on the back side as much as possible. To decorate the product, you can use decorative elements - ribbons, braid, rhinestones, etc.
Let's get acquainted with another tutorial - how to create origami pants from paper. The process is quite clear and interesting.As a result, we get formal trousers for a man’s business suit, made of paper. The size of the product depends only on the wishes of the master.
- You need to take a sheet of colored paper of any color, for example, black. For classic black trousers. The leaf shape is square. Bend it in half, then straighten it. Fold the other two sides in half and straighten them out. Placement of the sides – taking into account a slight slope. We connect the side parts to the middle again.
- Along the entire length we divide the layout into two equal sections. We visually divide the upper section into two equal parts. In this line, the material bends towards the bottom.
- To get the finished trousers, all that remains is to turn the material over.
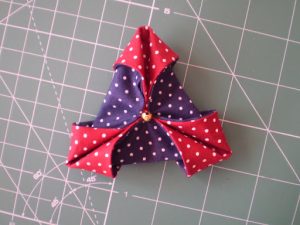
Fabric origami - flowers
Patchwork origami is used to create beautiful flowers that can be used to decorate a variety of products. Like origami patchwork, the patchwork technique is used in the formation of modern images in the fashion industry. For an origami flower you will need:
- Several pins;
- Thread, scissors, needle;
- Paper;
- Compass;
- The fabric is two colors, the size of the flap is 18x18 centimeters.
The technique of making jewelry includes several steps:
- Creating a template. Take a sheet of paper and a compass. Draw a circle. Diameter - fourteen centimeters. We put a mark in the center. Draw a straight line through the center point, forming a split line. The figure cut out of paper will be a ready-made template.
- Fold the paper circle in half along the lengthwise segment, then repeat the action. Open the circle. A line remains to mark the perpendicular fold. We draw a segment along it.
- From the middle along perpendiculars we make marks on the circle in increments of 2.8 centimeters. These marks will become the folding point of the edges of the fabric blank. We don’t add more circles.
- Preparation of the workpiece.On fabric of one color we place material of a different color with the right sides facing inward. We fix the paper circle with pins along the fractional segment. We outline it, this will help make the figure even. We take centimeter seam allowances into account.
- Now you need to remove the paper circle, pin two materials together, and mark a five-centimeter segment on the edge of the resulting circle. Set marks. This part will not be stitched; it will serve as a hole for turning the product inside out.
- Working with fabric. Cut a circle from the material, stitch along the perimeter between the marks on the larger side. Secure the edge and leave a marked gap. You can stitch the workpiece twice using a narrow stitch.
- Reduce the allowance to five millimeters, make several shallow notches around the circumference. We do not take into account the gap; the allowance is not cut off on it either. Iron the material. Smooth the seam allowance on different sides. Turn the workpiece outside.
- Place a paper circle on any side of the product along a fractional segment. Using a pin we determine the middle. We set 4 marks - the distance from the middle is 2.8 centimeters. Remove the circle.
- On each side of the circle, bend the edge towards the middle, to the established mark. The folds are fixed with a pin and ironed. The result is a perfect square shape. It needs to be turned over, the corners bent towards the middle and pinned together. Iron again.
- Remove the fasteners and sew the middle corners with an invisible seam. Place a bead or button in the center to make the flower look natural.
 0
0