creativecommons.org
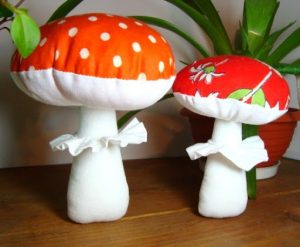
A homemade fly agaric made from fabric or other materials will be an excellent decoration for a New Year tree, kitchen window sill or children's room. The brightest and most original polka dot mushroom is often used in various interior designs. Applications with fly agarics decorate slippers, pajamas, potholders and towels. Thanks to its bright cap, this particular mushroom is often embodied in children's toys, pictures and stickers. Today we will look at ways to create mushrooms with your own hands. All of them are quite simple, so both an adult and a child can make a mushroom.
Do-it-yourself fly agaric clothespin made of wood - diagram
Original clothespins with fly agarics look bright and cheerful. This master class will help you turn boring clips into interesting, fun products. They not only fulfill their function, but also serve as a real decoration. Now you can make garlands from photos, drawings or children's crafts.You can hang a string in the room, attaching pictures to it using homemade clothespins. To make a craft you need to prepare:
- Thick rope.
- Twenty white beads or small buttons.
- Thick colored material.
- Glue gun.
- Ten wooden clothespins.
Let's take a step-by-step look at the process of creating a garland of clothespins with fly agaric mushrooms step by step:
- Cut out a mushroom cap from the material. The shape of the figure is a semicircle. It is better to take red fleece fabric as a base.
- Place white dots around the perimeter of the cap. You can sew small buttons or cut circles from plain paper. You can glue the mugs with a glue gun. Another way is to decorate the hat with white beads.
- Using a glue gun or PVA glue, fix the finished fly agaric cap on a clothespin in the upper part.
- We pass a thin rope through the closed clothespins. We tie a bow at the ends of the rope on each side.
Fly agaric from cotton wool - master class “How to make a fly agaric mushroom with your own hands”
Cotton mushrooms look like they are alive. They can be a wonderful decoration for a festive interior or complement a children's craft for school. Children often prepare such fly agaric for kindergarten. Children's creativity will certainly be appreciated if you make a mushroom according to the recommendations of the master class. First you need to prepare the material:
- Two pieces of felt. Color: red and cream. Thickness – millimeter.
- Cotton wool that will be used for filling.
- Strong sewing thread.
- White acrylic paint.
- White paint with 3D effect - optional.
- A dry branch about twenty centimeters long. The diameter of the branch is no more than two centimeters.
Now you can get to work. How to make a fly agaric from felt - template:
- We make a pattern for a standard mushroom cap. Cut it out of paper. We combine two materials of different colors. We pin the pattern on top with pins. Draw an outline using a pencil onto the inside of the cream felt. Cut out the piece with scissors and remove the pins. We also cut out a smaller circle in the middle. By analogy, we make a leg for a mushroom.
- Apply textile glue in a thin strip to the edges of the red circle. Apply it to the cream circle and squeeze a little. Leave the product for a while for the glue to dry. Turn the hat inside out.
- We go through the inner circle with a needle, the stitches should be small. We do not cut the end of the thread.
- We stuff cotton wool into the hat through the smaller circle. We determine the amount of padding by eye. We take a twig, measure fifteen centimeters, cut off the rest.
- Acrylic paint is slightly diluted with water. It should become more liquid so that you can apply a coating to the twig with a sponge. Leave the part to dry on a flat surface.
- Apply hot glue to the uppermost point of the branch - a medium-sized drop so that it does not drain. We insert the stick into the mushroom cap.
- We tighten the remaining thread on the inner ring so that the caps are tightly fixed on the branch. Trim the ends of the thread.
- You can paint dots on red felt with regular paint or use a coating with a 3D effect. We leave the composition to dry.
- We put a leg made of cream felt on the bottom of the stick. These are two pieces sewn on the sides. The hole at the top was also trimmed with thread, like the inner circle of the hat. We tighten the threads around the branch, tie it, and trim the ends.
How to make a fly agaric from paper - fly agaric craft
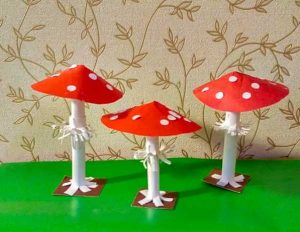
The original fly agaric can be made from paper and scrap materials. To do this you need to take:
- An ordinary plastic lid from a half-liter jar of sour cream;
- A little moss or greenery;
- Glue, scissors, cotton circles;
- Thin white paper;
- Red colored paper;
- A toilet paper roll;
- Plasticine. Plasticine ladybugs are used to decorate the finished product. As an alternative, you can buy ready-made decorative elements in a specialized store.
The process of making a mushroom consists of several stages:
- We divide white A4 paper into three equal strips, cut them out and turn them into fringe using scissors. We twist the fringe, and then fix it with glue on the sleeve. This is the base of the fly agaric.
- We fix the sleeve in the lower part on the lid of the jar and cover it with moss or greenery to make the craft look more natural.
- Take red paper and cut out a circle for the hat. In one place we cut the paper from the edge to the center with a straight line. We round off the future hat and fix it on the PVA leg.
- We divide the cotton pad into small circles, which are glued to the cap in different places. For beauty, we attach a ladybug to the mushroom - one or several pieces, depending on the size of the product. Even a small child can make such fly agaric crafts with his own hands.


 0
0
