lifehacker.org.ua
Both adults and children face the problem of how to make a pig's snout. This is an indispensable attribute of a pig costume in any performance or performance. In the Year of the Pig, the popularity of the accessory skyrockets. In addition, it is a fun element in many competitions and costumes for corporate parties, weddings and other events. Making a pig's snout with your own hands is not at all difficult. There are many options in just a few hours, and sometimes even faster, to build an accessory.
How to make a pig snout with your own hands - step by step guide
In order for a pig to get a cute nose, you need to prepare the following materials:
- Any type of glue. The best option is PVA.
- Small plastic rings.
- Pink marker.
- A4 paper – several sheets.
- An elastic band up to twenty-five centimeters long.
Initially, you should decide on the size of the patch. The basic diameter is considered to be six to seven centimeters.If the pig is a small child, you can make the diameter four to five centimeters. Progress:
- Draw a circle on a piece of paper. It should be a little larger than needed. You will need material for bending and joining parts.
- Cut out the resulting circle. Then bend the edges so that the surface of the desired size remains. To avoid deformation during the folding process, make several cuts where the paper is folded.
- Using a thread, measure the rim of the circle. We measure the resulting segment with a ruler. This is the length of the rectangle that needs to be cut. The width regulates the length of the patch and is determined individually. The basic width is five centimeters, the children's standard is three to four centimeters.
- The rectangle should be a little larger so that there is paper left over for gluing.
- We make a tube from a rectangle and glue it along the edges.
- We apply PVA to the section of the circle that was left to connect to the base. The circle must be carefully inserted into the tube from the inside.
- The product should be held until the glue dries.
- Cut two holes on the sides to thread the elastic through. To prevent them from tearing when the elastic is pulled, you can also glue plastic rings on the inside.
- We thread the elastic band. At this point, it is advisable to try on the nose to find the correct length.
- To ensure the correct fit of the nose, a small cutout is also made in the upper part, next to the nose.
- The last step is to paint the patch with pink paint or a marker and draw nostrils.
How to quickly make a piglet with your own hands
If you don’t have time for painstaking work, you can use accelerated options for creating a pig’s nose.
Option #1.
lifehacker.org.ua
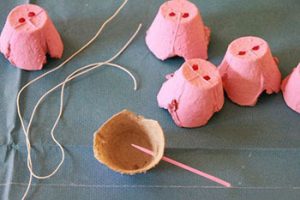
We use cardboard egg packaging.Let's cut one cell out of it. Paint it pink with a marker or paint and leave it to dry. Then, using a black marker, draw two nostrils. Carefully make holes inside the nostrils. You can take a pen, scissors or pencil for this purpose.
We will make one hole on each side for a fixing elastic band. We thread the elastic through the holes and secure it. Piglet is whipped up and ready!
Option #2.
To work you will need:
- Some cardboard or pink paper.
- PVA, simple pencil.
- Black felt-tip pen.
- Scissors.
- Pink wool threads.
We fold thick paper into a cylinder shape. It needs to be attached to another piece of this paper and circled. We get a circle. Cut it out, adding about a centimeter along the contours. Glue it to the cylinder. Let the product dry. We completely paint it with the desired color, and draw two dots on the bottom with a black marker. We make holes on the sides and thread the elastic through.
 0
0