creativecommons.org
Today, the exclusivity of clothing and textiles is highly valued. Individual tailoring, designer embroidery and designer cut are the key features of a stylish, expensive item. You can start working on your personal image at the very beginning - creating unique fabrics using homemade stamps.
DIY stamps for printing on fabric can come in different sizes, shapes and colors. With their help, a simple, plain fabric can be turned into an exclusive material. The print is made from various available materials - vegetables and fruits, wine corks, office erasers and much more. Wooden fabric stamps are considered the most durable.
Sometimes an exclusive stamp is made, the technique of working with it differs from the others. For example, in order not to waste time cutting out shapes, a design is applied to flat surfaces using a silicone gun.It turns out convex, dipped in paint and reprinted onto the canvas without any problems.
How to make leaf prints on fabric - beautiful stamps, photo
To make a unique decor, you will need special paints for printing on fabric and a stamp for clothing. You can make a stamp from building materials according to the instructions:
- Take water to dilute building plaster. The consistency should resemble thick sour cream. Using a spoon, place one plaster cake at a time on the surface of ordinary polyethylene.
- Leave the plaster to harden, then take a dark pencil and draw a drawing. For drawing, select the flat side lying on the surface of the polyethylene.
- Using a screwdriver, scratch out the entire area of the workpiece, with the exception of the outlines of the image. Use a brush to remove plaster chips.
- Soak the plaster with a solution of glue and water. A regular primer can replace the solution.
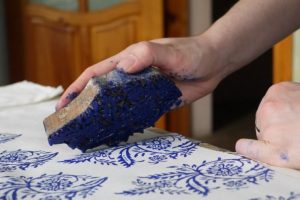
- Before using stamps for printing on fabric, apply acrylic paint to the surface using a washcloth. A piece of foam rubber will also work. Within a second, you need to apply paint and apply the print to the material, pressing with maximum force. The less ink that penetrates into the print details, the longer it will last. It is advisable to make deep grooves, then the image will be clearer.
The second method of creating an imprint from building materials uses foam ceiling tiles. Fabric stamps are created by pressing patterns using stacks. The indentation line remains white. The advantage of this material is that it is easy to clean, and the surface allows you to mix shades directly on the stamp. Still, it is necessary to minimize paint getting into the recessed area.This stamp for acrylic paint is ideal for decorating fabrics and is relatively easy to make.
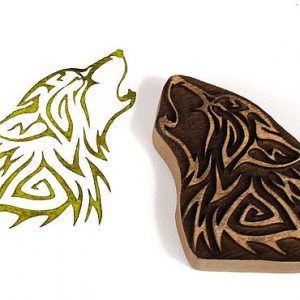
Making fabric stamps - how to make fabric stamps from wood
creativecommons.org
This high quality wooden stamp, photos of which are often found on the Internet, is made only in India. Craftsmen use unique technologies, thanks to which the wooden stamp does not deform and lasts long enough. It is better to make a print with your own hands from plywood and plastic - it is more reliable and durable than a homemade print made of wood. It is necessary to prepare for work:
- A little special construction glue;
- Electric jigsaw;
- Plywood with a density of eight millimeters;
- Thick film. Packaging material from household appliances is perfect;
- Stationery knife or scalpel. Needed for cutting paper;
- A pipe or rolling pin to roll out the plastic;
- Plastic. To harden the material, it is placed in the oven.
We first draw or print the drawings, keeping to the natural size. Then you need to cut out each picture and roll out the plastic on the surface of the film. The thickness of the layer is no more than four millimeters. It will provide sufficient relief height. Next you need:
- Trace the contours of the drawing and transfer it to plastic, cut out the shape with a knife, remove excess material.
- To fix the shape, the film together with the cut out picture is placed in the freezer for three minutes.
- The backing and film are removed from the hardened product. A breadboard knife is used. The working side is considered to be the one that was on the film. This is due to its smoothness.
- For baking, the stamps are laid out on flat metal sheets. Before starting the printing procedure, they are covered with substrates.
- After baking, remove the prints from the oven and cool.
- Like a wood stamp, a plywood stamp is attached to a base. Take plywood, make a rough sketch of the image, which will not be too difficult to cut out of wood.
- Use an electric jigsaw to cut out each silhouette marked on the plywood. Sandpaper is used to clean the sides and edges.
- Using construction adhesive, apply a thick, leveling layer to the stamp, increasing its height. It will take a day to dry the finished seals. They should be placed on a flat surface, face down.
Hand printing on fabric - do-it-yourself fabric stamp made from linoleum
To create an exclusive canvas, you will need paint for a stamp on the fabric and the stamp itself. It can be made from ordinary linoleum, a wooden base and glue. The tools you will need are a sharp stationery knife and a gravel, if necessary. The type of linoleum does not matter; you should not take the most expensive option, you can save money here. It is important that there is no texture on the surface and that the density is above average.
An image is applied to the material. A pen or pencil is used and the sketch is made on the surface of the linoleum. Specular reflection is taken into account. To transfer the drawing with maximum accuracy, try on a laser printer for printing. Then the picture is transferred to the material with an iron. Further actions:
- Cut out the stencil using a knife. If there are large areas, use a gravel.
- To make the material harder, it is sent to the freezer. You can soften the fabric with warm water.
- Cut out the figure strictly along the contour, remove excess linoleum. Large spaces need to be made as level as possible.
- All that remains is to fix the stamp on the wooden base using reliable glue.
 0
0